background image

R-5210

Page 9

9. Remove heater from wall.

10. Remove gas valve bracket from casing assembly (4 screws to be

removed are located on casing assembly back).

11. Remove hydraulic thermostat bulb from thermostat bulb clip

located at casing assembly bottom.

12. Remove gas valve from gas valve bracket.
13. As parts are being replaced in reverse order, check for gas leaks at

all gas connections  before upper louver, reflector and lower louver
are replaced onto casing assembly.

Removing Main Burner From Casing Assembly

1. Turn OFF gas supply to the heater.
2. Turn OFF electrical supply to the heater if optional blower is

installed in heater.

3. Remove lower louver from casing assembly (2 screws).
4. Remove reflector from casing assembly (2 screws).
5. Disconnect supply tubing from orifice holder(s).
6. Remove pilot bracket from main burner assembly (2 screws).
7. Remove main burner assembly from casing assembly (4 screws).
8. Remove orifice shield from main burner assembly. Attach orifice

shield to new main burner assembly.

9. As parts are being replaced in reverse order, check for gas leaks at

all gas connections before lower louver is replaced onto casing
assembly.

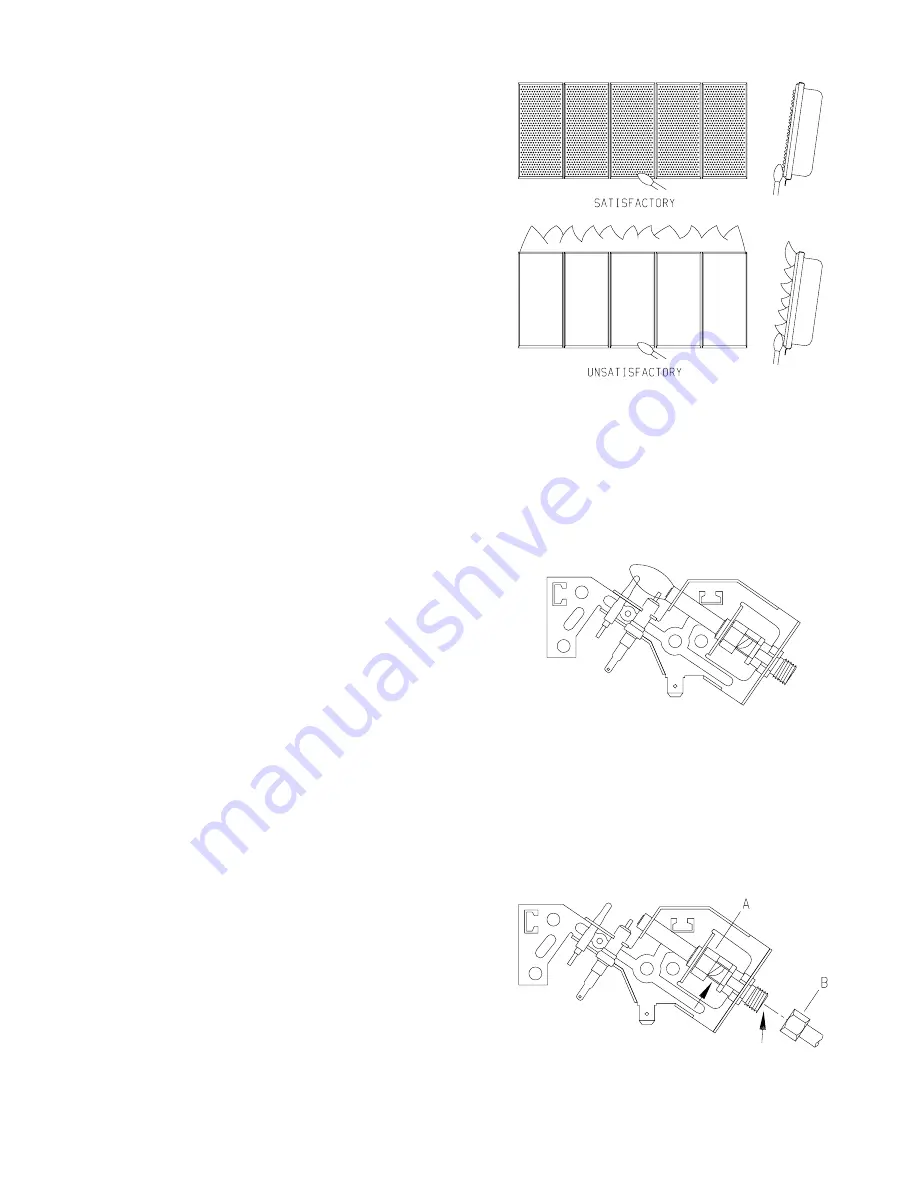
SR-10T, SR-18T and SR-30T Main Burner Flame (Figure11)
The main burner flame will have a red-orange glow over the surface of
the ceramic plaques. A few small, hairline cracks may form over the
surface of the ceramic plaques or at the edges of the ceramic plaques
where they have been cemented into position on the burner assembly
frame. These small, hairline cracks will not affect the operation or
performance of the ceramic plaques. Only, when large cracks develop,
with blue flames escaping from the large cracks, should you contact your
QUALIFIED SERVICE PERSON.

A red-orange haze that is visible on the ceramic plaques is acceptable.
A blue flame that rolls out at the top of the ceramic plaques indicates an
accumulation of dust, lint or spider webs inside the casing assembly and
main burner assembly. Use the following procedure to inspect the casing
assembly and main burner assembly.

1. Turn OFF gas supply to the heater.
2. Turn OFF electric supply to the heater if optional blower is installed

in heater.

3. Remove lower louver from casing assembly ( 2 screws).
4. Remove reflector from casing assembly (2 screws).
5. Inspect interior of casing assembly for accumulation of dust, lint or

spider webs. If necessary, clean interior of casing assembly with a
vacuum cleaner or apply air pressure. Do not damage any components
within casing assembly when you are cleaning.

6. Remove pilot bracket from main burner assembly (2 screws).
7. Pivot pilot bracket with attached pilot away from main burner

assembly (do not damage pilot tubing).

8. Inspect main burner orifice(s) through the rectangular opening(s) in

the venturi (throat) of the main burner(s). Dust, lint and spider webs
can accumulate on top of the main burner orifice(s). If necessary,
clean main burner orifice(s) with a vacuum cleaner or apply air
pressure. To thoroughly clean the main burner orifice(s) proceed to
Step 9.

9. Disconnect supply tubing from orifice holder(s).

10. Remove orifice holder from venturi of main burner assembly (1

screw for each orifice holder).

11. Remove main burner orifice from orifice holder.
12. Apply air pressure through main burner orifice and orifice holder to

remove dust, lint or spider webs.

13. Apply air pressure into ceramic plaque(s) to remove dust, lint or

spider webs.

14. As parts are being replaced in reverse order, check for gas leaks at

all gas connections before lower louver is replaced onto casing
assembly.

SR-30T SHOWN

Figure 11

Proper Pilot Flame (Figure 12)
The correct flame will be blue and will extend beyond the thermocouple.
The flame will surround the thermocouple just below the tip.  A slight
yellow flame may occur where the pilot flame and main burner flame
meet.

Figure 12

Oxygen Depletion Sensor Pilot (Figure 13)
When the pilot has a large yellow tip flame, clean the Oxygen Depletion
Sensor as follows:

1.

Clean the ODS pilot by loosening nut B from the pilot tubing. When
this procedure is required, grasp nut A with an open end wrench.

2.

Blow air pressure through the holes indicated by the arrows. This
will blow our foreign materials such as dust, lint and spider webs.
Tighten nut B also by grasping nut A.

Figure 13

Summary of Contents for SR-10T-2

Page 1: ...ified installer service agency or the gas supplier INSTALLATION INSTRUCTIONS AND OWNER S MANUAL UNVENTED ROOM HEATER MODELS SR 10T 2 SR 18T 2 SR 30T 2 EFFECTIVE DATE MARCH 2000 This is an unvented gas fired heater It uses air oxygen from the room in which itisinstalled Provisionsforadequatecom bustion and ventilation air must be pro vided Refer to page 4 WARNING Ifnotinstalled operatedand maintain...

Page 2: ...esignedtoturnofftheheaterifnotenoughfresh air is available DO NOT TAMPER WITH PILOT LIGHT SAFETY SYSTEM If heater shuts off do not relight until you provide fresh air If heater keeps shutting off have it serviced Keep burner and control compartment clean CARBON MONOXIDE POISONING MAY LEAD TO DEATH Early signs of carbon monoxide poisoning resemble the flu with headache dizziness and or nausea If yo...

Page 3: ...b or absorb onto or into walls masonry and other materials and fabrics in a room That will take some of the odorant out of the gas reducing its odor intensity LP Gasmaystratifyinaclosedarea andtheodorintensitycould vary at different levels Since it is heavier than air there may be more odor at lower levels Always be sensitive to the slightest gas odor If you detect any odor treat it as a serious l...

Page 4: ...a problem In most applications the water vapor enhances the low humidity atmosphere experienced during cold weather The following steps will help insure that water vapor does not become a problem 1 Be sure the heater is sized properly for the application including ample combustion air and circulation air 2 If high humidity is experienced a dehumidifier may be used to help lower the water vapor con...

Page 5: ...Whenfacingthefrontoftheappliancethefollowingminimumclearances to combustible construction must be maintained Left side 6 inches 152mm Right side 6 inches 152mm Do not install in alcove or closet Rear wall 0 inches 0mm Ceiling 24 inches 610mm Minimum vertical clearance from a projection above the appliance shelves window sills etc 14 inches 356mm Maximum horizontal extension of projection above the...

Page 6: ...SR 30T Locating Gas Supply The gas line can be routed either through the floor or wall The gas line opening should be made at this time Location of the opening will be determined by the position of floor joists and the valve and union used for servicing Wall Mount Installation Figures 5 6 and 7 Refer to Figures 5 6 and 7 for measurements in order to locate 4 mounting holes on wall Figures 5 6 and ...

Page 7: ...ing steps to properly align the upper louver and the reflector with the heat shield a When replacing upper louver be sure the bottom lip of upper louver goes behind the heat shield b When replacing reflector be sure the top lip of reflector goes in front of the heat shield 3 Connect the gas line On Sheet Rock Wall 1 After locating mounting holes drill 4 5 16 8mm diameter holes into the wall 2 Inse...

Page 8: ...P T plugged tapping High Altitudes For altitudes elevations above 2 000 feet 610m ratings should be reduced at the rate of 4 percent for each 1 000 feet 305m above sea level Contact the manufacturer or your gas company before changing spud orifice size Piezo Pilot Ignitor Instructions Depressing the ignitor button completely causes a spark to occur at the pilot To light the pilot it is important t...

Page 9: ... assembly 1 Turn OFF gas supply to the heater 2 Turn OFF electric supply to the heater if optional blower is installed in heater 3 Remove lower louver from casing assembly 2 screws 4 Remove reflector from casing assembly 2 screws 5 Inspect interior of casing assembly for accumulation of dust lint or spider webs If necessary clean interior of casing assembly with a vacuumcleanerorapplyairpressure D...

Page 10: ...laques will glow There will never be a time when only one or two ceramic plaques are glowing The SR 30T has an input of 30 000 BTUH 8 8KW H The hydraulic thermostat bulb is located at the casing assembly bottom When the hydraulic thermostat bulb senses the need for heat the unit cycles ON at a full input rate of 30 000 BTUH 8 8KW H The unit remains at this full input rate until the hydraulic therm...

Page 11: ... 1 minute after the pilot is lit Release knob and it will pop back up Pilot should remain lit If it goes out repeat steps 4 through 8 If knob does not pop up when released stop and immediately call your service technician or gas supplier If the pilot will not stay lit after several tries turn the gas control knob to OFF and call your service technician or gas supplier 9 Attention GascontrolhasanIN...

Page 12: ...clean see Main Burner Flame Page 9 Attention Thenumberstampedonthemain burner orifice is a millimeter diameter b Inlet gas pressure too low contact gas supplier 5 Heater keeps shutting OFF during normal operation a Pilot is blocked clean pilot see Page 9 b Inlet gas pressure too low contact gas supplier TROUBLESHOOTING INFORMATION FOR QUALIFIED SERVICE PERSON SYMPTOMS POSSIBLE CAUSES AND CORRECTIO...

Page 13: ... HARDWARE PACKAGE SR 30T 1 10811 CASING SIDE ASSEMBLY LEFT 2 SR 041 CASING BACK 3 R 2313 PIEZO IGNITOR 4 SR 008 CASING SIDE ASSEMBLY RIGHT 5 SR 113 VALVE BRACKET 6 R 2351 GAS VALVE SIT 7 R 2329 BURNER 8 SR 114 ORIFICE SHIELD 9 SR 032 PILOT BRACKET 10 R 5007 PILOT THERMOCOUPLE ASSEMBLY NAT ONLY INCLUDES ITEM 11 10 R 5001 PILOT THERMOCOUPLE ASSEMBLY LPG ONLY INCLUDES ITEM 11 11 R 5003 THERMOCOUPLE L...

Page 14: ...Page 14 R 5210 SR 10T ...

Page 15: ...R 5210 Page 15 SR 18T ...

Page 16: ...Page 16 R 5210 SR 30T ...

Page 17: ...iththeheaterstandingupright positiontheairdischargeopening of the blower housing downward Place the bottom flange of the blower housing over the top edge of the top heat shield Insert the blower housing into the top portion of the heater by pivoting the blower housing upward 90 Attach the blower housing to the casing assembly with 4 screws provided with the optional blower 13 Grasp cord set at cas...

Page 18: ...eration after servicing Blower Motor The blower motor does not have oiling holes Do not attempt to oil the blower motor Blower Wheel The blower wheel will collect lint and could require periodic cleaning If the air output decreases or the noise level increases it indicates a dirty blower wheel To clean blower wheel 1 Turn OFF gas supply to the heater 2 Turn OFF electrical supply to the heater 3 Re...

Reviews: