background image

9

8

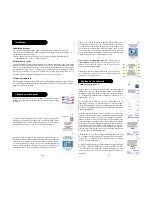
Setting Up Your Devices, cont.

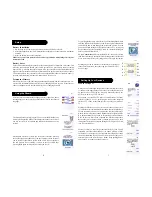
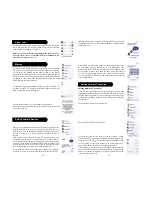
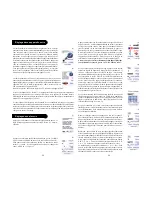
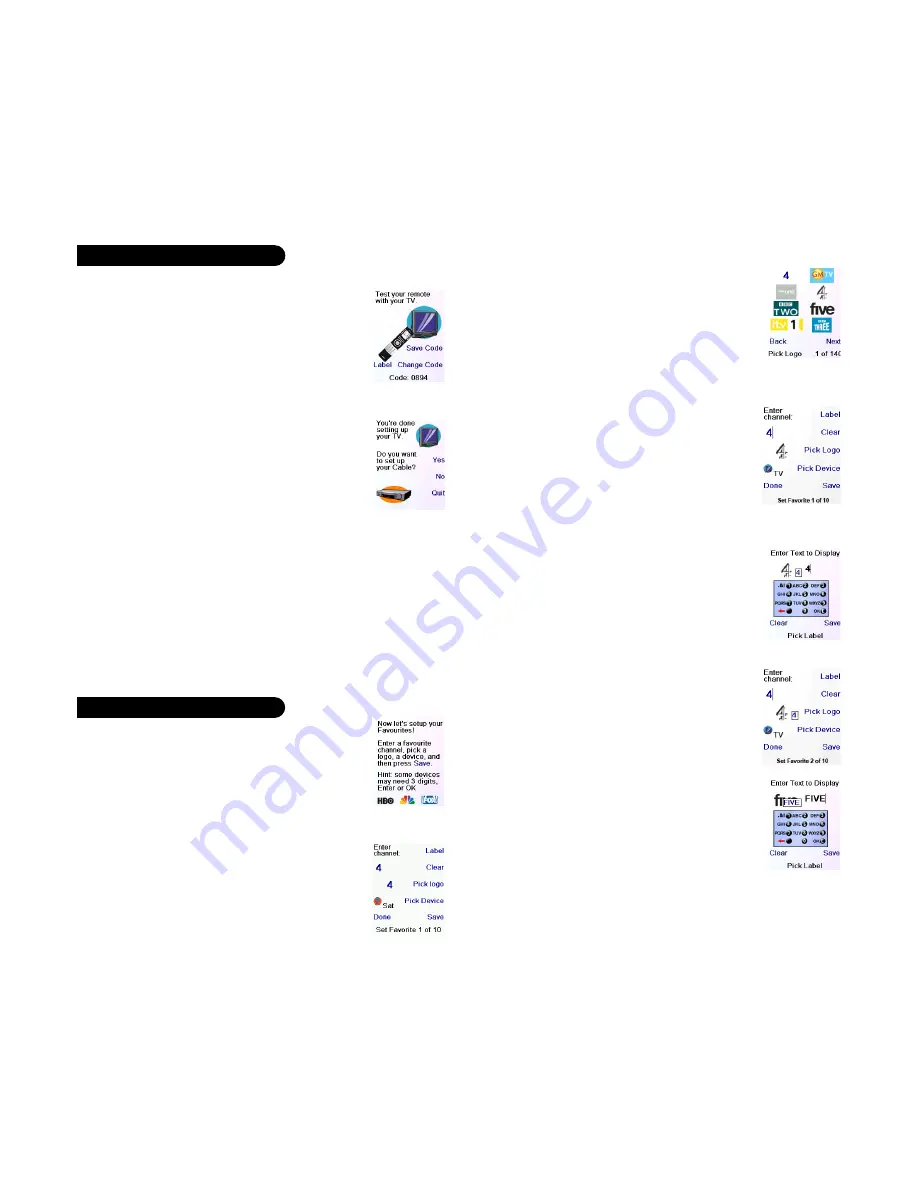
Pressing Save shows screen (5) that instructs you to try a few other
keys on the remote to make sure you’ve found the correct code. Tip:
try keys like Menu, and Guide. Power might work yet you still might
not have the correct code. If several keys seem to work fine, press
Save Code. If some keys don’t work, select Change Code (or press
Back) to go back and find another code that works better. Selecting
Label lets you rename the device, e.g. you could call it My TV. You
can ignore this for now and try it later if you like. See pages 9, and
24 for more details on entering text to change labels.

(5)

(6)

(1)

(2)

(3)

(4)

(5)

Let’s assume for now that you go ahead and set up a TV, Cable, and SAT.

If you select No at screen (1) on the previous page the procedure will be similar to the above,
except that you will be searching through the entire library of codes for your device to find
the one that works best (instead of just searching through the codes for your brand of device,
e.g., Sony).

If you say Yes when asked if you know your Brand, but subsequently don’t find a code that
works, you are asked if you want to try again (in case you missed it), or try all the codes for
your device. If you try all codes for your device type, and still don’t find a code that works,
you can skip it.

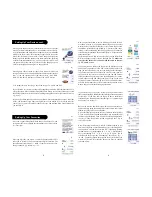
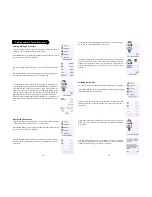
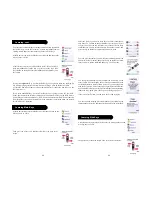
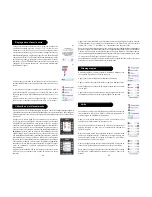
Once you’ve gone through the Wizard and set up at least a TV, and
set up more devices, or skipped the rest of them, you arrive at screen
(1) to the right.

Press any digit key, say digit 4, to enter a channel number. This
takes you to screen (2). You can enter more digits if desired. The
channel number can include -/--, or OK, if your device requires it to
change channels, e.g. 472Ok, or -/--55.

Setting Up Your Favourites

Now you press the Side Key next to Pick Logo on screen (2). You
are shown a screen (3) of popular channel logos. You can select
Next (Side Key 10) or Back (Side Key 5) to see more logos. In this
example we pressed the 4 logo (Side Key 7). Screen (4) now shows
that we’ve chosen channel 4 and the 4  logo. Note, you could also
select the top left position which would display “4” as the favourite
rather than a logo.
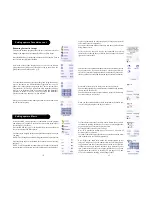
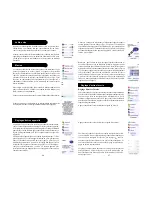
The Default device is this case was Sat, but you can select Pick
Device to change it. In this case we changed it to TV. 

Make sure

you select the device that you want each favourite to control,
e.g. TV, Cable, or Sat.

If you want to add a label to the logo press the Side Key next to
Label. This is optional so if you don’t want to add a label to the
logo you can just select Save to save the setting for this favourite.
If you save this favourite, Set Favourite 2 of 10 is now shown at
the bottom of the screen to indicate that you can add another
favourite channel. Again just press a channel number key on the
remote, choose a logo and change the Device Type (if you want
to). Add a few more favourites (up to 10). You can add more later,
or delete or edit them later, or even reorder their positions. Select
Done when you’re finished setting up favourites.

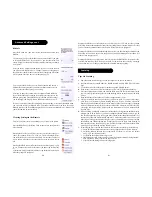
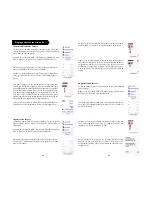
If you select Label, you see the screen to the right with a small
label on top of the logo. Initially the label will be the channel number
for that logo. If you Save this, the logo will have a small label
representing the channel number for that logo in it’s bottom right
hand corner, see screen (5).

But you can type in a new label if you want one. You enter the new
name for the key using the numeric keys on the remote, in a similar
fashion to typing in text on a cell phone.
E.G. in this example we pressed the 3 key 3 times to enter the letter
F. Then we waited a second and pressed the 4  key repeatedly until
the letter I was displayed. Then we waited a second and pressed 8
to select V. Then we waited a second and pressed the 3 key to
select E. See below.

Note: “Triple tap” name entry works in a similar fashion to text
entry on a cell phone. Tap each numeric key to cycle through ALL
caps, numbers, and lower case letters. E.G., repeatedly pressing
the number 2 key cycles through A, B, C, 2, a, b, c. Pressing the 9
key cycles through W, X, Y, Z, 9, w, x, y, z. A “space” can be
selected with the 0 (zero) key. The number 1 key selects 1 . @ ? !
- & and :  You can backspace an entry with the key to the left of the
0 (zero) key. Press OK (or the side key next to Save) to confirm
your new name.

Pressing Save Code at screen (5) takes you to screen (6) where you
set up a Cable box. You can quit at this point and set up other devices
later, or you can continue and set up other devices - SAT, DVR,
DVD, VCR, Audio, CD Player, or either of the 2 AUX devices.

Summary of Contents for H510

Page 1: ......

Page 2: ...is remote In such cases you can learn the commands from your original remote Please use this manual to become familiar with your EMTEC Universal Remote After you are familiar with this owner s manual the first thing you need to do is to install batteries and setup your remote following the on screen instructions Thank you for buying this Emtec remote and we hope it will give you many years of serv...

Page 3: ...ed to Navigate menus 13 VOLUME UP DOWN Changes the volume level of the device normally the TV 14 OK Selects menu items for the device you are controlling or confirms selections on the screen 15 NUMBERS Enter numbers for direct program channel selection 16 PROG UP DOWN Changes the program channels 17 AV Selects input source 18 Enter Accesses program channels 9 or Enter function 19 TEXT HOLD holds c...

Page 4: ...mes to go back through the Wizard and then follow the instructions on the screens again to familiarize yourself with how to step through the screens and go back You can go back and forth through the Wizard but once you ve set up your devices and quit to save the settings you won t see the Wizard again unless you do a Master Reset To do a Master Reset Press the HOME key then select Setup then selec...

Page 5: ...case was Sat but you can select Pick Device to change it In this case we changed it to TV Make sure you select the device that you want each favourite to control e g TV Cable or Sat If you want to add a label to the logo press the Side Key next to Label This is optional so if you don t want to add a label to the logo you can just select Save to save the setting for this favourite If you save this ...

Page 6: ...emote QuickPower QuickPower is a way of quickly turning all your devices on or off from one easy to use screen Press the HOME Key to go to the Home screen Then press the Side Key next to QuickPower Only Devices you ve previously set up are displayed The others are grayed out Press any key that isn t grayed out to send the Power command for that device Sleep Sleep lets you set any device to turn of...

Page 7: ...zard See pages 7 and 8 Note you can select Aux 1 or Aux 2 from the Devices screen and then select any type of device to set up under either Aux key Or you could select any device and then press ChangeType repeatedly on screen 1 above to scroll through the devices and change to TV for example to set up a second TV Selecting Label on screen 2 lets you rename the device e g you could call it Den TV a...

Page 8: ...locations on the screen i e reorder them Press the HOME key select Setup and then select Favourites Then at the screen to the right select Reorder When your favourites are displayed select the one you want to move e g ABC It is then marked with a green box Deleting Favourites This lets you delete favourites that you previously set up in a group Press the HOME key select Setup and then select Favou...

Page 9: ... sheet of paper by writing down the series of keystrokes that is composed of If you press the button Mode or Favourite or Home you ll exit from Setup Macro screen Select the device that will receive the command by pressing successively on the side key next to Pick Device In the scrren at the right we have selected TV To define the first command assigned to the device selected press the key of your...

Page 10: ...o device For example if you have a TV DVD Combo you might need to set up one code under the TV key to control the TV partAND a separate code under any other Mode key to control the DVD part Other Combo devices have one code that will control both parts of the device See separate code list To set up a combo device press the HOME key then select Setup then select Advanced then Device Codes as descri...

Page 11: ... you had set up for a device Only devices that you have set up Punchthrough for are shown All other devices are grayed out Pressing the Side Key next to Master Clear lets you clear EVERYTHING in the remote Be careful when selecting this Note however that ALL the sections above display a warning screen allowing you to change your mind before actually clearing anything Tips On Learning a Some functi...

Page 12: ... Key next to Setup and then on the Side key next to Learn Then press one of the top 4 Side Keys K6 K9 to the right of the screen Select the Device you want to learn keys for In this example we only have a TV Cable Box and Satellite Receiver set up so the rest are grayed out but you can still select any of the devices to learn commands for You are then instructed to line up the remotes and press th...

Page 13: ...ge Label you see the screen to the right You enter the new name for the key using the numeric keys on the remote in a similar fashion to typing in text on a cell phone See next page E G in this example we pressed the 3 key on the remote to enter the letter D Then we pressed the 8 key repeatedly until the letter V was displayed Then we waited a second and pressed 3 to select D Then we pressed the 0...

Page 14: ...appropriate local collection point or leave it with the vendor when buying a new appliance If you are a professional user please follow your supplier s instructions If the appliance is rented to you or left in your care please contact your service provider Félicitations Vous venez de faire l acquisition de la télécommande universelle modèle H510 d Emtec Les télécommandes universelles Emtec permett...

Page 15: ...iguer dans les menus 13 VOLUME Pour changer le niveau de volume de l appareil normalement de la TV 14 OK Pour sélectionner les options des menus de l appareil que vous contrôlez ou pour confirmer l option à l écran 15 Chiffres Pour sélectionner directement un canal Les fonctions en rouge sont disponibles en mode audio 16 Prog Pour changer de canal CHAPTER permet de passer à la piste précédente ou ...

Page 16: ...an à l autre Vous pouvez avancer et reculer dans l assistant comme vous le voulez mais une fois que vous aurez réglé vos appareils et quitté l assistant après avoir enregistré vos paramètres vous ne reverrez plus l assistant à moins de procéder à une réinitialisation générale Pour faire une réinitialisation générale Appuyez sur la touche HOME Pogrammation Avancé Effacer puis Tout Effacer Cette pro...

Page 17: ...0 s affiche maintenant au bas de l écran pour indiquer que vous pouvez ajouter un autre canal favori Encore une fois appuyez simplement sur la touche du numéro du canal sur la télécommande et choisissez le type d appareil si vous le souhaitez Ajoutez quelques favoris jusqu à 10 Plus tard vous pourrez en ajouter d autres en supprimer en modifier et même les reclasser Sélectionnez Terminé lorsque vo...

Page 18: ...il clignote à chaque envoi de commande Il montre également quel appareil est télécommandé Appuyez sur la touche HOME en tout temps pour accéder à l écran d où vous pouvez configurer des options ou accéder à d autres fonctions Appuyez sur la touche MODE puis sélectionnez un type d appareil pour changer le mode de la télécommande Si par exemple la télécommande est en mode Câble alors les touches com...

Page 19: ... puis sélectionner tout type d appareil que vous enregistrerez sous l une ou l autre des touches Aux Ou encore vous pouvez sélectionner n importe quel appareil appuyer ensuite plusieurs fois sur Changer Type à l écran 1 ci dessus pour faire défiler la liste des appareils et sélectionner TV par exemple pour régler une deuxième TV La touche Etiquette à l écran 2 vous permet de renommer l appareil l ...

Page 20: ...les favoris déjà configurés dans un groupe autrement dit d en modifier le classement Appuyez sur la touche HOME sélectionnez Programmation puis Favoris Ensuite à l écran à droite sélectionnez Organiser Sélectionnez le groupe dans lequel vous voulez reclasser les favoris Les groupes ne contenant aucun favori sont en grisé et ne peuvent pas être sélectionnés Lorsque vos favoris sont affichés sélecti...

Page 21: ...vous quitterez l écran de programmation de la Macro Sélectionnez l appareil qui recevra la commande en appuyant plusieurs fois sur la touche latérale en regard de Choisir Appareil Dans l écran de droite nous avons sélectionné TV Pour définir la première commande dédiée à l appareil choisi appuyez sur la touche de votre choix si vous souhaitez choisir une touche latérale appuyez d abord sur la touc...

Page 22: ...s la touche AUX1 en mode DVD Vous pouvez également modifier le type d appareil en appuyant sur la touche écran 1 en regard de l appareil dont vous saisissez le code Le fait d appuyer de façon répétitive sur cette touche fait dérouler tous les types d appareil disponibles Programmation des codes des appareils combinés Certains appareils combinés TV magnétoscope TV DVD DVD magnétoscope etc exigent l...

Page 23: ...touche latérale en regard de Tout Effacer vous permet de supprimer TOUT LE CONTENU de la télécommande Il faut donc faire très attention avant de l utiliser Veuillez noter que toutes les touches ci dessus affichent un avertissement vous permettant de changer d avis avant de supprimer quoi que ce soit Conseils sur l apprentissage a Il se peut que l apprentissage de certaines fonctions provenant de c...

Page 24: ...de Programmation puis sur la touche en regard d apprentissage Appuyez ensuite sur l une des 4 premières touches latérales K6 K9 à droite de l écran Sélectionnez l appareil pour lequel vous voulez faire l apprentissage des touches Dans cet exemple nous n avons configuré qu une TV un décodeur câble et un récepteur satellite les autres sont en grisé mais vous pouvez quand même sélectionner n importe ...

Page 25: ...ran illustré à droite Entrez le texte du libellé au moyen des touches numériques de la télécommande de la même façon que vous entrez du texte sur un téléphone cellulaire Cf page suivante Dans cet exemple nous avons appuyé sur la touche 3 pour obtenir la lettre D Puis nous avons appuyé plusieurs fois sur la touche 8 jusqu à afficher la lettre V Nous avons ensuite attendu une seconde avant d appuyer...

Page 26: ...re TV s allume lorsque vous appuyez sur une touche de favori Certains types de TV les écrans plats Philips par ex s allument et affichent le canal sélectionné lorsque vous appuyez sur un numéro de canal et que la TV est éteinte Pour ce genre de TV le fait d appuyer sur une touche de favori produit le même effet mais cela risque de ne pas fonctionner avec les canaux à trois chiffres comme 550 Vous ...

Page 27: ...hts betätigen möchten 12 UNTEN OBEN LINKS und RECHTS Dient der Navigation innerhalb der Menüs 13 VOLUME Einstellung der Lautstärke der zu steuernden Geräte normalerweise des Fernsehers 14 OK Auswahl der Menü Optionen des gerade gesteuerten Gerätes oder um die im Display erscheinende Option zu bestätigen 15 Numerische Tasten direkte Programmauswahl Die roten Tasten stehen der Betriebsart Audio zur ...

Page 28: ...ie Videogeräte u s w zu drücken bis sich das Gerät einschaltet Die Taste der Inbetriebnahme überträgt den Befehl der Inbetriebnahme an Ihren Fernseher und das FENSTER 4 zeigt an dass Sie den Kode 1 aus einer Liste von XX gewählt haben XX variiert entsprechend der Marke Ihres Gerätes Drücken Sie solange auf diese Taste bis Ihr Gerät anspricht und anschließend drücken Sie auf die Symboltaste Speiche...

Page 29: ...E store bogstaver numre og små bogstaver Dvs ved gentagne gange at trykke nr 2 tast kredses igennem A B C 2 a b c Trykkes på 9 tasten kredses igennem W X Y Z 9 w x y z A space mellemrum kan vælges med 0 nul tasten Nummer 1 tast vælger 1 og Man kan slette en indtastning med tasten til venstre for 0 nul tasten Tryk OK eller sidetasten ved siden af Save for at bekræfte dit nye navn Indstilling af app...

Page 30: ...en wir fünfmal auf die K7 Taste die dem Symbol SAT zugeordnet ist gedrückt und den Zeitschalter auf 1 Stunde und 30 Minuten eingestellt Indstilling af favoritter forts 6 7 Anvendelse af fjernbetjeningen Lad os antage at du følger trinene på de tidligere sider og har opsat nogle apparater og nogle favoritter så kan du nu anvende fjernbetjeningen Se de følgende sektioner for at opsætte flere apparat...

Page 31: ... nächste Mal das Fenster Sleep öffnen werden Sie feststellen dass die Zeitschaltung den Count down bereits begonnen hat Vergewissern Sie Sich dass die Fernsteuerung immer auf diejenigen Geräte ausgerichtet bleibt für die Sie eine Zeitschaltung des Stand by eingestellt haben und somit zum gewünschten Zeitpunkt der Befehl zur Abschaltung übertragen wird Einschlaf Timer Folge Makros Die Makros dienen...

Page 32: ...bol Reorder ermöglicht es Ihnen bereits eingetragene Lieblingsprogramme an einer anderen Stelle auf dem Fenster anzubringen mit anderen Worten Sie können die Anordnung verändern Drücken Sie auf die Taste HOME wählen Sie das Symbol Setup danach Favoriten Wählen sie anschließend rechts im Display das Symbol Sortieren Wählen Sie die Gruppe in der Sie die Lieblingsprogramme neu ordnen wollen aus Die G...

Page 33: ... auf dem rechts gelegenem Displayfeld zu erhalten für den Buchstaben M die Taste 6 gedrückt dann haben wir für den Buchstaben y acht mal auf die Taste 9 gedrückt und zweimal auf die Taste Null um eine Leerstelle zu schaffen und einmal auf die Taste 8 für ein T sowie dreimal auf die Taste 8 für ein v um letztlich My TV einzugeben Siehe für weitere Einzelheiten über die Umbenennung die Seiten 57 ode...

Page 34: ...etriebsart Kabel lernen drücken Fortgeschrittene Einstellungen Drücken Sie auf die Taste HOME wählen Sie die Funktion Setup sowie Erweitert Mit den Symbolen im rechten Teil des Bildschirmes können Sie die Dauer der Beleuchtung ändern Sie können direkt aus der zusammen mit der Fernbedienung gelieferten Kodeliste Kodes zur Bestimmung der Geräte entnehmen und Befehle für verschiedene Geräte erstellen...

Page 35: ...en der ersten und der letzten Funktionstasten dauernd zu Fehlern führt versuchen Sie folgende Schritte 1 Vergewissern Sie sich dass die Signalgeber empfänger zwischen den beiden Fernbedienungen präzise auf derselben Höhe liegen 2 2 Nähern Sie die zwei Fernbedienungen bis auf 1 cm an oder entfernen Sie diese bis zu 5 cm voneinander 3 Versuchen Sie erneut das Erlernen der Funktionen Ihrer originalen...

Page 36: ...nktion Drücken Sie sodann auf eine der ersten vier seitlichen Tasten K1 K5 Lernfunktion Folge Sie können die Befehle einer gegeben Fernbedienung lernen und diese unter den Haupttasten oder unter irgendeiner der 10 seitlichen Tasten der Fernbedienung H510 speichern Wenn Sie sich im dem Fenster Home befinden drücken Sie zuerst auf die seitliche Symboltaste Setup und danach Lernfunktion In diesem Men...

Page 37: ...der Funktionstaste MODE und der seitlichen Taste für die Auswahl der Betriebsart dass das Gerät in der richtigen Betriebsart funktioniert Programmieren Sie einen neuen Kode in der Fernbedienung Ihre Fernsteuerung beinhaltet vielleicht nicht den Kode Ihres Gerätes Versuchen Sie mit Hilfe Ihrer alten Fernbedienung die hierzu erforderlichenKodes zu lernen Legen Sie neue Batterien ein Die Befehle steu...

Page 38: ...l wechselt oder wenn Sie auf auf die Navigationstasten Oben Unten und Links Rechts drücken diese jeweils mehr als nur einen Schritt durchführen dann Lernen Sie erneut den Funktions Kode Drücken Sie hierbei nur kurz auf die entsprechende Taste aber nicht so lange bis das Fenster erfolgreich abgeschlossen meldet Ihr Fernseher geht wenn Sie auf eine Taste eines Lieblngsprogrammes drücken an Bestimme ...

Page 39: ...igare tra i menù 13 VOLUME Per cambiare il livello sonoro dell apparecchio di solito la TV 14 OK Per selezionare le opzioni dei menù dell apparecchio controllato oppure per confermare l opzione visualizzata sullo schermo 15 TASTI NUMERICI Per selezionare direttamente un canale Le funzioni in rosso sono disponibili in modalità audio 16 Prog Per cambiare canale CHAPTER per passare alla traccia prece...

Page 40: ... di accensione oppure su Prog o su PLAY per i videoregistratori ecc fino a quando non risponda l apparecchio Il tasto di accensione invia il comando di accensione al televisore e lo schermo 4 indica che è stato selezionato il codice 1 di xx xx varia a seconda della marca Continuare a premere questo tasto fino a quando il televisore non risponda Premere infine su Salva 1 2 3 4 K1 K2 K3 K4 K5 K6 K7 ...

Page 41: ...re il tasto 0 zero Il tasto 1 permette di selezionare 1 e E possibile andare indietro di un carattere premendo il tasto situato a sinistra del tasto 0 Premere OK oppure il tasto situato a fianco di SALVA per confermare la nuova intestazione Impostazione degli apparecchi segue Dopo avere premuto il tasto Save viene visualizzata la schermata 5 che v invita a provare vari tasti del telecomando per ve...

Page 42: ...ei preferiti segue 6 7 E possibile inserire fino ad un massimo di 10 preferiti sarà possibile aggiungerne altri più tardi vedi a pag 85 Nella schermata 6 potete decidere se i preferiti appena configurati andranno registrati nel gruppo o E inoltre possibile sistemare dei preferiti in gruppi diversi dai gruppi e Selezionando verrà visualizzata la schermata 7 che conferma che 4 è ora il primo preferi...

Page 43: ...sono comunque essere selezionati L aggiunta di preferiti avviene nello stesso modo che nell Assistente basta seguire le istruzioni visualizzate sul display vedi anche a pag 80 82 Premere OK per memorizzare le temporizzazioni di standby e tornare alla schermata iniziale Home La prossima volta che verrà visualizzata la schermata Sleep vedrete che la temporizzazione inizia automaticamente il conto al...

Page 44: ...eriti a un gruppo già esistente oppure di inserire dei preferiti in un nuovo gruppo Premere il tasto HOME selezionare Configurazione poi Favoriti Premere infine il tasto situato a fianco della scritta Aggiungi Modifica per selezionarla Selezionare un gruppo al quale desiderate aggiungere dei preferiti o di cui desiderate modificare i preferiti già esistenti Premere il tasto situato a fianco di un ...

Page 45: ...gitare M poi premere otto volte sul tasto 9 per visualizzare la lettre y due volte sul tasto 0 per inserire uno spazio e una volta sul tasto 8 per una T ed infine tre volte sul tasto 8 per una V digitando così alla fine My TV vedi a pagg 11 12 e 23 per maggiori informazioni riguardanti la modifica delle intestazioni Impostazione di altri Preferiti segue Rinomina dei gruppi di preferiti Il tasto Re...

Page 46: ...e di cancellare varie programmazioni effettuate nel telecomando Opzioni di visualizzazione Selezionare Opzioni premere poi sul tasto presente a sinistra o a destra dell opzione per aggiustare l impostazione Premere poi su OK Il parametro Durata d illuminazione stabilisce quanto tempo lo schermo rimane acceso da 2 a 35 secondi circa se nessun tasto viene premuto Il parametro Durata Trasmissione int...

Page 47: ... una volta soltanto eseguite di nuovo la fase di apprendimento con una breve pressione soltanto i Se l apprendimento del primo o del secondo tasto produce sempre errori procedere nel modo seguente 1 Controllare l allineamento del trasmettitore ricevitore IR dei due telecomandi 2 Ravvicinare fino ad 1 cm ad esempio o allontanare fino a 5 cm ad esempio i due telecomandi tra loro 3 Provare di nuovo a...

Page 48: ... poi su uno qualunque dei tasti laterali K1 K5 a sinistra dello schermo Apprendimento segue E possibile procedere all apprendimento dei comandi di un telecomando esistente e registrarli nei tasti principali oppure nell uno o nell altro dei 10 tasti a fianco del telecomando H510 Nella schermata Home premere prima il tasto a fianco di Configurazione poi di Imparare In questa schermata premere uno de...

Page 49: ...odificare il tempo di trasmissione di un tasto vedi Opzioni Visualizzazione a pag 90 I tasti non programmabili del telecomando non comandano l apparecchio Verificare che il telecomando si trovi nella modalità appropriata premendo il tasto MODE poi il tasto laterale corrispondente alla modalità dell apparecchio desiderato Programmare un nuovo codice nel telecomando E possibile che il telecomando no...

Page 50: ...indichi che l apprendimento è terminato La TV si accende quando premete un tasto Preferito Certi tipi di TV ad esempio quelli a schermo piatto di Emtec si accendono e visualizzano il canale selezionato quando viene premuto il numero di un canale quando la TV è spenta Per questo tipo di TV il fatto di premere un tasto Preferito produce lo stesso effetto però è possibile che non funzioni per i canal...

Page 51: ...gar por los menús 13 VOLUME Para cambiar el nivel del volumen del dispositivo generalmente de la televisión 14 OK Para seleccionar las opciones de los menús del dispositivo que controla o bien para confirmar la opción de la pantalla 15 Números Para seleccionar directamente un canal Las funciones en rojo están disponibles en el modo audio 16 PROG Para cambiar de canal 17 AV Para seleccionar la fuen...

Page 52: ...a hacia su televisión y pulse varias veces la tecla de encendido apagado o Prog o PLAY para los vídeos etc hasta que su dispositivo responda La tecla de encendido apagado envía el comando de encendido a su televisor y la pantalla 4 indica que ha seleccionado el código 1 de xx xx varía según la marca Mantenga pulsada esta tecla hasta que responda el televisor a continuación pulse Guardar 1 2 3 4 K6...

Page 53: ...La tecla 9 muestra sucesivamente W X Y Z 9 w x y z Para introducir un espacio utilice la tecla 0 cero La tecla número 1 permite seleccionar 1 y Puede retroceder un espacio pulsando la tecla que se encuentra a la izquierda de la tecla 0 cero Pulse OK o bien la tecla lateral próxima a SAVE para introducir la nueva etiqueta Configuración de sus dispositivos continuación La tecla Guardar muestra la pa...

Page 54: ...us favoritos continuación 6 7 Utilización del mando a distancia Si ha seguido correctamente los pasos de las páginas anteriores ha configurado varios dispositivos y varios favoritos que puede utilizar ahora con el mando a distancia Para configurar otros dispositivos y favoritos o para configurar otras funciones consulte las secciones siguientes Utilización del mando a distancia Pulse la tecla o en...

Page 55: ...s comandos en cualquier tecla que desee Al pulsar la tecla Macro ya programada se envía la secuencia de pulsaciones sucesivas de teclas comandos IR Cualquier secuencia de comandos que se utilice con frecuencia puede quedar reducida a 2 comandos Tecla MACRO situada al lado del menú Home seguida de la tecla Macro que usted desee Por ejemplo al pulsar MACRO y a continuación la Macro deseada puede enc...

Page 56: ...tos a un nuevo grupo Pulse la tecla HOME seleccione Configurar a continuación Favoritos Después en la pantalla derecha seleccione Nuevo Editar Configuración de otros favoritos continuación Seleccione un grupo al que desee añadir los favoritos o en el que desee modificar los favoritos existentes Al pulsar la tecla lateral situada al lado del grupo existente en este caso se muestran los favoritos qu...

Page 57: ...eces la tecla 8 para seleccionar v Esperamos de nuevo un segundo antes de pulsar la tecla 4 para seleccionar la letra i Por último pulsamos la tecla 3 para introducir la d Después de introducir el nombre nuevo del grupo de favoritos presione OK para memorizarlo Programación de varias macros Las macros permiten almacenar secuencias de comandos Puede programar y almacenar hasta 27 secuencias de puls...

Page 58: ...erentes para poder controlar las dos partes del dispositivo combo Si por ejemplo tiene un dispositivo combo TV DVD puede que sea necesario configurar un código en la tecla TV para controlar la parte TV y otro código en cualquier otra tecla de modo para controlar la parte DVD En otro tipo de dispositivos combo un solo código controla las dos partes del dispositivo Ver la lista de códigos separada P...

Page 59: ...PROG se da cuenta de que cambia varios canales cuando se pulsa una sola vez vuelva a realizar el aprendizaje pulsando levemente i Si el aprendizaje de la primera o segunda tecla presenta errores continuamente intenterealizar lo que se describe a continuación 1 Compruebe que el transmisor y el receptor IR están bien alineados ente los dos mandos a distancia 2 Aproxime 1 cm p ej o aleje 5 cm p ej lo...

Page 60: ...la lateral K1 K5 situada a la izquierda de la pantalla Aprendizaje continuación Puede realizar el aprendizaje de comandos de un mando a distancia existente y memorizarlos en las teclas principales o en cualquiera de las 10 teclas laterales del mando a distancia H510 En la pantalla Home pulse la tecla lateral situada al lado de Configurar y después Aprentizaje En esta pantalla es necesario pulsar u...

Page 61: ...á en el modo adecuado pulsando la tecla MODE después pulse la tecla lateral correspondiente al modo del dispositivo deseado Programe un nuevo código en el mando a distancia Es posible que el mando a distancia no cuente con el código de su dispositivo Intente realizar el aprendizaje de los códigos necesarios a partir de su antiguo mando a distancia Instale pilas nuevas El mando a distancia no contr...

Page 62: ...smiten varias veces por ejemplo si una tecla PROG aprendida cambia varias veces el canal cuando la pulsa o si las teclas de navegaciónArriba Abajo Izquierda Derecha aprendidas se mueven más de un paso cuando las pulsa realice el aprendizaje de la tecla pulsando sobre ella levemente en vez de mantenerla pulsada hasta que la pantalla le indique que ha realizado la operación con éxito Su TV se encien...

Page 63: ...geert 12 Boven Beneden Links en Rechts Om in de menu s verder te navigeren 13 VOLUME Om het geluidsniveau te veranderen meestal is dit de TV 14 OK Om menuopties te kiezen of te bevestigen 15 Cijfers Om een kanaal te kiezen De functies in rood zijn voor de audio mode beschikbaar 16 PROG Om van kanaal te veranderen 17 AV Om de A V bron uit te kiezen 18 Voor het kiezen van de programma s 9 of voor de...

Page 64: ...y De volgende display 3 vraagt u om de afstandsbediening op uw TV te richten en om op de AAN UIT toets van de Emtec afstandsbediening te klikken totdat deze reageert of op PROG of op PLAY voor de videorecorder enz De AAN UIT toets stuurt een signaal naar de TV en display 4 geeft aan dat u code 1 van xx xx afhankelijk van het merk heeft gekozen Blijf op deze toets klikken totdat uw TV reageert en b...

Page 65: ... u op de toets 0 nul De toets 1 geeft 1 en U kunt een karakter terug met de toets links van de toets 0 nul klik op OK of klik op de schermtoets naast OPSLAAN om een nieuwe tekst te bevestigen Afstellen van uw apparaten vervolg Nadat u op de toets Opslaan heeft geklikt verschijnt display 5 waarin u verzocht wordt om enkele andere toetsen van de afstandsbediening uit te proberen om de gevonden code ...

Page 66: ...euren opgeven zie blz 133 indien u later nog andere wilt toevoegen Met display 6 bepaalt u of u de door u ingestelde voorkeuren wilt registreren in de groep voor of voor Behalve de groepen en Hers kunnen voorkeuren in verschillende groepen worden ingesteld Door te kiezen gaat u door naar display 7 met daarop de bevestiging dat 4 nu de eerste voorkeursafstelling van de groep is omdat op de display ...

Page 67: ...s als wanneer u de wizard zou hebben gebruikt U hoeft alleen maar de instructies op de display op te volgen zie ook blz 128 130 Door op de toets OK te klikken bevestigd u de door u gemaakte instellingen De display Home verschijnt Wanneer u weer naar de display Sleep gaat zult u zien dat de tijdschakelaar loopt Gelieve er op te letten dat wanneer de tijdschakelaar is ingesteld de afstandsbediening ...

Page 68: ... aan een al bestaande groep voorkeurszenders toevoegen veranderen of deze opnemen in een nieuw groep Klik op de toets HOME kies eerst Setup en dan Voorkeursinstellingen Kies vervolgens rechts op het scherm Toevoegen Bewerkenen Kies een groep om de voorkeursinstelling toe te voegen of te veranderen Klik op een schermtoets naast een bestaande groep in dit geval en de display geeft een lijst met de v...

Page 69: ...ts 0 nul voor een spatie en keer op 8 voor de T drie keer op 8 voor V om tenslotte als resultaat Mijn TV te krijgen gelieve blz 129 133 en 136 te raadplegen als u de tekst voor een macro wilt veranderen Afstellen andere voorkeurszenders vervolg Andere naam geven aan een groep voorkeurszenders Met de toets Hernoemen kunt u een andere naam geven aan een groep voorkeurszenders U kunt bijvoorbeeld de ...

Page 70: ... welke met de afstandsbediening is meegeleverd de punchthrough voor de verschillende apparaten instellen Geluidsinstelling kinderslot voor bepaalde kanalen instellen en tenslotte onnodige elementen verwijderen welke u eerder op de afstandsbediening geprogrammeerd heeft Display instellingen Kies eerst Opties en klik vervolgens op de toets links of rechts naast de optie om het scherm af te regelen B...

Page 71: ...proces overdoen en dan de toets niet ingedrukt blijven houden maar slechts even aanklikken i Als het aanleren van de eerste of tweede toets telkens fout loopt dan wordt u geadviseerd het volgende proberen 1 Controleren of de beide IR diodes van de beide afstandsbedieningen precies tegenover elkaar liggen 2 De afstand tussen beide afstandsbedieningen verkleinen bijv 1 cm of vergroten bijv 5 cm 3 Pr...

Page 72: ...tup klikken en vervolgens op de schermtoets Leren Klik vervolgens op een van de schermtoetsen K1 K5 links van de display Leerfunctie vervolg VU kunt de instructies van uw oude afstandsbediening overnemen en deze aan ieder van de belangrijkste toetsen of een van de 10 toetsen naast de display toekennen Klik vanuit de display Home eerst op de schermtoets naast Setup en vervolgens op Leren Vanuit dez...

Page 73: ... apparaat niet Klik eerst op de toets MODE en vervolgens op de schermtoets naast het door u te gebruiken apparaat zodat u er zeker van bent dat de afstandsbediening in de juiste mode werkt Voer een nieuwe code voor uw apparaat in De afstandsbediening beschikt misschien niet over de juiste code om uw apparaat te besturen Probeer om m b v uw oude afstandsbediening de juiste code aan de H510 aan te l...

Page 74: ...it op het locale inzamelpunt deponeren of anders moet dit bij de verkoper worden ingewisseld bij aankoop van een nieuw apparaat Professionele gebruikers worden doorverwezen naar de instructies van hun leverancier Gebruikers van gehuurde of geleende apparaten worden doorverwezen naar hun verhuurder toetsen op de oude afstandsbediening en de H510 hebben misschien verschillende namen probeer in dit g...

Reviews: