background image


ENANCER Electrónica S.A.


Page 16 of 17


Rua Max Grundig 9 


4705-820 Braga Portugal                                                                                                                                             info@only-smartbuildings.com                                                                                                                                                                                                            
Tel: +351 253 221 484                                                                                                                                                 www.only-smartbuildings.com 

Very often it is necessary to have a button to control exactly the same outputs as another, for example, the button 
for switching on/off the ceiling light from both sides of the bed. 
In this case a copy button procedure is available. This procedure just adds the address of the new button to the 
outputs that already had the first button. The procedure does not update the function 
(Toggle/Set/Reset/Time/Delay/Scenario) of the new button, which should be set manually. 
The method is as follows: 
1.Ensure that both buttons have the same function. 
2.Press the PROG key for > 1 second (on the module where the key to be copied is located) to enter 
programming buttons mode: the green LED lights on. 
3.Briefly press PROG again: the green LED blinks 1 time per second. 
4.Press the button you want to copy (source). 
5.Then press the target button (destination): the second button now actuates the same outputs as the first button. 
Important Note: ONLY modules marked with firmware version V2.0 or later have this function built-in. Modules 
with older firmware versions ignore this function not making the copy. 
 
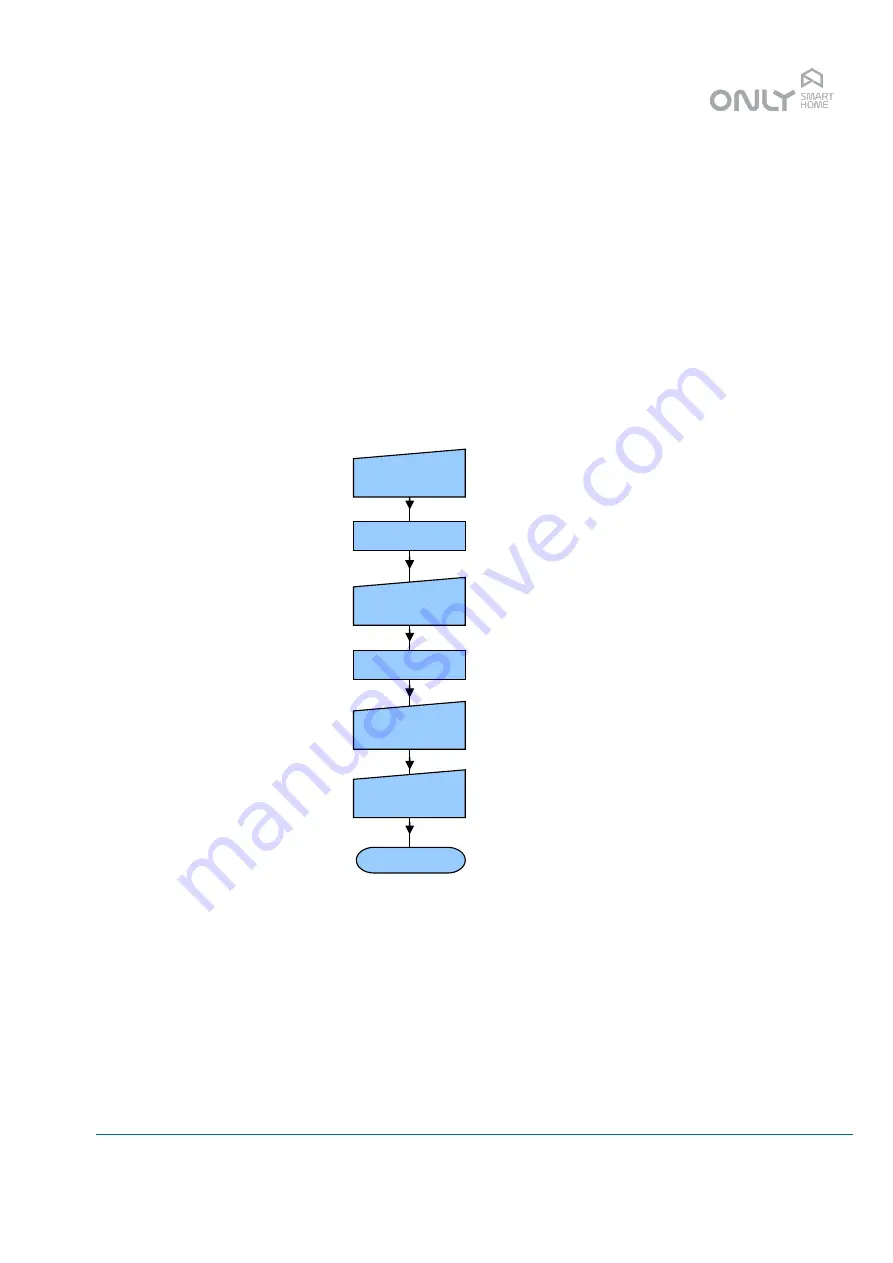
The following scheme explains how to activate the copy buttons procedure: 


Finally, modules marked with firmware version V2.0 or later are able to accept general commands to set their own 
outputs in programming mode.  
For this purpose, the BUS drivers are able to send the following commands:  
PROG_ALL

……………………………………………….…

sets all outputs in programming mode outputs of modules for motor and 

climatization control are not included 
PROG_SH

U…………………………………………………

sets all shutter modules in programming mode  

PROG_LIGH

T…………………………………………….

sets all on/off modules and dimmers in programming mode 

ERASE_ALL

………………………………………..………

sets all outputs in erasing mode outputs of modules for motor and 

climatization control are not included. 
ERASE_SHU

………………………………………………

sets all shutter modules in erasing mode  

ERASE_LIGHTS

……………………………………….

sets all on/off modules and dimmers in erasing mode 


Prog. Buttons 

press PROG  

> 1 second 

press PROG  

briefly 

Copy buttons 

press original 

button 

Press target 

button 

End 

Summary of Contents for ONLY

Page 1: ...Automation Installation Manual...

Page 2: ...5 13 Minor changes 1 3 2018 09 13 Branding actualization Index Historical Erro Marcador n o definido Index 2 Introduction 3 ONLY Automation system 3 Electrical piping and threading 3 Protections 5 Swi...

Page 3: ...his tension is generated in a BUS line feeder and is short circuited with the neutral by the modules during a communication The pulses in the BUS line codify a communication For all modules to communi...

Page 4: ...fore a mixed switching Figure 4 Mixed switching The BUS line is connected to all ONLY distributed in wall commands and switchbox modules being put in the same piping as Phase and Neutral So the same p...

Page 5: ...stinguish it from the rest of the installation It must have the same kind of isolation as the phase and neutral wires Protections The distributed ONLY commands receive power supply from the load circu...

Page 6: ...icantly the cutting capacity of the commands because of the start up or cutting current A good rule of calculation is to switch ONLY 5 of the rated load Like this an ONLY command can ONLY switch 500mA...

Page 7: ...of this type of switchboard should be as follows The connections of the switchboard should be as follows In the switchboard a D BUSDRV is used a BUS driver without any connection to other switchboard...

Page 8: ...me below where ONLY the domotics part is indicated TO CIRCUITS WITH ONLY ON FLOOR L N B B B B D FDRV Q Q 0V 0V MAI N FLOOR TO OTHER SWITCHBOARD FROM MAIN CIRCUIT BREAKER 10A 10A 6A 6A 6A 6A LIGHT1 LIG...

Page 9: ...g X Solution with floor BUS driver Floor switchboard The green and orange lines are 24V lines isolated from the mains supply They are as such no active lines and therefore do not need to be switched o...

Page 10: ...drive for the floor but also an isolated BUS connection to another floor The electrical diagrams of the switchboards are as follows The connections in the switchboards are as follows note that ONLY th...

Page 11: ...rtbuildings com Tel 351 253 221 484 www only smartbuildings com Fig X Solution with floor BUS coupler floor switchboard 10A 10A 10A 10A 6A 6A N N IL1 IL2 ESTOR SEG CLIMA ONLY TO CIRCUITS WITH ONLY ON...

Page 12: ...tion For interconnection between switchboards a FXG 2x1 0 cable should be used BUS line The BUS line of the floor is an active line as it is referred to Neutral The current is considerably small being...

Page 13: ...53 221 484 www only smartbuildings com CONNECTION SCHEMES In this chapter you will find the connection schemes of almost all types of ONLY commands C 2OUT B N 1 L 2 L N BUS C 1OUT B N N L 1 L N BUS C...

Page 14: ...5 820 Braga Portugal info only smartbuildings com Tel 351 253 221 484 www only smartbuildings com L N L N BUS D 4OUT B N L D 8OUT B N L L N BUS L L N D 4SHU M M M M B N L L N L N BUS D 1DIM B N L L N...

Page 15: ...ons to the outputs in each room 3 Configure the scenarios The diagram below summarizes the programming of ONLY inputs and outputs PROG 5 sec Remove the button from all outputs 1 second 1 second Prog O...

Page 16: ...en press the target button destination the second button now actuates the same outputs as the first button Important Note ONLY modules marked with firmware version V2 0 or later have this function bui...

Page 17: ...e is around 24V This voltage is isolated from the mains supply If the floor BUS voltage drops below 12VDC it s because there is a leakage somewhere Please verify the connections or the state of the mo...

Reviews: