background image


REVERSIBLE PLATE COMPACTORS


en


22


TEN2540-TEN2550-TEN3040-TEN3050 

7.8 CHANGING THE FUEL FILTER (HATZ MOTOR) 

The maintenance intervals for the fuel pump filter depend on the purity of the diesel fuel that is used. 
Where necessary, the interval should be reduced to 250 hours. 


!


 ATTENTION: 


When working on the combustion system, never expose it to naked flames without any 
protection; do not smoke. 


!


 IMPORTANT: 


Make sure that jobs are carried out cleanly, so as to avoid any dirt from entering the 
fuel pipe. 


Fuel particles may cause damage to the injection system. 


7.8.1. 

Take the cover off the tank and remove the fuel filter from its housing inside the tank, with 
the aid of the cord. 

7.8.2. 

Unscrew fuel pipe “1”  from filter “2” and fit a new filter. 

7.8.3. 

Fit the filter back in place and replace the cover on the fuel tank. 

7.8.4. 

The fuel injection system will commence purging automatically. 


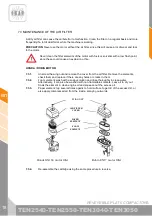
7.9 CLEANING THE OIL FILTER (HATZ MOTOR) 

The oil filter should be cleaned at the same time as the oil is changed, since there may be a loss of 
oil when this filter is changed. 


!


 ATTENTION: 


The motor should remain at a standstill and in a horizontal position. 


Danger of burns caused by hot oil! 


Use current standard procedures for managing the residual oil. 


7.9.1. 

Loosen nut “1” (approximately 5 turns). 

7.9.2. 

Remove the filter from its housing. 

7.9.3. 

Use compressed air from the inside spraying outwards to eliminate dirt from the filter. 

7.9.4. 

Check the state of gasket “1”, and replace if damaged. 

7.9.5. 

Check that gasket “2” is in good condition and inserted in the correct position, if 
necessary, change the oil filter. 

7.9.6. 

Lubricate the gasket before fitting in position. 

7.9.7. 

Insert the filter and press home. 

7.9.8. 

Make sure that ends “1” of the tension springs are next to the oil filter before tightening 
up the nut. 

7.9.9. 

Check the oil level with the dipstick and, if necessary, fill up with oil until it reaches the 
MAX level.  


Summary of Contents for TEN2540

Page 1: ...ENARCO S A es MX TEN 1301 en BANDEJAS REVERSIBLES REVERSIBLE PLATES Manual de Instrucciones Instruction Manual TEN2540 TEN2550 TEN3040 TEN3050 ...

Page 2: ...HOJA EN BLANCO ...

Page 3: ...NTO 8 4 4 MEDIDAS ACÚSTICAS Y VIBRATORIAS 8 5 INSTRUCCIONES DE OPERACIÓN 9 5 1 DESCRIPCIÓN DEL FUNCIONAMIENTO 9 5 2 APLICACIONES 9 5 3 TRANSPORTE DE LA MÁQUINA 11 6 FUNCIONAMIENTO 13 6 1 ANTES DE INICIAR EL TRABAJO 13 6 2 PUESTA EN MARCHA 13 6 3 TRABAJO 14 6 4 PARADA DEL MOTOR 15 7 MANTENIMIENTO 16 7 1 CALENDARIO DE MANTENIMIENTO 16 7 2 CARACTERÍSTICAS DE LA BUJÍA DEL MOTOR Y SERVICIO HONDA ROBIN ...

Page 4: ...LTRO DE ACEITE MOTOR HATZ 22 7 10 TENSADO CORRECTO Y ESPECIFICACIÓN DE LA CORREA 23 7 11 CAMBIAR CORREA TRAPEZOIDAL 23 7 12 MANTENIMIENTO DEL CONJUNTO VIBRANTE 24 7 13 MANTENIMIENTO DEL MANDO HIDRÁULICO 25 7 14 LOCALIZACIÓN Y REPARACIÓN DE AVERÍAS 26 8 EN CASO DE AVERÍAS 30 8 1 INTRUCCIONES PARA PEDIR REPUESTOS 30 8 2 INTRUCCIONES PARA SOLICITAR GARANTÍAS 30 9 DIRECCIONES DE INTERÉS 30 ...

Page 5: ... solicítelo a ENARCO o acceda a él en formato electrónico en la página web de ENARCO http www enar es e imprímalo Los procedimientos correctos de mantenimiento aseguran la larga duración y un excelente trabajo de la unidad Aunque el presente manual da algunas indicaciones acerca del motor recomendamos la consulta del manual de instrucciones del motor en lo que al mantenimiento y reparaciones del m...

Page 6: ...bajo de personal no autorizado Asegurese de que sabe desconectar la máquina antes de poner el motor en marcha por si se encuentra en dificultades Pare la máquina antes de transportarla No intente levantar el equipo sin ayuda Solicite ayuda o emplee un aparato de elevación usando el asa de izado integrada en la jaula de la bandeja No utilice el equipo si no se encuentra en buenas condiciones física...

Page 7: ...na Cámbiese de ropa si le cae combustible sobre ella Asegúrese de que el depósito de combustible está bien cerrado después de rellenarlo Compruebe que las tuberías y el depósito de combustible no tienen grietas ni fugas 2 3 SEGURIDAD EN EL SERVICIO No limpie ni revise el equipo estando en funcionamiento No arranque el motor con el cilindro inundado y habiendo retirado la bujía en los motores de ga...

Page 8: ...AS REVERSIBLES 6 es 6 TEN2540 TEN2550 TEN3040 TEN3050 2 4 CALCOMANÍAS CALCOMANÍA SIGNIFICADO LWA Nivel de potencia acústica en dB A 2004 A50012442 MOD NR Placa de identificación Utilice protectores auditivos ...

Page 9: ...pm 4 kW 5 4 HP a 3600 rpm BUJÍA NGK BPR6ES DENSO W20EPR U ENTREHIERRO 0 7 mm 0 8 mm REVOLUCIONES 3000 100 3600 100 RALENTÍ 1100 150 200 r p m 1400 150 200 r p m FILTRO DEL AIRE ELEMENTO DOBLE ELEMENTO DOBLE 4 2 DATOS DE LA MAQUINA UNIDAD TEN2540GH TEN2550GH TEN2540DH TEN2550DH TEN2540GR TEN2550GR FUERZA CENTRÍFUGA kN 25 ANCHURA DE TRABAJO mm 400 500 400 500 400 500 FREQUENCIA Hz r p m 90 5400 90 5...

Page 10: ...0 1 0 9 4 4 3 INCLINACIÓN MÁXIMA DE LA BANDEJA EN FUNCIONAMIENTO 2 0 2 0 4 4 MEDIDAS ACÚSTICAS Y VIBRATORIAS nivel de potencia acústica según EN 500 4 LWA 106 dB A nivel de presión sonora según EN 500 4 LpA 93 dB A valor efectivo ponderado de aceleración axial según EN 500 4 Ahv 3 2 m s2 ...

Page 11: ... suave al ralentí Aunque mediante la palanca del acelerador se puede regular el régimen de giro del motor se debe llevar el motor a máximo régimen para que el embrague no patine La base inferior de la bandeja está conectada a la base motor mediante cuatro amortiguadores que aminoran las vibraciones en la masa superior de la máquina de este modo tanto el motor como el usuario pueden operar de un mo...

Page 12: ...ruce de ferrocarriles Bloques de cemento entrelazados Construcción de redes Construcción de drenajes Compactación de zanjas Reparación de huecos por rotura de tuberías cables etc Alrededor de tuberías cables drenajes etc Relleno de rocas Grava Arena o material volcánico Suelos mixtos Fango Arcilla Espesor de capa 0 25 cm Espesor de capa 20 40 cm Mezcla caliente Mezcla fría Base Capa de ligado 40 1...

Page 13: ...a ver punto 4 2 DATOS DE LA MAQUINA o Ponga el gancho de elevación o la eslinga al punto de anclaje en la jaula de la máquina del modo indicado en la siguiente ilustración o No se coloque nunca debajo de la carga suspendida Las rampas de carga deberán ser sólidas y estables Deberá tenerse cuidado de no poner en peligro a personas por posibles vuelcos o deslizamientos del equipo como también por pa...

Page 14: ...os de fijación abiertos apuntando a los puntos de anclaje o Eche los dos gatillos de fijación de forma que el conjunto ruedas quede firmemente anclado a la máquina o Incline con el asidero la máquina hacia adelante ayudándose con el pie en la barra central del conjunto ruedas A y desplace la bandeja B A B C Cuando suelte la máquina hágalo con suavidad apoyando el pie en el estribo para que usted n...

Page 15: ...ceite caliente Para facilitar la salida del aceite usado incline la máquina y golpee ligeramente el vibrador 6 1 7 En el motor se debe usar gasolina tipo normal sin plomo Al rellenar el tanque de gasolina asegúrese de que se está usando el filtro 6 2 PUESTA EN MARCHA MOTOR HONDA GX160 ROBIN EX17 6 2 1 Abra la llave de combustible desplazando la palanca y ponga la palanca en la posición media abier...

Page 16: ...alanca del acelerador IMPORTANTE En el momento en que el embrague centrífugo alcanza la velocidad de corte comienza la vibración en la caja de excéntricas 6 3 2 Cuando trabaje con la bandeja el gatillo de fijación del asidero no debe estar accionado 6 3 3 Para compactar asfalto es recomendable impregnar la cara inferior de la placa vibratoria con combustible diesel Esto ayudará a prevenir que la p...

Page 17: ...eja hasta que el motor se pare por completo 6 4 2 Cierre la llave de combustible MOTOR HATZ 1B20 6 4 3 Para parar el motor lleve la palanca del acelerador al ralentí luego apriete el botón rojo de paro y no lo suelte hasta que se pare el motor Verifique que al soltarlo el botón vuelve a su posición original 6 4 4 Cierre el paso de combustible poniendo totalmente a la izquierda la palanca de ABERTU...

Page 18: ...a Revisar amortiguadores de goma Comprobar nivel de aceite de vibrador Revisar y ajustar correa trapezoidal 7 12 Mensual o cada 250 horas Motor Cambio aceite motor 7 4 Motor Hatz Limpiar la pieza reticulada del escape Comprobar y ajustar la holgura de válvulas Motor Honda Robin Limpiar la taza de sedimentos Revisar bujía 7 7 7 2 Máquina Comprobar y ajustar apriete de tornillos Mando hidráulico ver...

Page 19: ...Para ello consulte el manual de explicaciones del motor entregado con la bandeja Consulte el punto 4 1 DATOS DEL MOTOR para elegir la bujía y para conocer el entrehierro 7 2 1 Retire la tapa de la bujía y emplee una llave de bujías adecuada para extraer la bujía 7 2 2 Revise visualmente la bujía y reemplácela si tiene desgaste aparente o si el aislador está partido o rajado 7 2 3 Si la bujía está ...

Page 20: ...o MOTOR HONDA ROBIN 7 3 1 Desenrosque la tuerca de mariposa y retire la tapa del filtro de aire Extraiga los elementos revíselos y cámbielos si tienen agujeros o están rajados 7 3 2 Elemento de espuma lávelo en una solución jabonosa y aclárelo perfectamente en agua limpia También puede lavarlo con disolventes que no sean inflamables Deje que seque completamente Empape el elemento en aceite limpio ...

Page 21: ...7 3 8 Colocar nuevamente la tapa del alojamiento y asegurarla con el tornillo PRECAUCIÓN En caso de no lograrse con este procedimiento un grado de limpieza satisfactorio Ej Suciedad húmeda o grasosa se deberá de colocar un nuevo cartucho de filtro Verificar que la junta del cartucho no está dañada Comprobar que no hay grietas en el cartucho de filtro ni ningún otro tipo de daño en el filtro de pap...

Page 22: ...a el nivel ver punto 4 1 DATOS DEL MOTOR 7 4 7 Rosque y apriete el tapón de llenado Motor Honda Robin MOTOR HATZ 7 4 8 Colocar un recipiente bajo el motor para recoger el aceite 7 4 9 Quitar tapón de vaciado de aceite y esperar que drene todo el aceite 7 4 10 Limpiar el tapón de vaciado colocar una nueva arandela y apretar de nuevo 50 Nm 7 4 11 Añadir aceite de motor ver apdo datos tecnicos Motor ...

Page 23: ...ca El rendimiento disminuirá y aumentará el consumo de combustible El rendimiento a grandes altitudes puede mejorarse realizando modificaciones especificas en el carburador Si se opera el motor siempre en altitudes más elevadas que 1 500m sobre el nivel del mar permita que su concesionario autorizado Honda realice estas modificaciones en el carburador Incluso con un surtido apropiado del carburado...

Page 24: ...le se realiza automáticamente 7 9 LIMPIEZA DE FILTRO DE ACEITE MOTOR HATZ El filtro de aceite debería limpiarse al mismo tiempo que se cambia el aceite puesto que puede haber pérdidas de aceite al cambiar dicho filtro ATENCIÓN El motor debe estar en posición horizontal y parado Peligro de quemaduras por aceite caliente Gestionar el aceite residual según la normativa vigente 7 9 1 Afloje la tuerca ...

Page 25: ... central flexione 10 15 mm 7 10 4 Vuelva a apretar los cuatro tornillos de fijación de las levas de regulación 7 10 5 Coloque el cubrecorreas superior y apriete los dos tornillos del cubrecorreas 7 11 CAMBIAR CORREA TRAPEZOIDAL Atención La máquina ha de estar parada o fuera de servicio Si la máquina hubiese estado funcionando el conjunto de transmisión estará caliente Compruebe que la máquina se h...

Page 26: ... 300 horas de operación ATENCIÓN La máquina ha de estar parada o fuera de servicio Solo vaciar el aceite con la máquina en caliente Peligro de quemaduras por aceite caliente Gestionar el aceite residual según la normativa vigente 7 12 1 Tumbe la máquina ligeramente hacia el lado contrario por el que se vaya a vaciar el aceite 7 12 2 Remueva el tapón de vaciado de aceite vibrador 1 7 12 3 Incline a...

Page 27: ...lega hasta el borde inferior del orificio ATENCIÓN La máquina ha de estar parada o fuera de servicio Para rellenar el circuito 7 13 4 Remueva el tapón superior de la carcasa bombín del asidero 2 7 13 5 Llevar el asidero a su posición más avanzada 7 13 6 Rellene por el orificio del bombín con aceite Shell MORLINA 100 y bombee con el asidero para que baje el aceite Repetir la operación hasta que se ...

Page 28: ...ente Válvula de admisión o escape pegada ó defectuosa Aro del pistón ó cilindro gastado Culata del cilindro ó bujía de encendido ajustada incorrectamente Junta de culata o junta de la bujía de encendido defectuosa El embrague bloqueado haciendo que el vibrador gire al intentar arrancar No existe combustible en el carburador Tanque de combustible vacío La llave de combustible no está correctamente ...

Page 29: ... válvula deficiente Aro del pistón desgastado Cilindro gastado Superficie de ajuste del cilindro y de la culata del cilindro defectuosas Asiento del inyector flojo B No existe una inyección correcta de combustible en la cámara de combustión Flujo de combustible insuficiente ó nulo Orificio de ventilación de aire en la tapa del tanque obturado Paso del filtro de combustible obturado y tamiz del fil...

Page 30: ...stado Inyector obturado Aro del pistón superior e inferior instalados al revés Regulación del avance de la inyección incorrecta Sincronización de la válvula incorrecta Junta de la bomba de inyección floja Junta de la bomba de inyección floja Consumo de combustible alto Se observa escape oscuro Fuga en la tubería de combustible Elemento de filtro de aire obturado Combustible defectuoso debido a que...

Page 31: ...SAT de Enarco Si vibra pero no se traslada el vibrador puede encontrarse en una superficie húmeda y deslizante Pruebe en la superficie correcta Retroceso a baja velocidad Falta aceite en el mando hidráulico de la bandeja rellene con aceite siguiendo el punto 7 13 Aire en el circuito del mando hidráulico purgue el circuito Avance a baja velocidad Exceso de aceite en el mando hidráulico retire aceit...

Page 32: ... 1 La garantía tiene validez por 1 año a partir de la compra de la máquina La garantía cubrirá las piezas con defecto de fabricación 2 En ningún caso la garantía cubrirá una avería por mal uso del equipo 3 En todas las solicitudes de garantía DEBE ENVIARSE LA MÁQUINA A ENARCO S A O TALLER AUTORIZADO indicando siempre la dirección y nombre completo del consignatario 4 El departamento de S A T notif...

Page 33: ...SOUND AND VIBRATION MEASUREMENTS 8 5 OPERATING INSTRUCTIONS 9 5 1 DESCRIPTION OF OPERATION FUNCTIONS 9 5 2 APPLICATIONS 9 5 3 MACHINE TRANSPORT 11 6 OPERATION 13 6 1 BEFORE STARTING WORK 13 6 2 STARTUP 13 6 3 WORK 14 6 4 STOPPING THE MOTOR 15 7 MAINTENANCE 16 7 1 MAINTENANCE SCHEDULE 16 7 2 CHARACTERISTICS OF THE SPARK PLUG AND SERVICE HONDA ROBIN MOTOR 17 7 3 MAINTENANCE OF THE AIR FILTER 18 7 4 ...

Page 34: ...CIFICATIONS FOR THE BELT 23 7 11 CHANGING THE V BELT 23 7 12 MAINTENANCE OF THE VIBRATING UNIT 24 7 13 MAINTENANCE OF THE HYDRAULIC CONTROL 25 7 14 LOCATION AND REPAIR OF FAULTS 26 8 TROUBLE SHOOTING LOCATION AND REPAIR OF FAULTS 30 8 1 INTRUCTIONS FOR ORDERING PARTS 30 8 2 INTRUCTIONS FOR REQUESTING GUARANTEES 30 9 USEFUL ADDRESSES 30 ...

Page 35: ...lost or a further copy required this can be ordered from ENARCO or printed out direct from the ENARCO website http www enar es Following the correct procedures for maintenance will guarantee the long life and excellent performance of this equipment Although this manual provides certain specifications for the motor we recommend consulting the instruction manual for the motor for information on main...

Page 36: ...rsonnel Make sure you know how to disconnect the machine before starting up the motor in case you get into difficulties Make sure the machine has stopped before any attempt is made to move it Do not attempt to lift the equipment unaided Ask for help or use a lifting machine taking hold of the equipment by the lifting handle incorporated in the assemblysurrounding the compaction plate Do not use th...

Page 37: ...er the area Change your clothes if any fuel is spilt on them Make sure that the fuel tank is closed properly after refueling Check that there are no cracks or leaks in the pipes or fuel tank 2 3 SAFETY DURING SERVICE Do not clean or inspect the equipment during operation Do not start the motor up with the cylinder flooded or if the spark plug in the petrol motors has been removed Do not inspect th...

Page 38: ...REVERSIBLE PLATE COMPACTORS en 6 TEN2540 TEN2550 TEN3040 TEN3050 2 4 LABELS LABEL MEANING LWA Sound level in decibels A 2004 A50012442 MOD NR Specifications plate Use earmuffs ...

Page 39: ...m 4 kW 5 4 HP at 3600 rpm SPARK PLUG NGK BPR6ES DENSO W20EPR U GAP 0 7 mm 0 8 mm REVOLUTIONS 3000 100 3600 100 IDLING 1100 150 200 r p m 1400 150 200 r p m AIR FILTER DUAL ELEMENT DUAL ELEMENT 4 2 CHARACTERISTICS OF THE MACHINE UNIT TEN2540GH TEN2550GH TEN2540DH TEN2550DH TEN2540GR TEN2550GR CENTRIFUGAL FORCE kN 25 OPERATING WIDTH mm 400 500 400 500 400 500 FREQUENCY Hz r p m 90 5400 90 5400 85 53...

Page 40: ...1 0 9 4 4 3 MAXIMUM TILT OF THE PLATE DURING OPERATION 2 0 2 0 4 4 SOUND AND VIBRATION MEASUREMENTS Level of acoustic power according to EN 500 4 LWA 106 dB A Level of acoustic pressure according to EN 500 4 LpA 93 dB A Weighted real value of axial acceleration according to EN 500 4 Ahv3 2 m s2 ...

Page 41: ...h the motor ticking over gently Although the motor s rotation regime can be regulated by means of the accelerator lever the motor needs to be on maximum regime to avoid the clutch slipping The underside of the compaction plate is connected to the engine plate by means of four dampers that reduce the vibrations in the upper part of the machine thereby facilitating operations both for the user and f...

Page 42: ... or ramps Level crossings Interleaved blocks of cement Network construction Construction of drainage systems Ditch compaction Hole repairs due to burst pipes broken cables etc Around pipelines cables drainage systems etc Landfill with rocks Gravel Sand or volcanic material Mixed soils Sludge Clay Thickness of layer 0 25 cm Thickness of layer 20 40 cm Warm mixture Cold mixture Base tack coat 40 100...

Page 43: ...sufficient capacity to raise the machine see point 4 2 CHARACTERISTICS OF THE MACHINE o Attach the lifting hook or sling to the anchorage point on the machine cage assembly as indicated in the following diagram o Never stand underneath a suspended load The loading ramps should be solid and stable Care should be taken not to place people in danger due to the possiblity of the equipment overturning ...

Page 44: ...ne with the fastening latches open facing the anchor points o Place the two fastening latches so that the wheel unit is firmly anchored to the machine o Tilt the machine forward using the handle and with your foot on the central bar of the wheel unit A and move the tray B A B C W When you let the machine go do so gently keeping your foot on the central bar to keep your balance and so as not to dam...

Page 45: ...hange the oil while it is hot In order to make it easier for the used oil to come out tilt the machine and tap the vibrator 6 1 7 Normal unleaded petrol should be used in the motor When re filling the petrol tank make sure the filter is in use 6 2 STARTUP HONDA GX160 ROBIN EX17 MOTOR 6 2 1 Open the fuel cock by moving the lever to the half open position In order to start up the motor when it is co...

Page 46: ...clutch slipping Do not activate the throttle too slowly IMPORTANT At the moment when the centrifugal clutch reaches the cutting speed vibration begins in the cam box 6 3 2 While working with the compactor care should be taken not to activate the anchoring ratchet on the handlebar 6 3 3 For the compaction of asphalt it is advisable to impregnate the underside of the vibrating plate with diesel fuel...

Page 47: ...p button on the mast of the compactor until the motor comes to a complete standstill 6 4 2 Shut off the fuel HATZ 1B20 MOTOR 6 4 3 To stop the motor move the throttle to the idling position then press the red stop button until the motor stops Check that when released the button returns to its original position 6 4 4 Shut off the flow of fuel by moving the OPEN CLOSE lever for the carburettor to th...

Page 48: ...ng system Machine Inspect rubber buffers Check oil level for vibrator Inspect and adjust V belt 7 12 Monthly or every 250 hours Motor Change engine oil 7 4 Hatz motor Clean grating on exhaust Check and adjust valve clearance Honda Robin motor Clean sediment bowl Inspect spark plug 7 7 7 2 Machine Check and tighten up screws Hydraulic control check level and top up as necessary 7 13 Once every six ...

Page 49: ...n the manual with explanations on the motor supplied with the compactor Consult point 4 1 ENGINE SPECIFICATONS to select the spark plug and ascertain the gap required 7 2 1 Remove the cover from the spark plug and use a suitable plug spanner to extract the spark plug 7 2 2 Look at the spark plug to see if it needs replacing due to wear and tear or if the insulator is split or cracked 7 2 3 If the ...

Page 50: ... ROBIN MOTOR 7 3 1 Unscrew the wing nut and remove the cover from the air filter Remove the elements check them and replace if there are any holes or cracks in them 7 3 2 Foam element wash with a soapy solution and rinse thoroughly in clean water Alternatively it can also be washed with non flammable solvents Leave it to dry out Soak the element in clean engine oil and squeeze out the excess oil 7...

Page 51: ...Put the cover back on the housing and screw back into position PRECAUTION Where it is not possible to clean the filter satisfactorily using this procedure eg wet or greasy dirt a new filter cartridge should be inserted instead Ensure that the gasket on the cartridge is not damaged Check there are no cracks in the filter cartridge or any other type of damage in the paper filter by placing up agains...

Page 52: ...ee point 4 1 ENGINE SPECIFICATONS 7 4 7 Screw the filler plug tightly into place Honda Robin motor HATZ MOTOR 7 4 8 Place a receptacle underneath the motor to collect the oil 7 4 9 Remove the drain plug and wait until all the oil has drained out 7 4 10 Clean the drain plug fit a new washer and tighten up again 50Nm 7 4 11 Add engine oil see section on technical specifications Hatz motor PRECAUTION...

Page 53: ...diminish and its fuel consumption will rise Performance at higher altitudes can be improved by carrying out specific modifications on the carburettor If the motor always operates at altitudes of more than 1 500m above sea level ask your authorized Honda dealer to carry out these modifications on the carburettor Even in the case of an appropriate carburettor the power of the engine will be reduced ...

Page 54: ...l commence purging automatically 7 9 CLEANING THE OIL FILTER HATZ MOTOR The oil filter should be cleaned at the same time as the oil is changed since there may be a loss of oil when this filter is changed ATTENTION The motor should remain at a standstill and in a horizontal position Danger of burns caused by hot oil Use current standard procedures for managing the residual oil 7 9 1 Loosen nut 1 a...

Page 55: ...rted on it in the middle it flexes 10 15 mm 7 10 4 Tighten up the four lockscrews again on the adjustment cams 7 10 5 Replace the upper belt cover and tighten up the two screws for the cover 7 11 CHANGING THE V BELT ATTENTION The machine should be stopped or out of service If the machine had been working the transmission unit will be hot Check that the machine has cooled down before carrying out t...

Page 56: ... of operation ATTENTION The machine should be stopped or out of service Only empty out the oil when the machine is warm Danger of burns caused by hot oil Use current standard procedures for managing the residual oil 7 12 1 Tilt the machine slightly to the opposite side from the one on which the oil is going to be emptied out 7 12 2 Remove the drainage plug for the vibrating oil 1 7 12 3 Now tilt t...

Page 57: ... that the oil reaches the inside edge of the hole ATTENTION The machine should be stopped or out of service To top up the circuit 7 13 4 Remove the upper plug from the pump housing in the handlebar 2 7 13 5 Push the handle to its forwardmost position 7 13 6 Top up through the hole in the oil pump with Shell MORLINA 100 oil and using the handle pump to make the oil go down Repeat this operation unt...

Page 58: ... is fuel in the tank and the igniter plug sparks correctly Incorrect compaction Intake or exhaust valve is stuck or faulty Piston ring or cylinder is worn Cylinder head or spark plug not adjusted properly Head gasket or gasket on spark plug faulty The clutch is blocked making the vibrator turn when attempting to start There is no fuel in the carburettor Fuel tank is empty The fuel cock is not open...

Page 59: ...w compression Faulty contact of valve seat Piston ring is worn Cylinder is worn Incorrect surface adjustment of cylinder or cylinder head Loose injector seat B Fuel not injected correctly in combustion chamber Insufficient or zero flow of fuel Air vent in cover of tank is blocked Fuel filter is blocked up and filter screen is blocked Fuel filter spigot closed Air retained in fuel pipe particularly...

Page 60: ...Ring worn Injector blocked Upper or lower piston rings installed the wrong way round Incorrect setting for injection speed Incorrect synchronization of the valve Loose gasket on injection pump High fuel consumption dark exhaust fumes observed Leak in fuel pipe Air filter element blocked Defective fuel due to presence of impurities Overload Sliding element worn out or piston ring stuck Defective oi...

Page 61: ...echnical department SAT at Enarco It vibrates but does not move The vibrator may be on a slippery wet surface Try on the right surface Moves back very slowly Lack of oil in the hydraulic control unit for the compactor top up with oil following the instructions given in point 7 13 Air in the hydraulic control circuit purge the circuit Moves forward very slowly Too much oil in the hydraulic control ...

Page 62: ...s valid for one year from the date the machine was purchased The guarantee covers the parts with manufacturing faults 2 In no case will the guarantee cover a fault caused by improper use of the equipment 3 In all requests for guarantees THE MACHINE SHOULD BE SENT TO ENARCO S A OR AN AUTHORIZED WORKSHOP always indicating the complete name and address of the consignee 4 The Technical Department S A ...

Page 63: ...HOJA EN BLANCO ...

Page 64: ...nufactured according to the following standards est produit conforme aux dispositions des directives ci apres in overeenstemming met de voldenge voorschriften gefabriceerd is in übereinstimmung mit folgenden richtlinien hergestellt worden ist er blevet fremstillet i overenstemmelse med følgende retningslinier é fabricado conforme as seguintes normas è stata fabbricata secondo le norme vigenti buvo...

Page 65: ...ENARCO S A MX TEN 1005 fr de PLATEAUX RÉVERSIBLES REVERSIERBARE PLATTEN Manuel d Instructions Bedienungsanweisung TEN2540 TEN2550 TEN3040 TEN3050 ...

Page 66: ...HOJA EN BLANCO ...

Page 67: ...U EN FONCTIONNEMENT 8 4 4 MESURES ACOUSTIQUES ET VIBRATOIRES 8 5 INSTRUCTIONS DE MANIPULATION 9 5 1 DESCRIPTION DU FONCTIONNEMENT 9 5 2 APPLICATIONS 9 5 3 TRANSPORT DE LA MACHINE 11 6 FONCTIONNEMENT 13 6 1 AVANT DE COMMENCER LE TRAVAIL 13 6 2 MISE EN MARCHE 13 6 3 TRAVAIL 14 6 4 ARRÊT DU MOTEUR 15 7 ENTRETIEN 16 7 1 CALENDRIER D ENTRETIEN 16 7 2 CARACTÉRISTIQUES DE LA BOUGIE DU MOTEUR ET SERVICE H...

Page 68: ...UILE MOTEUR HATZ 22 7 10 TENSION CORRECTE ET SPÉCIFICATION DE LA COURROIE 23 7 11 CHANGER LA COURROIE TRAPÉZOÏDALE 23 7 12 ENTRETIEN DE L ENSEMBLE VIBRATOIRE 24 7 13 ENTRETIEN DE LA COMMANDE HYDRAULIQUE 25 7 14 LOCALISATION ET RÉPARATION DE PANNES 26 8 EN CAS DE PANNE 30 8 1 INSTRUCTIONS POUR COMMANDER DES PIÈCES DE RECHANGE 30 8 2 INSTRUCTIONS POUR FAIRE VALOIR LA GARANTIE 30 9 ADRESSES UTILES 30...

Page 69: ...vous pouvez le demander à ENARCO ou le trouver sous format électronique sur la page web d ENARCO http www enar es et l imprimer Les procédés corrects d entretien garantissent une longue durée de vie et un excellent travail de l unité Même si ce manuel fournit quelques indications à propos du moteur pour son entretien et ses réparations nous recommandons une consultation du manuel d instructions du...

Page 70: ...cteurs auditifs Interdisez l accès à la zone de travail aux personnes non autorisées Vérifiez que vous savez déconnecter la machine avant de mettre en marche le moteur au cas où vous rencontreriez des difficultés Arrêtez la machine avant de la transporter N essayez pas de soulever le matériel sans aide Demandez de l aide ou servez vous d un appareil de levage en utilisant le levier intégré à la ca...

Page 71: ...e avec du sable Changez vous si vous renversez du carburant sur vos vêtements Assurez vous que le réservoir de combustible est bien fermé après l avoir rempli Vérifiez que la tuyauterie et le réservoir de combustible n ont ni fissures ni fuites 2 3 SÉCURITÉ DANS LE SERVICE Ne nettoyez pas et ne révisez pas le matériel pendant son fonctionnement Ne faites pas démarrer le moteur avec le cylindre ino...

Page 72: ...RSIBLES fr 6 TEN2540 TEN2550 TEN3040 TEN3050 2 4 SIGNALISATIONS SIGNALISATION SIGNIFICATION LWA Niveau de puissance acoustique en dB A 2004 A50012442 MOD NR Plaque d identification Utilisez des protecteurs auditifs ...

Page 73: ...3600 rpm 4 kW 5 4 HP à 3600 rpm BOUGIE NGK BPR6ES DENSO W20EPR U ENTREFER 0 7 mm 0 8 mm RÉVOLUTIONS 3000 100 3600 100 RALENTÍ 1100 150 200 r p m 1400 150 200 r p m FILTRE À AIR ÉLÉMENT DOUBLE ÉLÉMENT DOUBLE 4 2 DONNÉES DE LA MACHINE UNITÉ TEN2540GH TEN2550GH TEN2540DH TEN2550DH TEN2540GR TEN2550GR FORCE CENTRÍFUGE kN 25 LARGEUR DE TRAVAIL mm 400 500 400 500 400 500 FRÉQUENCE Hz r p m 90 5400 90 54...

Page 74: ...9 4 4 3 INCLINAISON MAXIMALE DU PLATEAU EN FONCTIONNEMENT 2 0 2 0 4 4 MESURES ACOUSTIQUES ET VIBRATOIRES Niveau de puissance acoustique selon EN 500 4 LWA 106 dB A Niveau de pression sonore selon EN 500 4 LpA 93 dB A Valeur effective pondérée d accélération axiale selon EN 500 4 Ahv 3 2 m s2 ...

Page 75: ... le levier de l accélérateur on peut régler le régime de rotation du moteur on doit mettre le moteur à un régime maximum pour que l embrayage ne patine pas La base inférieure du plateau est reliée à la base moteur par quatre amortisseurs qui réduisent les vibrations dans la masse supérieure de la machine de cette manière le moteur et l utilisateur peuvent opérer avec plus de sécurité Avec le manch...

Page 76: ...sement ferroviaire Blocs de béton entrecroisés Construction de réseaux Construction de drainages Compactage de tranchées Réparation de trous pour cause de rupture de tuyauteries câbles etc Autour des tuyauteries câbles drainages etc Remplissage de pierres Gravier Sable ou matériel volcanique Sols mixtes Boue Argile Épaisseur de couche 0 25 cm Épaisseur de couche 20 40 cm Mélange chaud Mélange froi...

Page 77: ...machine voir point 4 2 DONNÉES DE LA MACHINE o Mettez le crochet de levage ou l élingue au point d ancrage sur la carcasse de la machine comme il est indiqué dans l illustration suivante o Ne vous mettez jamais au dessous de la charge suspendue Les rampes de chargement doivent être solides et stables Il faudra faire attention à ne pas mettre en danger des personnes avec de possibles chutes ou glis...

Page 78: ...verts orientés vers les points d ancrage o Appuyez sur les deux cliquets de fixation de sorte que l ensemble roues soit fermement ancré à la machine o Inclinez avec le manche la machine vers l avant en vous aidant du pied sur la barre centrale de l ensemble roues A et déplacez le plateau B A B C Quand vous lâchez la machine faites le en douceur en appuyant le pied sur le marchepied pour ne pas êtr...

Page 79: ... l huile est chaude Pour faciliter l écoulement de l huile usée inclinez la machine et frappez légèrement le vibrateur 6 1 7 Pour le moteur il faut utiliser de l essence normale sans plomb En remplissant le réservoir d essence vérifiez que vous utilisez bien le filtre 6 2 MISE EN MARCHE MOTEUR HONDA GX160 ROBIN EX17 6 2 1 Ouvrez le robinet de combustible en déplaçant le levier et placez le sur la ...

Page 80: ...ntrifuge se raccorde Si la vitesse du moteur augmente très lentement il se peut que l embrayage patine N actionnez pas lentement le levier de l accélérateur IMPORTANT Au moment où l embrayage centrifuge atteint la vitesse de coupe la vibration dans la caisse d excentriques commence 6 3 2 Quand vous travaillez avec le plateau le crochet de fixation du manche de doit pas être actionné 6 3 3 Pour com...

Page 81: ... 2 3 minutes et ensuite appuyez sur le bouton d arrêt sur le manche du plateau jusqu à ce que le moteur s arrête complètement 6 4 2 Fermez le robinet de combustible MOTEUR HATZ 1B20 6 4 3 Pour arrêter le moteur amenez le levier de l accélérateur au ralenti ensuite appuyez sur le bouton rouge d arrêt et ne le lâchez pas jusqu à ce que le moteur s arrête Vérifiez qu en le lâchant le bouton revient à...

Page 82: ...tisseurs en caoutchouc Vérifier niveau d huile de vibrateur Vérifier et ajuster la courroie trapézoïdale 7 12 Mensuel ou toutes les 250 heures Moteur Vidange 7 4 Moteur Hatz Nettoyer la pièce réticulée du pot d échappement Vérifier et ajuster le jeu des soupapes Moteur Honda Robin Nettoyer le dépôt de sédiments Vérifier bougie 7 7 7 2 Machine Vérifier et ajuster serrage des vis Commande hydrauliqu...

Page 83: ...nement du moteur Pour cela consultez le manuel d explications du moteur qui est remis avec la plaque vibrante Consultez le point 4 1 DONNÉES DU MOTEUR pour choisir la bougie et pour connaître l entrefer 7 2 1 Retirez le bouchon de la bougie et utilisez une clé à bougie appropriée pour extraire la bougie 7 2 2 Vérifiez visuellement la bougie et remplacez la si elle est usée ou si l isolateur est ca...

Page 84: ...vissez la vis papillon et retirez le couvercle du filtre à air Enlevez les éléments vérifiez les et changez les s ils ont des trous ou s ils sont fissurés 7 3 2 Élement en mousse lavez le dans une solution savonneuse et rincez le parfaitement à l eau claire Vous pouvez aussi le laver avec des dissolvants qui ne sont pas inflammables Laissez le sécher complètement Trempez l élément dans de l huile ...

Page 85: ...er de nouveau le filtre 7 3 8 Placer de nouveau le bouchon et le fermer en revissant ATTENTION Si un degré de propreté satisfaisant n est pas atteint Ex saleté humide ou graisseuse il faudra alors placer une nouvelle cartouche de filre Vérifier que le joint de la cartouche n est pas abîmé Vérifier quil n y a pas de fissures sur la cartouche du filtre ni aucun autre type de dommage sur le filtre en...

Page 86: ...DONNÉES DU MOTEUR 7 4 6 Vissez et serrez le bouchon de remplissage Moteur Honda Robin MOTEUR HATZ 7 4 7 Placer un récipient sous le moteur pour récupérer l huile 7 4 8 Enlever le bouchon de vidange d huile et attendre que toute l huile soit drainée 7 4 9 Nettoyer le bouchon de vidange placer une nouvelle rondelle et serrez de nouveau 50Nm 7 4 10 Ajouter de l huile de moteur voir paragraphe données...

Page 87: ...t la consommation de combustible augmentera Le rendement à de grandes altitudes peut être amélioré en réalisant des modifications spécifiques dans le carburateur Si le moteur travaille toujours à une altitude de plus de 1 500m au dessus du niveau de la mer permettez que votre concessionnaire Honda réalise ces modifications dans le carburateur Même si le carburateur est au maximum de son rendement ...

Page 88: ...urge du système d injection de combustible se réalise automatiquement 7 9 NETTOYAGE DU FILTRE À HUILE MOTEUR HATZ Le filtre à huile devrait être nettoyé en même temps qu on change l huile puisqu il peut y avoir des pertes d huile quand on change le filtre ATTENTION Le moteur doit être en position horizontale et arrêté Danger de brûlures par huile chaude Se défaire de l huile résiduelle selon les n...

Page 89: ...0 4 Resserrez les quatre vis de fixation des cames de réglage 7 10 5 Placez le couvre courroie supérieur et resserrez les deux vis du couvre courroie 7 11 CHANGER LA COURROIE TRAPÉZOÏDALE Attention La machine doit être arrêtée ou hors service Si la machine fonctionnait l ensemble de transmission serait chaud Vérifiez que la machine s est refroidie avant de réaliser toute opération 7 11 1 Desserrez...

Page 90: ...es les 300 heures de travail ATTENTION La machine doit être arrêtée ou hors service Vider seulement l huile avec la machine à chaud Danger de brûlures par huile chaude Se défaire de l huile résiduelle selon les normes en vigueur 7 12 1 Inclinez légèrement la machine du côté inverse au côté où l huile va être vidée 7 12 2 Remuez le bouchon de vidange d huile vibratoire 1 7 12 3 Inclinez maintenant ...

Page 91: ...jusqu au bord inférieur de l orifice ATTENTION La machine doit être arrêtée ou hors service Pour remplir le circuit 7 13 4 Remuez le bouchon supérieur de la carcasse de la pompe du manche 2 7 13 5 Mettez le manche dans sa position la plus avancée 7 13 6 Remplissez d huile Shell MORLINA 100 l orifice de la pompe et pompez avec le manche pour que l huile descende Refaites l opération jusqu à ce que ...

Page 92: ...bustible et la bougie d allumage fait des étincelles Compression déficiente Soupape d admission ou d échappement collée ou défectueuse Anneau du piston ou cylindre usé Culasse du cylindre ou bougie d allumage mal ajustée Joint de culasse ou joint de la bougie d allumage défectueuse L embrayage bloqué fait que le vibrateur tourne quand on essaie de démarrer Il n y a pas de combustible dans le carbu...

Page 93: ...ppement défectueuse Réglage du système de décompression incorrect Il y a très peu de compression ou elle est très faible Contact de l installation du siège de soupape déficient Bague du piston usée Cylindre usé Superficie de réglage du cylindre et de la culasse du cylindre défectueuse Siège d injecteur mal serré B Il n y a pas d injection correcte de combustible dans la chambre de combustion Flux ...

Page 94: ...pe d échappement ou silencieux obturé Surcharge Allumage défectueux accompagné de fumée blanche Piston Cylindre Anneau usés Injecteur obturé Bague du piston supérieur et inférieur montés à l envers Réglage de l avance à l injection incorrect Synchronisation incorrecte de la soupape Joint de la pompe à injection desserré Consommation élevée de combustible On observe une fuite sombre Fuite dans la c...

Page 95: ...vice Technique d Enarco Si elle vibre mais ne se déplace pas le vibrateur peut se trouver sur une superficie humide et glissante Essayez sur une superficie adéquate Recul à basse vitesse Il manque de l huile dans la commande hydraulique du plateau remplissez d huile en suivant le point 7 13 Air dans le circuit de la commande hydraulique purgez le circuit Progression à basse vitesse Excès d huile d...

Page 96: ...A GARANTIE 1 La garantie a une validité d 1 an à partir de l achat de la machine La garantie couvrira les pièces présentant un défaut de fabrication 2 En aucun cas la garantie ne couvrira une panne pour un mauvais usage de la machine 3 Dans toutes les demandes de garantie IL FAUT ENVOYER LA MACHINE À ENARCO S A OU ATELIER AGRÉÉ en indiquant toujours l adresse et le nom complet du consignataire 4 L...

Page 97: ...RIEB 8 4 4 AKUSTIK UND VIBRATIONSMESSUNGEN 8 5 BEDIENUNGSANWEISUNGEN 9 5 1 BESCHREIBUNG DER FUNKTIONSWEISE 9 5 2 ANWENDUNGEN 9 5 3 MASCHINENTRANSPORT 11 6 BETRIEBSWEISE 13 6 1 VOR AUFNAHME DER TÄTIGKEIT 13 6 2 INBETRIEBNAHME 13 6 3 ARBEIT 14 6 4 MOTORSTOPP 15 7 WARTUNG 16 7 1 WARTUNGSKALENDER 16 7 2 EIGENSCHAFTEN DER MOTORZÜNDKERZE UND SERVICE HONDA ROBIN 17 7 3 LUFTFILTERWARTUNG 18 7 4 MOTORÖLWEC...

Page 98: ...7 10 RICHTIGE RIEMENSPANNUNG UND SPEZIFIZIERUNG 23 7 11 KEILRIEMEN AUSWECHSELN 23 7 12 WARTUNG DER VIBRATIONSBAUGRUPPE 24 7 13 WARTUNG DER HYDRAULIKSTEUERUNG 25 7 14 STÖRUNGSFINDUNG UND ABHILFE 26 8 IM STÖRUNGSFALL 30 8 1 ANWEISUNGEN ZUR ERSATZTEILBESTELLUNG 30 8 2 ANWEISUNGEN ZUR BEANTRAGUNG DER GEWÄHRLEISTUNG 30 9 WICHTIGE ANSCHRIFTEN 30 ...

Page 99: ... eine weitere Ausgabe benötigen fordern Sie es bitte bei ENARCO an oder greifen sie auf das Handbuch im elektronischen Format auf der ENARCO Homepage http www enar es zu und drucken Sie es aus Eine ordnungsgemäße Wartung gewährleistet lange Lebensdauer und ausgezeichnete Leistung des Geräts In diesem Handbuch geben wir zwar einige Anweisungen zum Motor gegeben aber bezüglich Wartung und Reparature...

Page 100: ...agen Verhindern Sie den Zugang Ungefugter zum Arbeitsbereich Bevor Sie den Motor starten stellen Sie bitte sicher dass Sie bei eventuellen Fehlern wissen wie die Maschinen ausgeschaltet wird Stoppen Sie die Maschine vor ihrem Transport Versuchen Sie nicht das Gerät ohne Hilfe hochzuheben Bitten Sie um Hilfe oder benutzen Sie ein Hubgerät indem Sie den im Plattenkäfig eingebauten Griff zum Anheben ...

Page 101: ...stoff auf ihre Kleidung gelangt ist Stellen Sie sicher dass der Kraftstofftank nach dem Tanken wieder gut verschlossen ist Prüfen Sie nach ob Leitungen und Kraftstofftank weder Risse noch Lecks aufweisen 2 3 SICHERHEIT BEIM SERVICE Reinigen oder prüfen Sie das Gerät nicht während es in Betrieb ist Starten Sie den Motor nicht wenn der Zylinder überschwemmt ist und bei den Benzinmotoren die Zündkerz...

Page 102: ...REVERSIERBARE PLATTEN de 6 TEN2540 TEN2550 TEN3040 TEN3050 2 4 PIKTOGRAMME PIKTOGRAMM BEDEUTUNG LWA Lautstärke in dB A 2004 A50012442 MOD NR Typenschild Gehörschutz verwenden ...

Page 103: ... min 4 kW 5 4 PS bei 3600 U min ZÜNDKERZE NGK BPR6ES DENSO W20EPR U LUFTSPALT 0 7 mm 0 8 mm UMDREHUNGEN 3000 100 3600 100 LEERLAUF 1100 150 200 U min 1400 150 200 U min LUFTFILTER DOPPELELEMENT DOPPELELEMENT 4 2 ANGABEN ZUR MASCHINE MENGENEINHEIT TEN2540GH TEN2550GH TEN2540DH TEN2550DH TEN2540GR TEN2550GR FLIEHKRAFT kN 25 ARBEITSBREITE mm 400 500 400 500 400 500 FREQUENZ Hz U min 90 5400 90 5400 8...

Page 104: ...71 935 500 400 1 0 9 4 4 3 MAXIMALE NEIGUNG DER PLATTE IM BETRIEB 2 0 2 0 4 4 AKUSTIK UND VIBRATIONSMESSUNGEN Lautstärke nach EN 500 4 LWA 106 dB A Schalldruckpegel nach EN 500 4 LpA 93 dB A Tatsächlicher axialer und gemittelter Beschleunigungswert nach EN 500 4 Ahv 3 2 m s2 ...

Page 105: ...Last starten und sanft auf den Leerlauf überwechseln kann Mit dem Beschleunigungshebel kann man die Drehzahl des Motors einstellen Er soll jedoch auf Höchstleistung betrieben werden damit die Kupplung nicht rutscht Das Plattenunterteil ist mit vier Dämpfern zur Senkung der Vibrationen in den oberen Maschinenmassen mit dem Motorunterteil verbunden Auf diese Art arbeiten Motor und Bediener sicherer ...

Page 106: ...n Eisenbahnkreuzungen Verbundzementblöcke Versorgungsnetzbau Entwässerungsbau Grubenverdichtung Reparatur von Löchern aufgrund von Rohr oder Leitungsbrüchen usw Im Umfeld von Rohrleitungen Kabeln Entwässerungen usw Felsfüllungen Kiesel Sand oder vulkanisches Material Mischböden Schlamm Ton Schichtdicken von 0 25 cm Schichtdicken von 20 40 cm Warme Mischungen Kalte Mischungen Grundschicht Verbindun...

Page 107: ...aschine verfügen siehe Punkt 4 2 MASCHINENANGABEN o Legen Sie den Hubhaken oder die Schlinge am Verankerungspunkt am Maschinenkäfig wie auf der folgenden Abbildung dargestellt an o Stellen Sie sich niemals unter schwebende Lasten Die Laderampen müssen solide und stabil sein Dabei ist darauf zu achten dass keine Personen durch eventuelles Umstürzen oder Abrutschen des Geräts oder auch durch Teile d...

Page 108: ...en geöffneten Befestigungsklemmen anbringen o Die beiden Befestigungsklemmen so anbringen dass die Radbaugruppe fest an der Maschine verankert ist o Maschinengriff nach vorne neigen indem man mit dem Fuß auf der Zentralstange der Radbaugruppe A nachhilft und die Platte B verfährt A B C Maschine vorsichtig loslassen indem der Fuß auf den Bügel gestützt wird damit man nicht von der Maschine angehobe...

Page 109: ...laufen des Altöls zu erleichtern neigen Sie die Maschine und klopfen leicht auf den Vibrator 6 1 7 Im Motor ist bleifreies Normalbenzin zu verwenden Wenn der Benzintank gefüllt wird müssen Sie sicher stellen dass der Filter verwendet wird 6 2 INBETRIEBNAHME HONDA GX160 ROBIN EX17 MOTOR 6 2 1 Öffnen Sie den Kraftstoffhahn indem Sie den Hebel auf halbgeöffnete Stellung stellen Um einen kalten Motor ...

Page 110: ...öglicherweise die Kupplung Bewegen Sie den Gashebel nicht langsam WICHTIG Sobald die Fliehkraftkupplung die Schnittgeschwindigkeit erreicht hat beginnt die Vibration im Exzenterkasten 6 3 2 Wenn die Platte arbeitet darf die Klinke der Griffbefestigung nicht ausgelöst sein 6 3 3 Zum Asphaltverdichten wird empfohlen die Unterseite der Vibrationsplatte mit Dieselkraftstoff zu imprägnieren Dadurch wir...

Page 111: ...m Leerlauf laufen lassen und anschließend den Stoppknopf am Mast der Platte drücken bis der Motor ganz stillsteht 6 4 2 Schließen den Kraftstoffhahn HATZ 1B20 MOTOR 6 4 3 Um den Motor zu stoppen müssen Sie den Gashebel auf Leerlauf stellen und anschließend den roten Stopknopf so lange drücken bis der Motor stillsteht Prüfen Sie nach dass der Knopf beim Loslassen wieder auf seine ursprüngliche Stel...

Page 112: ...e Gummidämpfer prüfen Ölstand im Vibrator prüfen Keilriemen prüfen und einstellen 7 12 Monatlich oder alle 250 Stunden Motor Motoröl wechseln 7 4 Hatz Motor Auspuffgitterteil reinigen Ventilspiel prüfen und einstellen Honda Robin Motor Absetzbehälter reinigen Zündkerze prüfen 7 7 7 2 Maschine Festsitz der Schrauben prüfen und einstellen Hydrauliksteuerung Pegel prüfen und bei Bedarf nachfüllen 7 1...

Page 113: ...ie den Punkt 4 1 MOTORANGABEN um die Kerze auswählen zu können und den Luftspalt zu kennen 7 2 1 Nehmen Sie den Zündkerzendeckel ab und verwenden Sie einen geeigneten Zündkerzenschlüssel für deren Ausbau 7 2 2 Unterziehen Sie die Kerze einer Sichtprüfung und ersetzen Sie sie wenn sie offensichtlich Verschleiß zeigt oder die Isolierung gebrochen oder gerissen ist 7 2 3 Wenn die Zündkerze in Ordnung...

Page 114: ... Sie den Luftfilterdeckel Bauen Sie die Elemente aus prüfen Sie sie und wechseln Sie sie aus wenn Sie Löcher aufweisen oder gerissen sind 7 3 2 Schaumgummielement Waschen Sie es in einer Seifenlösung und spülen Sie es gründlich mit klarem Wasser aus Sie können es auch mit nicht entzündlichen Lösemitteln waschen Vollständig trocknen lassen Das Element mit sauberem Motoröl tränken und auspressen um ...

Page 115: ... anbringen und mit der Schraube befestigen VORSICHT Sollte mit dieser Vorgehensweise keine zufriedenstellende Sauberkeit erreicht werden z B feuchter oder fettiger Schmutz ist eine neue Filterpatrone einzusetzen Prüfen Sie nach ob die Patronendichtung nicht beschädigt ist Prüfen Sie nach ob die Filterpatrone keine Risse aufweist und keine anderen Schäden am Papierfilter vorhanden sind indem Sie ih...

Page 116: ...ABEN 7 4 7 Schrauben Sie den Einfülldeckel wieder auf und drehen Sie ihn fest Honda Robin Motor HATZ MOTOR 7 4 8 Stellen Sie einen Behälter unter den Motor um das Öl aufzufangen 7 4 9 Entfernen Sie den Ölablassdeckel und warten Sie ab bis das ganze Öl ausgelaufen ist 7 4 10 Reinigen Sie den Ablassdeckel legen Sie eine neue Scheibe ein und ziehen Sie ihn wieder an 50 Nm 7 4 11 Füllen Sie Motoröl ei...

Page 117: ...ie Luft und Kraftstoffmischung im normalen Vergaser übersättigt Die Leistung lässt nach und der Kraftstoffverbrauch erhöht sich Die Leistung auf großen Höhen kann durch spezifische Änderungen am Vergaser verbessert werden Wird der Motor immer auf Höhen über 1 500 m N N betrieben sollte ihr Hondahändler diese Änderungen am Vergaser ausführen Sogar bei einer angemessenen Vergaserversorgung nimmt die...

Page 118: ...ritzsystems erfolgt automatisch 7 9 ÖLFILTER REINIGEN HATZ MOTOR Die Ölfilterreinigung sollte zur gleichen Zeit wie der Ölwechsel erfolgen da beim Filterauswechseln Ölverluste entstehen können ACHTUNG Der Motor muss auf einer ebenen Stellung und still stehen Verbrennungsgefahr durch heißes Öl Entsorgen Sie das Altöl nach den gültigen Vorschriften 7 9 1 Mutter 1 lösen ca 5 Umdrehungen 7 9 2 Filter ...

Page 119: ...chbiegt 7 10 4 Ziehen Sie die Befestigungsschrauben der Einstellnocken wieder an 7 10 5 Bringen Sie die obere Riemenabdeckung wieder an und ziehen Sie deren beiden Schraube an 7 11 KEILRIEMEN AUSWECHSELN Achtung Die Maschine muss ausgeschaltet oder außer Betrieb sein Wenn die Maschine in Betrieb war ist die Transmissionsbaugruppe heiß Stellen Sie sicher dass sich die Maschine vor Ausführung dieser...

Page 120: ...lle 300 Betriebsstunden ACHTUNG Die Maschine muss ausgeschaltet oder außer Betrieb sein Entleeren Sie das Öl nur wenn die Maschine betriebswarm ist Verbrennungsgefahr durch heißes Öl Entsorgen Sie das Altöl nach den gültigen Vorschriften 7 12 1 Legen Sie Maschine leicht auf die entgegengesetzte Seite der Seite wo das Öl abgelassen werden soll 7 12 2 Entfernen Sie den Ablassdeckel des Vibratoröls 1...

Page 121: ...ntere Kante der Bohrung reicht ACHTUNG Die Maschine muss ausgeschaltet oder außer Betrieb sein Kreislauffüllung 7 13 4 Entfernen Sie den oberen Deckel des Zylindergehäuses am Griff 2 7 13 5 Stellen Sie den Griff auf die vorderste Stellung 7 13 6 Füllen Sie Shell MORLINA 100 Öl durch die Zylinderbohrung ein und pumpen Sie mit dem Griff damit das Öl absinkt Wiederholen Sie diesen Vorgang bis sich de...

Page 122: ...f vorhanden und Zündkerze gibt Funken ab Fehlerhafte Verdichtung Einlass oder Auslassventil verklebt oder fehlerhaft Kolbenring oder Zylinder abgenutzt Zylinderkopf oder Zündkerze falsch eingestellt Zylinderkopf oder Zündkerzendichtung fehlerhaft Die verriegelte Kupplung führt dazu dass sich der Vibrator beim Startversuch dreht Kein Kraftstoff im Vergaser vorhanden Kraftstofftank leer Kraftstoffha...

Page 123: ...ehr gering Fehlerhafter Ventilsitzkontakt Abgenutzter Kolbenring Abgenutzter Zylinder Fehlerhafte Zylinder und Zylinderkopfeinstellfäche Einspritzersitz lose B Fehlerhafte Kraftstoffeinspritzung in die Verbrennungskammer Kraftstoffstrom unzureichend oder nicht vorhanden Belüftungsbohrung im Tankdeckel verstopft Durchfluss durch Kraftstofffilter und Filtersieb verstopft Kraftstofffilterhahn geschlo...

Page 124: ...Zylinder Ring abgenutzt Einspritzer verstopft Oberer und unterer Kolbenring umgekehrt eingebaut Fehlerhafte Vorschubeinstellung der Einspritzung Fehlerhafte Ventilsynchronisierung Einspritzpumpendichtung lose Einspritzpumpendichtung lose Hoher Kraftstoffverbrauch dunkles Abgas Leck in der Kraftstoffleitung Luftfilterelement verstopft Kraftstoff fehlerhaft weil er Verunreinigungen enthält Überlastu...

Page 125: ...riert aber nicht verfährt ist es möglich dass sich der Vibrator auf einer feuchten und rutschigen Fläche befindet Auf einer angemessenen Fläche probieren Rückfahrt mit niedriger Geschwindigkeit Ölmangel in der Hydrauliksteuerung der Platte mit Öl nach Angaben im Punkt 7 13 nachfüllen Luft im Kreislauf der Hydrauliksteuerung Kreislauf entlüften Vorwärtsfahrt mit niedriger Geschwindigkeit Ölübermeng...

Page 126: ...ie Gewährleistungsdauer beträgt 1 Jahr ab Maschinenerwerb Die Gewährleistung deckt Teile mit Herstellungsfehlern 2 Unter keinen Umständen deckt die Gewährleistung Störungen aufgrund fehlerhafter Geräteverwendung 3 Bei allen Gewährleistungsanträgen IST DIE MASCHINE AN ENARCO S A ODER AN DIE ZUGELASSENE WERKSTATT mit Angabe des Namens und der vollständigen Anschrift des Empfängers zu senden 4 Die Ku...

Page 127: ...HOJA EN BLANCO ...

Page 128: ...nufactured according to the following standards est produit conforme aux dispositions des directives ci apres in overeenstemming met de voldenge voorschriften gefabriceerd is in übereinstimmung mit folgenden richtlinien hergestellt worden ist er blevet fremstillet i overenstemmelse med følgende retningslinier é fabricado conforme as seguintes normas è stata fabbricata secondo le norme vigenti buvo...

Reviews: