Fastlane
®
Pro Swim Unit Installation
Fastlane
®
Pro Swim Unit Installation
Section 18
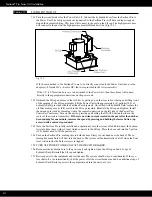
SUCTION OUTLET FITTING SERVICE INSTRUCTIONS
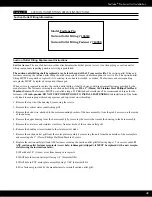
Suction Outlet Fitting Information:
Model: Fastlane Pro
Suction Outlet Fitting # 196310
Suction Outlet Fitting Fastener # 710980
Suction Outlet Fitting Replacement Instructions
Service Access: The use of adhesives or other attachment methods that prevent access to suction piping or suction outlet
fitting components requiring periodic servicing is prohibited.
The suction outlet fitting shall be replaced at or before the end of the 25 year service life. The suction outlet fitting and
fasteners securing the suction outlet fitting should be inspected before each use throughout its service life. The suction outlet
fitting MUST be repaired or replaced if it’s missing, loose, dented, cracked, or broken. The fasteners and corresponding
receptacles MUST be replaced or repaired if damaged.
When service is required to replace the suction outlet fitting, it shall be done so with replacement fasteners provided by the
manufacturer. The fasteners securing the suction outlet fitting are #10 x 1” (25mm) 316 Stainless Steel Phillips Flat Head
Machine Screws. The fasteners MUST be installed using a #2 Phillips head screwdriver. The recommended torque for the
fasteners is 25 inch-pounds. DO NOT USE POWER TOOLS TO INSTALL FASTENERS. Start installation of the fasten-
er by hand to ensure proper thread engagement and to prevent cross threading.
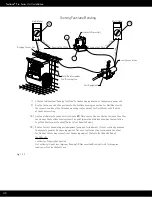
1. Remove the top lid of the housing by removing the screws.
2. Remove the vertical water conditioning grill.
3. Remove the bond wire, attached to the motor mounting bracket of the base assembly, from the grab bar screw on the inside
of the housing.
4. Remove the upper housing from the base assembly by removing the screws that secure the housing to the base assembly.
5. Remove the outer arcs and stainless steel discs from each side of the suction outlet grill.
6. Remove the bonding wires attached to the stainless steel disks.
7. Remove the suction outlet grill from the motor plate assembly by removing the nuts from the underside of the motor plate
and removing the 1” (25mm) Phillips Flat Head Machine Screws.
8. Replace the suction outlet grill and ALL fasteners securing the suction outlet grill following steps 1-7 in reverse order. If
ANY suction outlet fastener receptacle (screw hole) is damaged (stripped), it MUST be replaced with a new recepta-
cle following the instructions below:
8.1 Mark hole 1/2" (13mm) away from damaged receptacle.
8.2 Drill hole in suction outlet grill using 1/4" (6mm) drill bit.
8.3 Drill hole in PVC motor plate assembly using 11/64" (4mm) drill bit.
8.4 Use fasteners provided by the manufacturer to reinstall suction outlet grill.
48

