background image

38.2. These hoses, described more fully in Tech Bulletin #24,
are supplied by Endless Pools, Inc. to the length specified. Often
they are not shipped with the pool as the exact length is
unknown at the time of shipment. Please order these hoses a
week before they are needed to allow shipment by UPS ground.
Two hoses up to 25 feet in length are supplied at no additional
charge. It is best to use hoses close to the length you need rather
than simply going with the standard 25 feet. Lengths in excess
of 25 feet cost $5 per foot, e.g. two 40 foot hoses cost 15 feet x
$5 = $75. 

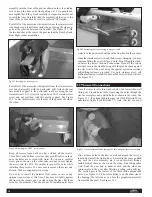
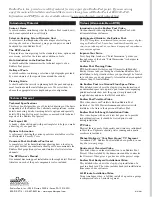
Remove the protective plugs and connect the 2 hydraulic hoses
to the 2 ports on the Power Unit and tighten firmly. See figure
38.1 Do not over-tighten. The hose connecting to the spin-on fil-
ter on the Power Unit is the return (low pressure) hose. See
Figure 38.1. To ensure that the propeller turns in the correct
direction, follow the drawing in Tech Bulletin #3 describing the
Valve Assembly. If the hoses you ordered are too short and you
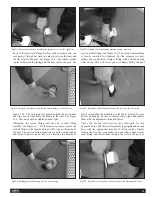
need longer hoses, call Customer Service. Extra care should be
taken that these hoses are cushioned when they pass by anything
that could reverberate. This will ensure a quieter installation.
Use simple pipe insulation and clips for this purpose. The
hydraulic hoses came with a length of tubing to connect between
the air button mounted on the top flange at the front of the pool
and the Controller. By pushing the button at the front of the pool
a pulse of air is sent to the controller which in turn closes a con-
tactor and provides power to the 5 HP Power Unit.

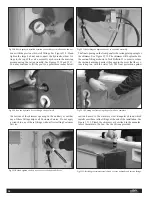
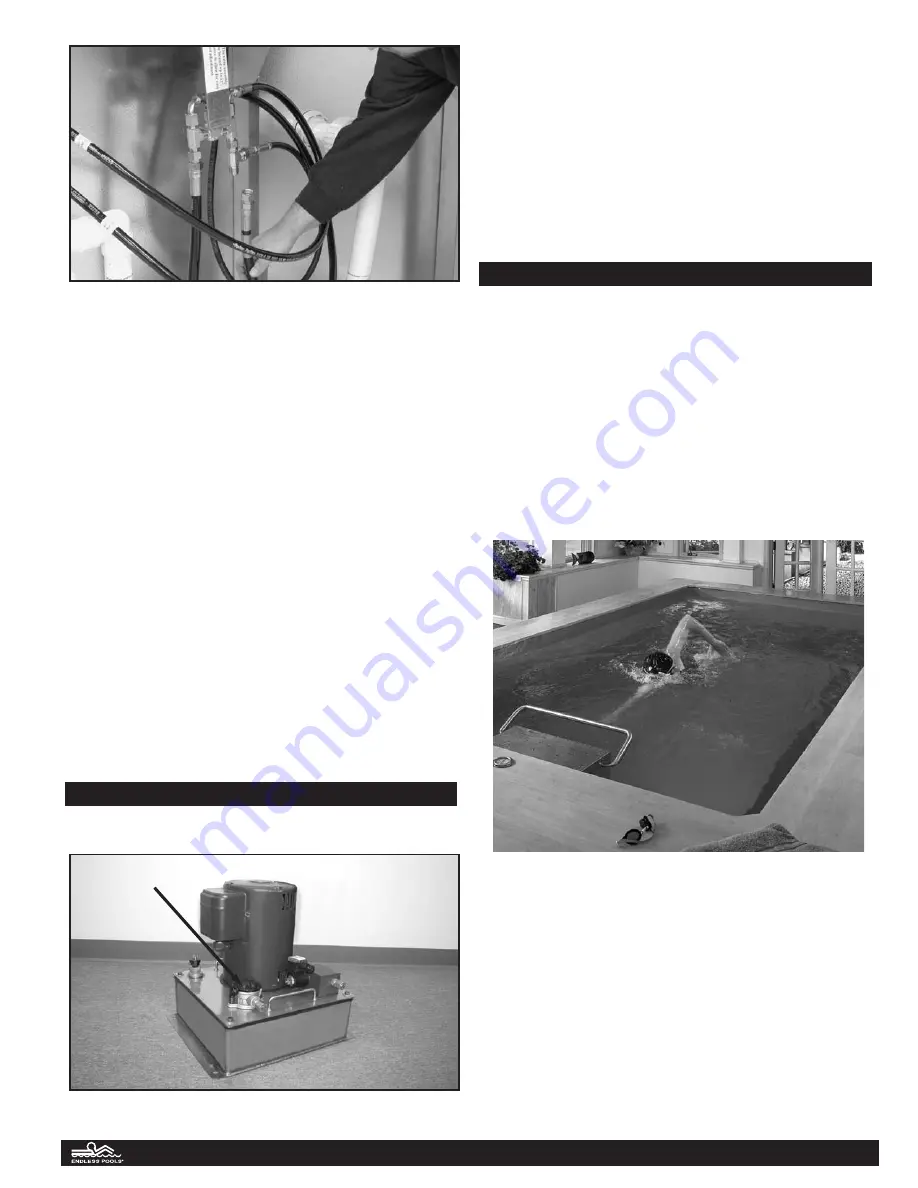
39. Adding Hydraulic Fluid

Fill the reservoir on the Power Unit using all of the oil provid-

ed. See Figure 39.1. Endless Pools, Inc. supplies a special 
non-petroleum fluid created for this application and this equip-
ment. Do not use a substitute hydraulic fluid. Extra hydraulic
fluid is provided for longer hose runs. Any excess fluid should
be retained for future use. Tech Bulletin #25 describes this
biodegradable environmental oil.

Make sure that all hydraulic connections are tight, then press the
air button poolside to turn on the Power Unit. Run for a minute
or two then check for hydraulic leaks at the Power Unit and the
pool and tighten if necessary. By pressing this air button again
you can turn off the Power Unit. Make sure you can do this.

40. Start-Up and Maintenance 

You have now completed the basic installation of the Endless
Pool.  Endless Pools, Inc. supplies a complete start-up kit with
every pool that includes a commercial quality water chemistry
test kit, start-up chemicals to balance your water, test logs to
record results, a thermometer, and equipment to vacuum and
clean your pool. These are packaged in the box labeled Start-Up
Kit and are described more fully in Tech Bulletin #26. Also
included are step-by-step instructions describing the operation
of your pool and recommended maintenance. If the pool will sit
for even a day filled with water we recommend that you disperse
a cup of regular Clorox bleach to the water to keep the water
clean. This will yield a temporary chlorine level of 1 ppm, for a
standard sized pool, which will retard bacteria and algae growth
for the moment.

Fig 38.2: Connect the hydraulic hoses to the valve assembly on the pool.

Fig 39.1: Power Unit fill cap is located above the low pressure fitting.

23

Fill Cap

Summary of Contents for Pools

Page 1: ...Fully Aboveground Installations Partially In Ground Installations Fully In Ground Installations I N S T A L L A T I O N I N S T R U C T I O N S ...

Page 2: ...uld be worn during the installation of an Endless Pool Installation Instruction Booklet Information Installation Instructions Table of Contents Pool Arrival and Inspection 3 Main Drain Outlet 3 Assembly of Pool Panels Overview 3 Panel Assembly Instructions 3 Exploded View of Panel Assembly 4 Optional Tension Straps for Flat Bottom Pools 7 Assembly of Pool Panels with a Deeper Pool 8 Installation o...

Page 3: ... call your sales person or our Customer Service Department If you are installing an Endless Pool on an existing concrete slab and your municipality requires a main drain outlet in your pool floor please call our Customer Service Department for details 3 Assembly of Pool Panels Overview Bolt the panels together as shown on the video leaving access at the front of the pool for service If jets lights...

Page 4: ...ESE DRAWING DIMENSIONS COMPLY WITH THE NATIONAL SPA AND POOL INSTITUTE SUGGESTED MINIMUM STANDARDS FOR RESIDENTIAL POOLS FOR INFORMATION CONCERNING NSPI MINIMUM STANDARDS WRITE NATIONAL SPA AND POOL INSTITUTE 2111 EISENHOWER AVENUE ALEXANDRIA VA 22314 703 838 0083 1 7 8 9 or 10 LONG ACCESS PANEL 10 GUSSETS 14 GAUGE 3 7 16 X 6 5 16 X 9 3 4 4 OUTSIDE SQ CORNER CAPS 14 GAUGE 1 1 2 X 1 1 2 X 6 7 16 4 ...

Page 5: ...de corner angles each 39 long See Figures 4 3 and 4 4 Install the 10 gussets at every panel inter section 1 on each side see figure 4 2 and 2 in each of the 4 corners see Figures 4 3 and 4 4 Do not install these gussets between the panels Install the 4 top corner angles in each of the 4 corners See Figures 4 3 and 4 4 Loosely bolt together the entire enclosure see Figures 4 5 and 4 6 then check th...

Page 6: ...aight Then measure both diagonals See Figure 4 11 Shift the panels by pushing at the corners until the differ ence is less than 1 8 Care should be taken to ensure that the pool is square before securing the panels to the concrete The bottom flange of each panel has pre drilled holes to accept the 3 8 x 3 anchor bolts provided See Figures 4 12 and 4 13 An absolute minimum of 10 anchor bolts are req...

Page 7: ...ist the hydrostatic force of the water in the pool Assemble the panels as described above placing the Tension Straps under the bottom flange The vertical lip of the bottom flange of each panel has pre punched holes to accept the 3 8 nuts and bolts which are used to secure the tension straps See Figure 5 3 This is the same hardware used to bolt the panel enclosure together The Tension Straps should...

Page 8: ...e be installed correctly so that your custom liner will fit Please refer to Tech Bulletin 2 for details of the deeper area EPI will make a liner only after receiving a completed copy of the Liner Order Form which is typically filled out once the pan els are installed This Order Form should be completed in full and faxed to EPI Customer Service at 610 497 8693 Allow 3 weeks for delivery of the cust...

Page 9: ...each side needs to be trimmed to length Self drilling fasteners are included in the kit along with a nut driver attachment for your drill If you have purchased the optional 8 Aluminum Coping which has a liner hanger built into it please refer to Section 14 and Technical Bulletin 4B prior to proceeding with your assembly If you have purchased the optional Bullnose Coping which has a liner hanger bu...

Page 10: ...n the System Control Board box with the thru wall fittings to be installed on the front wall of the pool See Figure 9 1 Attach the Valve Assembly to the top flange of the front panel as shown in the video This valve controls the amount of hydraulic fluid reaching the hydraulic motor thereby determining the speed of the water current The Valve Assembly is attached to the pool with self drilling fas...

Page 11: ... it is best not to undertake coping installation and a variety of external carpentry and fin ishing tasks with the pool filled with water many people choose to do that work now 11 Options An Endless Pool is usually customized to meet the needs of the end user Pools of different lengths and widths are selected as well as deeper pools as described previously Naturally the installation will vary depe...

Page 12: ...Tech Bulletin 4B The coping system is delivered with your pool It may be ordered later and shipped by UPS groundtrack for an additional shipping charge The kit s weight depends on the pool size and comes in 5 boxes Each coping kit contains pre fabricated corners and straight aluminum pieces cut to match your pool size The 8 wide pro file of the coping makes it ideally suited for pools which are fr...

Page 13: ...ng the PVC cleaner and PVC cement you received in your plumbing kit glue the second piece of pipe into the open end of the coupling For pools larger than 8 x 16 a larger solar blanket is available by request and shipped via UPS Alternatively the roller mechanism from the retractable security cover may be used in conjunction with a length of 3 diameter PVC pipe to roll up the blanket This optional ...

Page 14: ...e on the power unit Alternatively the optional Swim Current Gauge may be plumbed into the high pressure hydraulic line and the pressure may be read poolside in PSI Pounds per Square Inch See Figure 20 1 This pressure will correlate with swim current speed The correlation however is inexact and will change as the hydraulic fluid heats up Pressure is a good way to set the repeatable speed of the mac...

Page 15: ...ural Gas or Propane Gas Heater When Natural Gas or Propane Gas is available a Natural Gas or Propane Gas Heater is usually a less expensive alternative for heating the pool To properly consider this option review the owners manual describing the Raypak 50 000 BTU Electronic Ignition Natural Gas or Propane Gas Heater available from Endless Pools Inc This manual is included in its entirety in Tech B...

Page 16: ...filter free of construction debris Vacuum the pool floor carefully and make sure there are no sharp bumps that might damage the liner Take special care to remove any metal chips that may have fallen on the floor Install the protective felt underlayment on the floor of the pool The felt kit comes in a box with the four foam corners a can of spray adhesive and Tech Bulletin 15 See Figure 30 1 The fe...

Page 17: ...ve all tape and the vacuum hose Continue building the interior stainless steel portion of the pool as outlined in the Owner s Manual installation instructions Included in the box with the liner are No Diving signs Please post these in prominent locations around the pool The Endless Pool is shallow and must never be used for diving Diving into the pool is a very serious hazard and these stickers ar...

Page 18: ...tting the liner Put them aside for the moment They should not be installed until more water is in the pool which will push the liner back in the corners Once the stainless steel is in and the holes are lining up you may continue filling the pool while you work Stop filling three inch es below the lowest thru wall connection Once all the screws are tight secure the front housing with the grab bar b...

Page 19: ... the moment you may replace the round safety strainer fitting with a threaded plug with O ring This will allow you to continue filling the pool before completing the plumbing of the Water Quality System Before starting up be sure to remove these plugs and replace them with the appropriate threaded pieces Above the suction thru wall are two thru walls for two hydraulic hoses The thru wall assembly ...

Page 20: ... fitting as shown in Tech Bulletin 3 in order to reduce the suction hazard and protect the pump in the event that the sys tem is kept on with the water low The final protection against suction hazard is the stainless steel triangular shroud which installs over these inline fittings at the end of the installation See Figure 33 13 Plumb the skimmer as described in the manufac turer s literature in t...

Page 21: ... is important The pump and filter are pre plumbed and fasten securely to the plastic base with 3 8 bolts and self drilling fasteners The com ponents can be assembled to suit your specific site but they are generally installed as shown in the drawing in Tech Bulletin 16 The heater can be located anywhere downstream of the fil ter When the standard 5 5 KW electric heater is used it may be installed ...

Page 22: ...ound this limitation some will install the electric heater on a shelf above the equip ment or add a flow switch The gas heaters also have pressure switches and theoretically the same limitations When wired as described above however the electronic ignition will be deprived of power when the pump timer receptacle is off and the pressure switch is redundant Call Customer Service about these elevatio...

Page 23: ...r Unit 39 Adding Hydraulic Fluid Fill the reservoir on the Power Unit using all of the oil provid ed See Figure 39 1 Endless Pools Inc supplies a special non petroleum fluid created for this application and this equip ment Do not use a substitute hydraulic fluid Extra hydraulic fluid is provided for longer hose runs Any excess fluid should be retained for future use Tech Bulletin 25 describes this...

Page 24: ... This DVD explains in animated form various aspects of plan ning an Endless Pool Learn how to address humidity con cerns in an indoor pool or see how a deeper pool can enhance your exercise options ImproveYour Swim Terry Laughlin founder of Total Immersion guides you through some of the basic Total Immersion techniques in an Endless Pool Endless Pool Planning Video PBS host Richard Trethewey and O...

Reviews: