background image

®

Outdoor Patio Heater Model No. GWU501E

Contact 1.800.762.1142 for assistance. Do not return to place of purchase.

page no.

Step

7

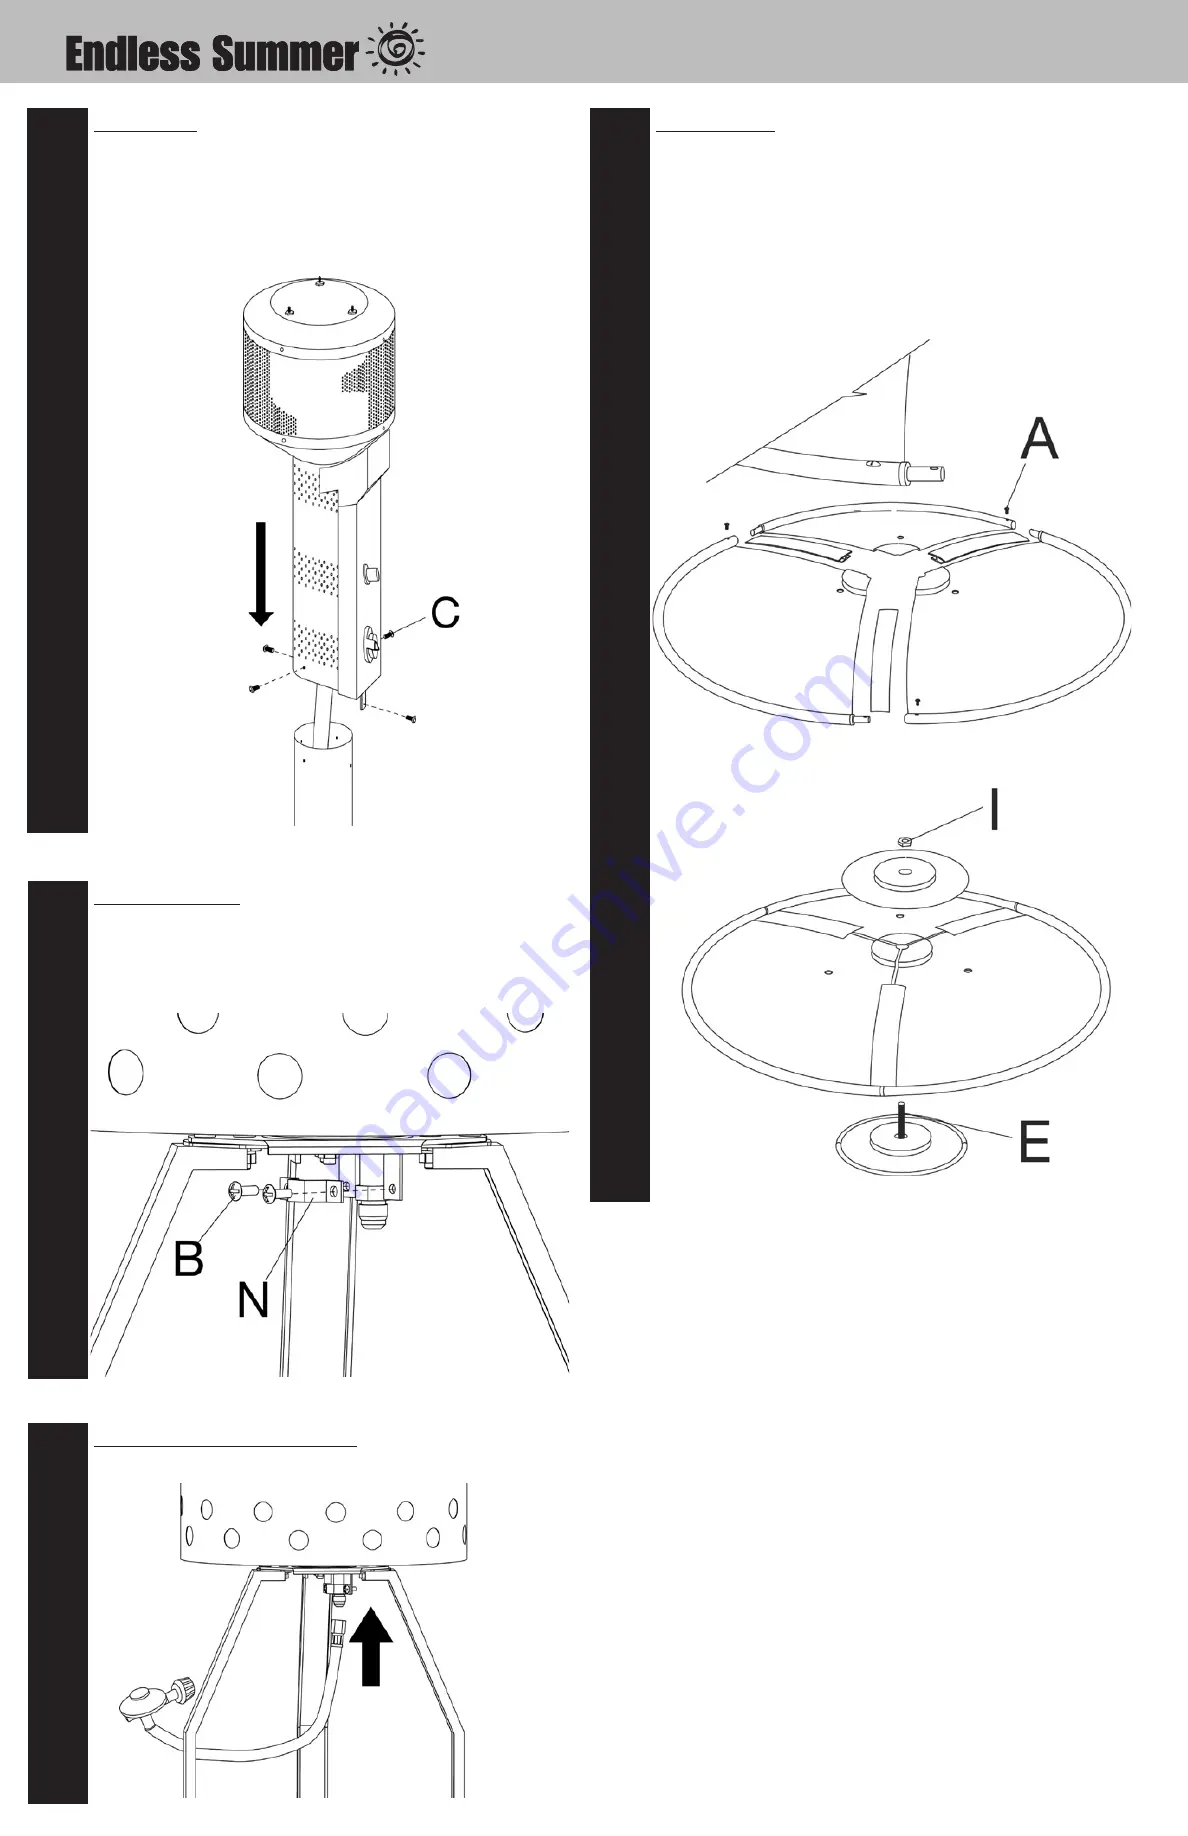
Attach gas line clip

A. Lift shroud cover to expose platform.

B. Make sure gas line feeds through indent in gas line clip.

C.  Attach gas line clip (N) to base platform using 2 medium screws (B), securing the 

gas line without damaging the exposed bolts.

Step

8

Attach gas line/regulator assembly

Attach gas line/regulator assembly to gas line using 3/4” wrench.

Step

9

Assemble Dome

Note: 

Each dome section has a pin mounted in the rolled bottom edge. If necessary 

for proper alignment of dome sections, loosen each screw prior to assembly.

A. Slide dome rib onto pin side of dome panel.

B. Slide two dome panels togther. Secure with small screw (A).

C. Repeat procedure for all three dome panels.

D.  Insert large bolt (E) through dome plate, dome, top dome plate, large nut (I).

E. Tighten all screws on dome panels.

Step

6

Attach engine

A. Lay engine assembly and base assembly on their side, using carton for support.

B. Insert gas line through pole.  

Note: 

Make sure gas line comes out bottom of pole before securing engine to pole.

C. Attach engine to post using 4 large screws (C).

Note: 

Do not fully tighten screws until all screws are in place.

Summary of Contents for GWU501E

Page 1: ...s for future reference If you are assembling this unit for someone else give this manual to him or her to read and save for future reference Manufactured in China for Blue Rhino Global Sourcing LLC 10...

Page 2: ...ified service person 30 Do not alter heater in any manner 31 Do not use the heater unless it is COMPLETELY assembled and all parts are securely fastened and tightened 32 This heater should be thorough...

Page 3: ...mall bolt D small lock washer K and medium nut H Finger tighten only Note Do not fully tighten until Step 4 B Attach the S hook on the tank retention chain to the left and right leg Step 3 Attach weig...

Page 4: ...tom edge If necessary for proper alignment of dome sections loosen each screw prior to assembly A Slide dome rib onto pin side of dome panel B Slide two dome panels togther Secure with small screw A C...

Page 5: ...restraint chain to hole in right leg Connect LP Gas Tank Before connecting be sure that there is no debris caught in the head of the gas tank head of the regulator valve or in the head of the burner...

Page 6: ...dissipate before attempting to relight pilot 3 Repeat the Lighting steps Shut Down 1 Turn control knob clockwise to pilot Normally burner will make a slight popping sound when extinguished Burner wil...

Page 7: ...nment such as near an ocean corrosion occurs more quickly than normal Frequently check for corroded areas and repair them promptly TIP Use high quality automobile wax to help maintain the appearance o...

Page 8: ...damage to the finish such as scratches dents discoloration rust or other weather damage after purchase This Limited Warranty is in lieu of all other express warranties Vendor disclaims all warranties...

Page 9: ...hilips Head Screw C Large Screw 4 pcs 1 4 20 x 15 Stainless Steel Philips Head Screw D Small Bolt 12 pcs 1 4 20 x 20 Nickel Plated Hex Head Bolt E Dome Bolt 1 pc 3 8 16 x 35 Stainless Steel Hex Head B...

Reviews: