
2
Ins_YG-0923v2
Please ensure the supply is OFF and cannot be inadvertently reconnected.
1.
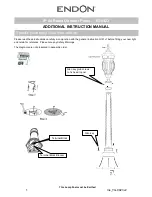
Install the supply cable for your Post, in the centre of the chosen position. There must be approximately 200mm of
cable above the mounting level. If installing on existing concrete base, use the holes in the base section as a
template to drill suitable fixing holes. Prepare with suitable ground fixing bolts (not supplied).
2.
If installing using the ground anchor plate, dig a hole in settled ground approximately 25 cm x 25 cm x 14 cm deep.
3.
See Step Diagrams above. Twist the three anchor bolts into the holes of the anchor plate. Ensure that when the
underside of the anchor plate is level with the base of the lamp, there is enough thread protruding to fit both the
spring washers and dome headed fixing nuts supplied. Wrap insulating tape around the thread.
4.
See Step Diagrams above. Pour 4 cm of prepared concrete in the bottom of the foundation hole. While the
concrete is still wet, place the assembled anchor plate in the concrete so that the bolts are vertical. Pour more
concrete into the foundation hole until it reaches ground level and the anchor plate is resting on the surface of the
concrete. Remove the insulation tape from the threaded part of the bolts, and double check there is enough thread
protruding to fit the spring washers and dome nuts when the base is fitted over the bolts- if not adjust accordingly.
Leave concrete to set.
5.
Thread cable connected to head unit through top section of centre post, and attach top section to head with
supplied grub screws or Allen screws. Thread cable from top section of centre post through base and attach top
section to base with Allen screws supplied.
6.
Remove the screw holding the terminal block bracket and connect the lamp post cable to the connector block as
follows, also referring to general instructions GI 41v1 for the terminal diagram.
Lamp post Live (Brown wire) to terminal block connector marked “L”.
Lamp post Neutral (Blue wire) to terminal block connector marked “N”.
Lamp post Earth (Green/yellow wire) to terminal block connector marked.
7.
Strip outer sheath from the end of supply cable for a length of approximately 20mm and separate Brown, Blue and
Green/Yellow wires and bare the ends for a length of approximately 5mm.
Connect the mains supply cable to the connector block as follows:
Incoming Live (Brown wire) to terminal block connector marked “L”.
Incoming Neutral (Blue wire) to terminal block connector marked “N”.
Incoming Earth (Green/Yellow wire) to terminal block connector marked.
8.
Fix the terminal block bracket back in position in the base with the screw removed earlier. This is essential
because the bracket is an Earth connection and also the terminal block cannot rest in any puddle which might
form under the Post.
9.
Secure base to anchor bolts using spring washers and dome nuts supplied, tightening firmly.
10.
Fit lamp bulb of type and wattage recommended on the lamp holder. Do not exceed maximum wattage indicated.
11.
Take the Cap and fit the top Finial with the hexagonal headed screw after unscrewing it and swapping positions.
Secure the Cap to the Head with the Cap fixing screws.
Switch on and try your new Post.
Light Fittings are designed for 240V ac, 50 Hz (220-240V ac)
Please retain these instructions for future reference.
Switch off and allow 10 minutes to cool before cleaning, or replacing bulb.
Clean only with a soft cloth or cloth soaked in warm water, do not use abrasive cleaning products.
Replace broken or cracked glass, this symbol will be on the Post.
Do not use until replaced, contact your retailer for replacements.
Care Information
Endon Lighting
LS9 0SE
20151110


