background image


By default the 

MODULATION OUTPUT


JACK

 is assigned to a special modulation 

track which together with 8 trigger outputs is a part of the drum track. Default 
modulation output range is 0...+5V and with the further firmware updates will be 
possible to reassign that modulation output jack to other generators or CV 
destinations. 


Assignable Modulation output jack works fully from the Firmware version 2 
and above 


G / SHUFFLE 

EXT. CV


SHUFFLE

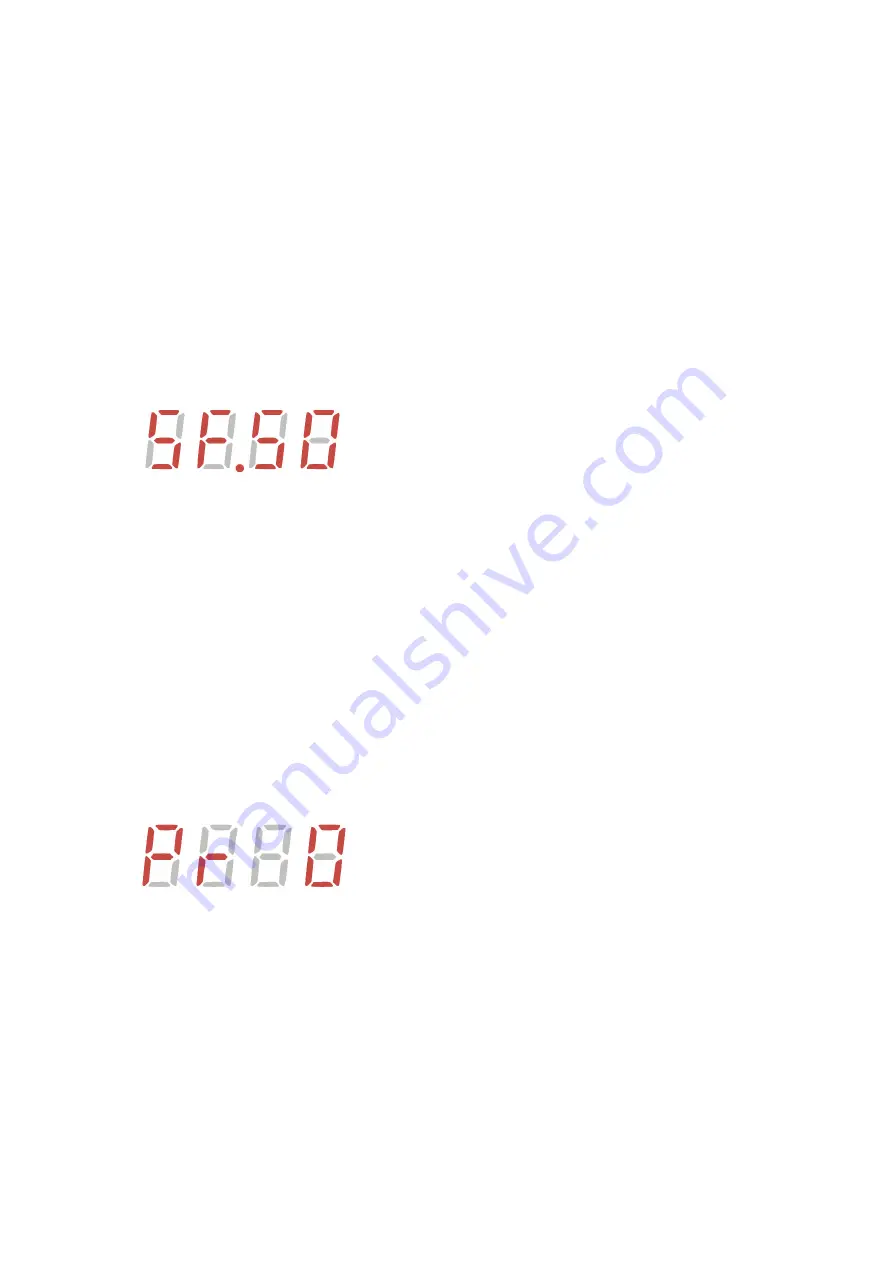
, groove or swing (shown at display as 

SF.50

 by default) – is settings 

per one of the 

TRACKS D/1/2/3

 inspired directly from famous AKAI

®

 MPC vintage 

machines by Roger Linn. It is set in values 0-50-100, which is a ratio of time 
duration between the first and second 16

th

 notes within each 8

th

 note. At value 

50% there is no swing. There is a perfect triplet swing at value 66%. Most used 
(and secret) value in electronic music producers used: 53-54%, which gives a 
light yet very musical feeling. 


Note: that parameter can be modulated under external CV 


H / PROBABILITY 

EXT. CV


PROBABILITY

 or humanization means some of the notes on the track can be 

accidentally skipped, imitating imperfection of the human nature. It is shown at 
display from 

PR_0 

to 

PR99

Zero setting corresponds to zero imperfections (default values on all the tracks). 
The higher the values increase from 0 to 99, the more notes or triggers will be 
skipped. 

Summary of Contents for GROUND CONTROL

Page 1: ...GROUND CONTROL FIRMWARE V 2 10 ...

Page 2: ...g The warranty covers replacement or repair as decided by us Please contact us via email for a return authorization before sending anything Shipping costs of sending a module back for servicing is paid by the customer Device complies with all EU regulations concerning RoHS lead free manufacturing and WEEE disposal VISIT US https endorphin es https youtube com user TheEndorphines https facebook com...

Page 3: ... 24 projects various record modes 101 style step input with step editing live recording and step editor with x0x style drum editing dedicated mute solo bus with momentary mute or quantized to pattern length action works also as a power supply for your modular system same as Shuttle Control or can be powered by a buss board like any other module arpeggiator roller patterns queue slides ties rests r...

Page 4: ...nect the module directly into the power buss board with supplied 16 16 ribbon cable like any other eurorack module 2 Power the module from the faceplate with 12 20V DC power adapter In that case the ribbon cable connector will act as a power supply For single sequencer connection you would need 500mA adapter For using the sequencer as a power supply the higher the amperage of the DC adapter the be...

Page 5: ...BLACK PANEL DESIGN NEW SILVER PANEL DESIGN ...

Page 6: ...INTERFACE ...

Page 7: ...the Shuttle Control outputs Gate outputs are 0 to 10V MODULATION TRACK with physical CV output Can be assigned to drum or melodic tracks with MIDI CC 01 Alternatively can be assigned to any track s note velocity The lowest recognizable MIDI note is C of 2nd octave MIDI note number 0 its output voltage corresponds to exact 5V The highest note is C of 8th octave MIDI note number 120 with the corresp...

Page 8: ... 2 3 buttons Long press enters the editor X0X for drums or step editor for melodic tracks When sequencer is running then short press enables live recording and long hold enters the live editor so you can preview all the changes on the fly Combination RECORD enters the save Pattern Project menu Combination RECORD RECORD saves all the current project settings as well as all unsaved tracks Combinatio...

Page 9: ...it with appropriate TRACK D 1 2 3 buttons Each track has a special dot symbol which is written in same combination on the track names as well as also duplicated with physical bumps on the rubber keys to help navigate those main tracks with the fingers when you are on the stage You can only select one of the four tracks at a time and depending on which track is active you can configure different ME...

Page 10: ...n corresponds to same bumps on the rubber buttons of the tracks In the menus display shows numeric values parameters of selected menu items hints etc small dot near each track letter appears if that pattern is altered and is currently unsaved That dot disappears if we switch to another not altered pattern After returning back to the unsaved pattern the dot will appear again Once we save the patter...

Page 11: ...ion LAST STEP MUTE BUS buttons TRANSPOSE sets the length of each drum track After choosing the track we adjust its amount of steps Note there are no patterns with the letters U and X Each track can have any of 24 available patterns or you can lock them with PATTERN PATTERN buttons so switching the patterns on one track will switch the same pattern s names on other tracks Once the patterns are lock...

Page 12: ...of patterns in the chain is 24 There is no specified song mode in the Ground Control however you can chain the patterns to switch one by one in the chain imitating that mode Once recorded pattern chains can also be saved with SAVE ALL combination RECORD RECORD and restored on the next project or module s power up PATTERNS LOCK By pressing both PATTERN PATTERN buttons we lock the patterns which mea...

Page 13: ... and gate information on appropriate 3 5 mm TRACK 1 2 3 OUTPUT JACKS as well as generate MIDI notes information on MIDI and USB MIDI outputs on the channels set in the MENU TEMPO M MIDI Keys cover range of two octaves F to E and we can shift transpose the keyboard up or down to play the keys in higher or lower octaves When no octaves are shifter TRANSPOSE buttons not lit C note E EXT CV correspond...

Page 14: ...row of O 0 Z 9 buttons to enter the exact parameter value along with the VALUE incremental buttons Save current pattern to another pattern via combo RECORD A Z and also to load open or save one of 24 projects via combo LAST STEP A Z to load another project and RECORD LAST STEP A Z to save current project into another project name cell TRANSPOSE VALUE CHANGE BUTTONS Initially OCT OCT buttons are us...

Page 15: ...the track by the amount of semitones up or down from the root C note marked with E EXT CV In that mode you can press single OCT OCT buttons to shift the keyboard to transpose to higher octave intervals up or down on the currently selected active TRACKS 1 2 3 LOCK SEMITONE TRANSPOSE In semitone transpose that mode short press the LAST STEP activates the LOCK SEMITOTE TRANSPOSE mode you will see LOC...

Page 16: ...tantly however sometimes is good to queue the mute for one or multiple tracks so it will be enabled or disabled at a certain time ALL DRUMS button will mute unmute immediately all the 8 drum triggers After ALL DRUMS unmute manually muted before tracks will be remembered You can press any MUTE buttons at a time to mute certain channels at once Muted tracks are remembered once you save the project R...

Page 17: ...s These buttons have additional labels as PAGE i e in certain menus they increment values by numbers of 10 or 16 depending on the context to speed up the values adjustment in the menus TIME DIVISION ARPEGGIATOR 1 32 1 4 Combination with TRACK D 1 2 3 1 32 1 4 buttons sets the TIME DIVISION of the track Same combination with the long hold 1 5 seconds sets the same track s division but in TRIPLETS 1...

Page 18: ...ally selected for the track will be recorded if recording the roller in real time see section below When we are on the active melodic TRACKS 1 2 3 combination 1 32 1 4 TRANSPOSE set the arpeggiator s OCTAVES RANGE 0 by default possible options 2 1 0 1 2 that means how many octaves the arpeggio pattern will sweep through Once the arpeggiator is running the notes you can change the modes on the fly ...

Page 19: ...e note buffer to allow seamless integration of modes Maximum notes amount in arpeggiator is 24 Pressing both OCT OCT buttons activates semitone transpose mode for the arpeggiator It works identically as normal semitone transpose i e C is the root note and pressing another note will transpose the notes in the arpeggiator as much semitones as needed One can also lock the mode to transpose all tracks...

Page 20: ...tracks at the same time with a single key press Pressing PROJ button during live pattern mode will exit that mode Pressing LAST STEP button in live pattern mode will enter the PROJECT LOAD menu and you can load any other project with A Z buttons without stopping the sequencer Loading a new project can be done smoothly on the fly when the current project is still running without losing the sync Onc...

Page 21: ...to another pattern letter press TRACK 1 2 3 A Z to save currently selected pattern on currently active track into ANOTHER track s pattern letter press LAST STEP A Z to save current project in one of 24 project letters A Z Unused clean project will show as unlit buttons and used projects will show as semi lit ones The project you are currently are in will blink To confirm the saving you will see SA...

Page 22: ...e disabled via SETTINGS menu TEMPO M MIDI C when pressing TEMPO button once you will see current project tempo or tempo of external clock if the sequencer engaged to external MIDI USB or jack clock Default project s BPM value is 120 Once you see that value on the display you can adjust it with VALUE buttons incrementing by 1 value at a press or long press to speed up the values changing with PAGE ...

Page 23: ...t also in Endorphin es Running Order Once the sequencer stopped the RECORD button is pressed once The existing sequence pattern on the current track is cleared and overwritten by a newly entered sequence of notes pauses rests Exit that mode by pressing RECORD or STOP without anything to record and the previous sequence will not be cleared This mode currently only works when the sequencer is not ru...

Page 24: ...eful to quickly fill the patterns on all the tracks EXAMPLE 2 OF STEP RECORD Press STOP and switch to drum TRACK D Select the pattern you wish to record and then press a few times one of the 1 8 piano keys In that case you will know exactly which drum trigger you are going to record and you can switch to different drum triggers to preview the drums After you decided which drum you are going to rec...

Page 25: ... via LAST STEP MUTE BUS button that corresponds to that track adjust the value with VALUE or PAGE buttons or using numerical 0 O Z 9 keys Remember to always save the pattern once you have entered the notes and you like it The easiest way to do that is PROJ RECORD RECORD from anytime the sequencer is running or stopped Last saved project or selected patterns saved are restored on the next module s ...

Page 26: ...r will add one extra step in the end of the currently edited pattern Pressing REST TEMPO anywhere in the editor will clear current step from any notes and associated flags Once you navigating thru the steps you can edit the notes and their features so called FLAGS Flag is a binary additional feature 0 or 1 which that step can have You can turn the notes on or off in the editor and then add or disa...

Page 27: ...g press RECORD Press MOD CC 1 32 button and you will get into the modulation step editor for the current pattern with the display showing C__1 meaning you are editing CC modulation 01 always CC 01 on the drum track default Rx Tx MIDI channel 10 Navigating thru the steps with the PAGE buttons you select the step on which you wish to adjust the modulation value and then either with VALUE buttons or ...

Page 28: ...drum trigger with 1 8 buttons Navigating thru the steps with the PAGE buttons you select the step the note s velocity on which you wish to adjust and then either with VALUE buttons or lower row of A N buttons you set the value from 0 to 127 Those 128 values correspond to 7 bit note s velocity message sent thru the MIDI and USB MIDI outputs on certain note appearance Velocity value 0 means the note...

Page 29: ...nd press of the same drum will preview it on the drums triggers and MIDI or USB MIDI outputs You can access the editor when the sequencer is stopped or when it is running LIVE EDITOR It is possible to adjust notes and drums step by step on the go i e when the sequencer is running Once the playback is running long press the RECORD button will enter into the live editor mode On the drum track you wi...

Page 30: ...LAY while the sequencer is running will reset all the sequences on all 4 TRACKS D 1 2 3 to the first step There is a row of separate track s reset inputs meaning you can apply a trigger on a certain track to reset it independently from others to the first step You can also manually reset certain tracks to the first step by TRACK D 1 2 3 PLAY combo Each separate track s reset is synchronized to the...

Page 31: ...d of Arturia Beatstep Pro 1010Music ALM Erica Synths Polyend VPME etc see more at https minimidi world PIN 5 RING current sink PIN 4 TIP current source PIN 2 SLEEVE shield One adapter is included with the module and you can use any third party ones just ensure it is B standard All the MIDI related settings can be accessed via the MENU TEMPO M MIDI see MIDI settings below USB MIDI HOST DEVICE I O T...

Page 32: ...we can decide if we wish to pass the MIDI flow from host to device or from device to host or have a host loopback a k a MIDI THRU in the MIDI MENU settings via TEMPO M MIDI Note for using the Ground Control with Arturia Beastep Pro Keystep Pro devices via USB Those devices mirror any MIDI notes that enter that via USB MIDI connection That may cause issues and double notes press or unwanted loops u...

Page 33: ...m is reserved for extra settings with the further firmware updates All arpeggiator settings are selected with 1 32 1 4 buttons which correspond to the following arpeggiator modes UP DOWN RANDOM ORDER Currently all drum roller settings are selected also with that buttons and correspond to drum rolls speed 1 32 1 4 the only roller setting Arpeggiator and rolls can be recorded in the live recording m...

Page 34: ...oves without necessity to patch something and hear the clock first Metronome settings are accessible with combination TEMPO C With the VALUE buttons we choose the following options CLC CLC means CLICK CLC none CLC D drum track CLC 1 2 3 certain melodic tracks When you choose any value other than the metronome is enabled and follows selected track s time division If you choose then metronome click ...

Page 35: ...ish its full cycle In FORWARD mode that means once the pattern will reach its last step the next step will be the first step from new pattern In BACKWARD mode the pattern should reach its first step and then will be switched to the new pattern In PENDULUM mode the pattern should go forward and then backward and only then will be switched to the next pattern i e will pass twice more steps before th...

Page 36: ...doesn t output the note at all value of 4 repeats the note on its step 4 times SLIDE D all T1 3 SLDE 0 100 Accepts only positive CV values 0 to 5V which correspond to 0 none to 100 max longest portamento slide time GATE LENGTH D 1 8 T 1 3 GATE 0 100 Defines the gate trigger length of a certain drum drigger or melodic track Accepts only positive values 0 to 5V which correspond from 0 to 100 max CC ...

Page 37: ...Modulation output jack settings are accessible in the menu via TEMPO F MOD OUT combination In that menu ALL DRUMS button defines whether the MOD OUT jack outputs CC 01 modulation or velocity by altering D 1 V and D 1 M letters V means velocity and M means modulation PAGE buttons will change the polarity or the velocity or modulation output unipolar 0 to 5V default or bipolar 5v 5v with D 1 Vb lett...

Page 38: ... vintage machines by Roger Linn It is set in values 0 50 100 which is a ratio of time duration between the first and second 16th notes within each 8th note At value 50 there is no swing There is a perfect triplet swing at value 66 Most used and secret value in electronic music producers used 53 54 which gives a light yet very musical feeling Note that parameter can be modulated under external CV H...

Page 39: ...times note repeat on the step where RATCHET FLAG was enabled With 0 value of ratchet the whole note will not be fired Additional possible settings are FWRD means FORWARD ratchets amount increases by 1 on every pattern cycle RAND means RANDOM random ratchets amount is set every time the note will ratchet on a certain track It is very interesting to modulate the amount of ratchets per track using ex...

Page 40: ...um value of 99 the slide time is approximately 1 second Note that parameter can be modulated under external CV K SYNCHRONIZATION DIVIDERS That menu sets the MASTER CLOCK synchronization source JACK INTERNAL EXTERNAL MIDI USB HOST USB DEVICE and their INPUT OUTPUT DIVIDERS MASTER CLOCK SOURCE Selecting the master clock is made via MENU TEMPO K VALUE The possible options are INT means internal Groun...

Page 41: ...o 1 original 24 PPQN output clock typically used for DIN sync o 2 24PPQN 2 twice slower than original clock output o 4 output clock in 24PPQN 4 o 32 output clock in 32nd notes corresponds to 24PPQN 3 o 16 output clock in 16th notes corresponds to 24PPQN 6 DEFAULT CLOCK OUTPUT SET FROM CLOCK OUT JACK o 8 output clock in 8th notes corresponds to 24PPQN 12 o 4 output clock in 4th notes corresponds to...

Page 42: ...native a k a Korg MIDI clock standard Choose this option when you synchronize Ground Control to other master MIDI device with twice faster 48PPQN clock PQ 12 corresponds to PPQN12 Choose this option when you synchronize Ground Control to other master MIDI device with twice slower 12PPQN clock With PQ 28 and PQ 12 options you can adjust your Ground Control to essentially be twice faster or twice sl...

Page 43: ...ernal CV M MIDI That menu covers all the MIDI and some other device specific or global settings New settings might be added with the further firmware updates please ensure you are running the latest firmware Once we press TEMPO M MIDI combination we enter the SETTINGS menu and see the lower row of certain keys light up Each of those lit up keys defines the menu item we can select or adjust By pres...

Page 44: ...ture if for example you want to send the master clock and all the notes from your computer DAW connected to DEVICE to be send also to Beatstep Pro as a slave source connected to the USB HOST Default value is ON F H LPB means USB HOST LOOPBACK or MIDI THRU Everything that is routed into USB MIDI HOST IN will be duplicated and routed thru same USB MIDI HOST OUT That is useful to use any USB MIDI ada...

Page 45: ...esn t fit the scale are either ignored to tuned to the nearest ones Ground Control offers a set of a few predefined music scales any of which can be edited into the custom scale There is only one custom scale per each musical track and tracks 2 and 3 can follow the same music scale as track 1 CHRM means chromatic music scale where all the 12 keys are active MAJR major MINR minor MMIN melodic minor...

Page 46: ...the DRUM MAPPING menu meaning we can set the custom MIDI notes mapping for each of 8 drum trigger notes Default DRUM MAPPING is the following P 1 TRIGGER 1 C1 Q 2 TRIGGER 2 C1 R 3 TRIGGER 3 D1 S 4 TRIGGER 4 D1 T 5 TRIGGER 5 E1 V 6 TRIGGER 6 F1 W 7 TRIGGER 7 F1 Y 8 TRIGGER 8 G1 With drum buttons P 1 Y 8 we select the certain drum trigger we want to change and with PAGE buttons we select its assigne...

Page 47: ... updates Most of the settings from the TEMPO A N keys are global settings and are applied to all projects at once Other settings are related to the project only and certain channel Each of 24 PROJECTS are stored the SD card into separate folders which correspond to that project s name A to Z The global settings are set for all the 24 projects in GlobalSettings txt file USB routing last loaded proj...

Page 48: ... every 4 CV outputs READ When you are using the calibration for the first time there are no certain values to be read literally default ones 3000 0000 3000 If you calibrate GC after you already calibrated it in the past press READ and all adjusted CV values are shown in the tables below the button Now press SET ALL TO 3V 0V 3V one by one and each time measure the CV outputs value with the voltmete...

Page 49: ...w features or bug fixes Feel free to write any bugs features ideas or improvements to beta endorphin es To update the firmware of your Ground Control sequencer first download the latest firmware file once available on Endorphin es website Take the sequencer out of your rack and eject micro SD from it Insert that card into your computer using SD adapter or card reader sold separately Unzip GC FIRMW...

Page 50: ...are design direction and manual by Andreas Zhukovsky Core engine programming by BSVi UI programming by Xavier Galai Kouik03 SD card updater by Vitaly a k a embedder Rubber keys 3D design by Simone Fabbri 3D printed light frames for the rubber keys by Leonardo Cardinale Video review and valuable feedback by Ziv Eliraz Loopop Manual proofreading and demo videos by Wisdom Water Endorphin es are made ...

Page 51: ...the first step quantized to each track s time division TRACK D 1 2 3 PATTERN PATTERN TRACK D 1 2 3 A Z piano keys A Z selecting the pattern on active track TRACK D 1 2 3 A Z sequence of letters entering the patterns chain TRACK 1 2 3 TRANSPOSE shift currently selected pattern by 1 octave up or down RECORD on sequencer stop starts step record mode RECORD on sequencer start starts live recording mod...

Page 52: ... the pattern save function RECORD RECORD saves all project s settings and all unsaved patterns RECORD A Z saves current pattern on any of 24 patterns cells in the current track RECORD TRACK 1 2 3 A Z saves current pattern on any of 24 patterns cells in the other selected TRACK 1 2 3 RECORD LAST STEP A Z saves current project into any of 24 project cells Keys with already non empty projects will li...

Page 53: ...attern rotation settings TEMPO C enabling the metronome click TEMPO D setting the tracks direction on current pattern TEMPO E settings for 4 external CV inputs modulation matrix TEMPO F settings for the modulation CV output jack settings TEMPO G setting the shuffle value on the current track TEMPO H setting the notes probability on the current track TEMPO I setting the ratchets amount on the curre...

Reviews: