background image

 · English

5.  Then insert the guide pins of the backrest into 

the bearing blocks of the frame, as shown. 

Installation and use

6.  Take  the  hand  control  in  one  hand  and  pull 

it  away  from  the  lift  until  the  cable  is  slightly 
 tensioned.

7.  Take  the  hand  grip  with  the  other  hand 

and  fold  up  the  backrest  until  it  reaches  the 
stop  position  of  the  base  plate  (see  figure).

➤  

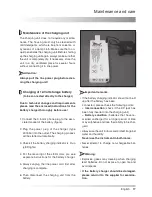
Attention:  Always  make  sure  that  both 
guide  pins  are  inserted  in  the  bearing 
blocks!

  

bearing block  ·  

  

guide pin (red)

 (((((

  

hand grip

1

1

Summary of Contents for Akkulift

Page 1: ...Operating Instructions Akkulift Bath lift FELIX English...

Page 2: ...tub 14 Maintenance and care 16 Maintenance of the Akkulift 16 Maintenance of covers 16 Assembly of new cushion plugs for cover of Akkulift 16 Maintenance of the charging unit 17 Charging of 12 Volt st...

Page 3: ...ting position Akkulift can also be adjusted to variable positions The drive is housed in a sealed hood the control electronics in the sealed hand control It is there fore also possible to use Akkulift...

Page 4: ...tain the Akkulift in a perfect hygienic con dition Do not use any detergents containing acetic acid for cleaning the Akkulift The charging unit must only be used outside the bathroom in a dry environm...

Page 5: ...should never be left unattended in the bath d Before using the bath lift a test run should be carried out for raising lowering and stopping and also for checking the Emergency Stop the red button on t...

Page 6: ...tructions 7 4 x Suction cup transparent for assembling on the underside of base plate Installation and use If one of these parts should be missing please inform your dealer Unpack the charging unit fi...

Page 7: ...The rear suction cups should be located at the bevelled edge of the bathtub 4 Make sure that the lever for the central suction cup black is in a raised position Now press down the suction lever PRESS...

Page 8: ...l in one hand and pull it away from the lift until the cable is slightly tensioned 7 Take the hand grip with the other hand and fold up the backrest until it reaches the stop position of the base plat...

Page 9: ...risk that the backrest is pushed against it the lift must be installed outside the bathtub and driven to its upper position before it is placed into the bathtub again However it may be possible that t...

Page 10: ...lation and use Attaching removing covers The covers can be attached and removed very easily To fix the cover place it correctly on the backrest plate seat and press the fastening buttons com Backrest...

Page 11: ...obs from the side flaps and seat with two fingers The bath lift can also be used without covers Seat Cover Installation head rest optional Insert the two guide rods of the headrest into the two holes...

Page 12: ...mediately see Charging the Storage Battery The charging status of the storage battery is mo nitored by electronic control elements After one lifting movement the storage battery needs ap prox 30 secon...

Page 13: ...est on the sides of the bathtub 4 If the bathtub is too tall to allow side flaps to lay flat then you can use available height adapters purchase separately to raise your lift to the proper height Heig...

Page 14: ...lap If the lift is to remain inside the bathtub then remove the battery from the battery compartment This will prevent unintended discharging of the storage battery Installation and use Removing the l...

Page 15: ...te The backrest cannot be removed from the frame when it is completely fol ded down to the seat because the backrest is then in a locked position again Lift the backrest to the angle as shown fig and...

Page 16: ...an be machine washed up to 140 F using a non bio washing powder detergent which does not contain any enzymes Please be aware that any oil based pro ducts that you add to your bath water may stain the...

Page 17: ...type 400350 into the outlet The charging process will be started automatically 3 Check if the battery charging indicator is lit up LED lights 4 For the meaning of the LED colors pls see separate instr...

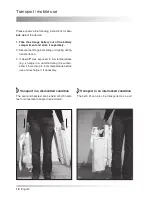
Page 18: ...ing or slipping during transportation 3 If Akkulift was exposed to low temperatures e g storage in a vehicle during the winter allow it to warm up to room temperature before use and recharge it if nec...

Page 19: ...th of base plate approx 21 5 Load max 308 lbs Weight incl storage battery approx 34 8 lbs Weight storage battery approx 2 2 lbs Motor unit without battery approx 15 lbs Seat unit approx 17 6 lbs Durat...

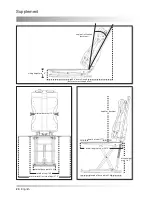
Page 20: ...width of base plate 12 2 height of backrest 22 depth of seat 17 7 sitting height max 16 1 length of base plate 21 5 overall length of seat 22 75 12 40 sitting height min 3 angle of inclination backre...

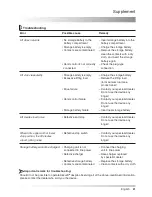
Page 21: ...ailure Contact your specialist dealer Do not use the device any longer Storage battery failure Insert new storage battery Lift creates loud noise Defective end stop Contact your specialist dealer Do n...

Page 22: ...lify for our warran ty the customer must present an original invoice delivery note or date stamp of the authorised dealer Damage due to natural wear or improper treat ment is not part of our warranty...

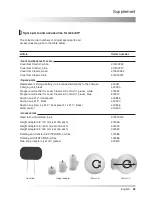
Page 23: ...400350 Stopper and washer for cover Classic Comfort 1 piece white 415252 Stopper and washer for cover Classic Comfort 1 piece blue 415312 Suction cup 2 transparent 400855 Suction cup 3 black 400900 S...

Page 24: ...general technical remarks on the product la bel there are two entries which are important for maintenance repair and guarantee claims WW YY Indicates the year and week of production of Akkulift SN In...

Page 25: ...ns 5 Head rest 11 23 Height adapter 13 23 Note concerning Electromagnetic Compatibility EMC 5 Inserting the Akkulift into the bathtub 7 Installation and use 6 LED lamp 17 Lever of suction cup 7 Liftin...

Page 26: ...e Medical Please enter your specialist dealer s address USA Drive Medical Design Manufacturing 99 Seaview Boulevard Port Washington NY 11050 Attn Customer Service Phone 877 224 0946 Fax 516 998 4601 E...

Reviews: