Installation and commissioning
HS 55 (Batch Mode)
34
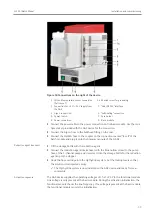
This leads to the following activation sequence:
}
Switch on the Hg/hydride system.
}
Switch on the AAS device.
ü
First measurements can be started.
4.3.4
Adjusting the autosampler for the graphite tube furnace with the titanium cannula
}
Start the ASpect LS or ASpect CS program.
}
In the Quick Start window, select the HydrEA method and initialize the device config-
uration.
}
Close the window with OK.
}
Click the Autosampler button. Select the Techn. parameters tab and click the Align
sampler to furnace button.
ü
The software guides you through the adjustment in the x and y direction and the
lowering of the titanium cannula step by step.
}
Insert the adjustment aid:
– novAA 800, contrAA 800: insert the adjustment aid with the crosshair into the
pipetting opening.
– ZEEnit 700 P, ZEEnit 700 Q, ZEEnit 650 P: open the Zeeman furnace and remove
the left furnace window. Remove the graphite tube from the furnace. Insert the
adjustment with the hole from the left into the furnace shell.
}
Continue following the software instructions:
– Use the left / right buttons to align the autosampler in the X-direction (parallel to
the optical axis) with the crosshair or the dosing opening. Use the adjusting
screws on the sides for fine adjustment.
– Turn the adjusting screw to perform the adjustment in the Y-direction (sample
chamber depth).
– Tighten the screws and secure the setting with lock nuts.
– Use the software to set the Z-direction: Lower the titanium cannula until the can-
nula is flush with the top edge of the adjustment aid.
}
Click the Next button to save the settings in the software.
}
Remove the adjustment aid.
}
Prepare the graphite tube:
– novAA 800, contrAA 800: insert the dosing funnel into the pipetting opening.
– ZEEnit 700 P, ZEEnit 700 Q, ZEEnit 650 P: insert the left furnace window, insert
the standard graphite tube or coated graphite tube, close the Zeeman furnace.
}
Adjust the sample injection depth into the graphite tube:
– Loosen the clamping nut, place the titanium cannula on the tube bottom and
check the position of the cannula with the furnace camera if necessary.
– Secure the cannula with the clamping nut.
– Set the injection depth above the tube bottom (approx. 0.5 mm).
}
Click Finish to complete the adjustment.
ü
The autosampler has now been adjusted and is ready for measurements.


