background image

Proline Promass 500

Use in protective systems

Hauser

25

Sensor

Sensor

adjustment

Mass flow

offset

Variable

adjustment

Mass flow

factor

Volume flow

offset

Volume flow

factor

Density factor

Density offset

=
0

=
1

=
0

=
0

=
1

=
1

Expert

  A0023070-EN

=

Sensor

External

compensation

Temperture

mode

Expert

Internal

measured

value

  A0031477-EN

Summary of Contents for HART Proline Promass 500

Page 1: ...Products Solutions Services Special Documentation Proline Promass 500 Functional Safety Manual Keep cover h ti g t w h i l e S p a n nu ng ö f f n e n SD01729D 06 EN 08 20 71488866 2020 07 31 ...

Page 2: ......

Page 3: ...f the safety function 15 5 2 Restrictions for use in safety related applications 16 6 Use in protective systems 19 6 1 Device behavior during operation 19 6 2 Parameter configuration for safety related applications 20 6 3 Proof testing 31 7 Life cycle 44 7 1 Requirements for the personnel 44 7 2 Installation 45 7 3 Commissioning 45 7 4 Operation 45 7 5 Maintenance 45 7 6 Repair 45 7 7 Modification...

Page 4: ...Manufacturer s Declaration Proline Promass 500 4 Endress Hauser 1 Manufacturer s Declaration A0037141 EN ...

Page 5: ...e for Output input 4 All options Order code for Additional approval Option LA SIL Safety related output signal 4 to 20 mA output input 1 Failure current 3 6 mA or 21 mA Assessed measured variable function Monitoring of mass flow volume flow or density Safety function s Min Max Range Device type according to IEC 61508 2 Type A Type B Mode Low Demand Mode High Demand Mode Continuous Mode 1 Valid har...

Page 6: ...Single channel service HFT 0 SIL 2 capability SIL 3 capability Multi channel service HFT 1 SIL 2 capability SIL 3 capability FMEDA Safety function s Min Max Range Device model A1 A2 Option BA BB Option CA CB Option BA BB Option CA CB CC λDU 1 127 FIT 127 FIT 145 FIT 146 FIT λDD 1480 FIT 1439 FIT 2131 FIT 2172 FIT λSU 994 FIT 957 FIT 1172 FIT 1209 FIT λSD 1319 FIT 1348 FIT 2131 FIT 2102 FIT SFF Saf...

Page 7: ...alue takes into account all failure types of the electronic components as per Siemens SN29500 5 All diagnostic functions are carried out at least once during this time 6 Maximum time between fault detection and fault response 7 The process safety time amounts to the diagnostic test interval 100 calculation as per IEC 61508 8 MTTFd as per ISO 13849 IEC 62061 also includes soft errors sporadic bit e...

Page 8: ...Certificate Proline Promass 500 8 Endress Hauser 2 Certificate A0033748 ...

Page 9: ...s menu Operating Instructions Operating concept Operating Instructions 3 3 Symbols 3 3 1 Safety symbols DANGER This symbol alerts you to a dangerous situation Failure to avoid this situation will result in serious or fatal injury WARNING This symbol alerts you to a dangerous situation Failure to avoid this situation can result in serious or fatal injury CAUTION This symbol alerts you to a dangerou...

Page 10: ...erating tool A0028665 Write protected parameter 3 3 3 Symbols in graphics Symbol Meaning 1 2 3 Item numbers A B C Views A A B B C C Sections 3 4 Supplementary device documentation For an overview of the scope of the associated Technical Documentation refer to the following W M Device Viewer www endress com deviceviewer Enter the serial number from nameplate Endress Hauser Operations App Enter the ...

Page 11: ...A01532D Promass P 500 BA01533D Promass Q 500 BA01534D Promass S 500 BA01535D Promass X 500 BA01536D Description of Device Parameters Measuring device Documentation code Promass 500 GP01060D Technical Information Measuring device Documentation code Promass A 500 8A5B TI01280D Promass A 500 8A5C TI01375D Promass E 500 TI01282D Promass F 500 TI01222D Promass H 500 TI01283D Promass I 500 TI01284D Prom...

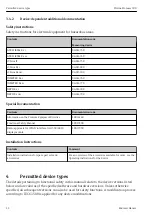
Page 12: ...sure Equipment Directive SD01614D Functional Safety Manual SD01729D Radio approvals for WLAN interface for A309 A310 display module SD01793D Installation Instructions Contents Comment Installation instructions for spare part sets and accessories For an overview of the accessories available for order see the Operating Instructions for the device 4 Permitted device types The details pertaining to fu...

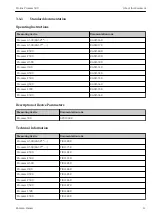
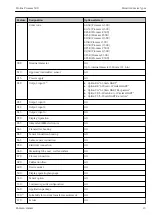
Page 13: ... 4 20mA Wireless HART Option CA 4 20mA HART Ex i passive Option CB 4 20mA Ex i Wireless HART Option CC 4 20mA HART Ex i active 021 Output input 2 All 022 Output input 3 All 023 Output input 4 All 030 Display Operation All 035 Integrated ISEM electronics All 041 Transmitter housing All 042 Sensor connection housing All 045 Cable sensor connection All 050 Electrical connection All 060 Measuring tube...

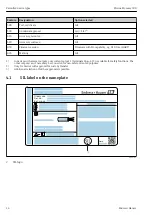
Page 14: ...th SIL capability e g 01 00 zz HART 895 Marking All 1 In devices with several outputs only current output 1 terminals 26 and 27 is suitable for safety functions The other outputs can if necessary be connected for non safety oriented purposes 2 Only for devices with approval for custody transfer 3 Additional selection of further approvals is possible 4 1 SIL label on the nameplate Order code Ser no...

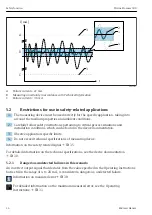
Page 15: ...connected for non safety oriented purposes The safety related output signal is fed to a downstream automation system where it is monitored for the following Overshooting and or undershooting of a specified limit value for the flow or the density of the medium The occurrence of a fault e g failure current 3 6 mA 21 mA interruption or short circuit of the signal line The safety related errors are br...

Page 16: ...uations and installation conditions which can be found in the device documentation 3 Observe application specific limits 4 Do not exceed technical specifications of measuring device Information on the safety related signal 15 For detailed information on the technical specifications see the device documentation 10 5 2 1 Dangerous undetected failures in this scenario An incorrect output signal that ...

Page 17: ...the measuring device 1 Carefully select the nominal diameter of the measuring device in accordance with the application s expected flow rates The maximum flow rate during operation must not exceed the specified maximum value for the sensor 2 In safety related applications it is advisable to select a limit value for monitoring the minimum flow that is not less than 5 of the specified maximum value ...

Page 18: ...measured value is transmitted via the 4 20 mA current output the measuring device s relative measured error is made up of the contribution of the digitally determined measured value and the accuracy of the analog current output These contributions which are listed in the device documentation apply under reference operating conditions and can depend on the sensor version ordered If process or ambie...

Page 19: ... in the initial seconds of this start up phase No communication with the device is possible via the interfaces during the start up phase After the start up phase the device switches to the normal mode measuring operation 6 1 2 Behavior of device during operation The device outputs a current value which corresponds to the measured value to be monitored This value must be monitored and processed fur...

Page 20: ...cs event is reset where applicable This behavior occurs in the case of the following diagnostic messages 803 Current loop diagnostic message 6 2 Parameter configuration for safety related applications 6 2 1 Calibration of the measuring point The measuring point is calibrated via the operating interfaces A wizard guides you systematically through all the submenus and parameters that have to be set ...

Page 21: ...teps 1 Makes sure that the preconditions are met The measuring device checks whether the user has correctly configured a predefined set of parameters for the safety function If the result is positive the device continues with the activation of the SIL mode If the result is negative the sequence is not permitted or is aborted and the device does not continue with the activation of the SIL mode 2 Au...

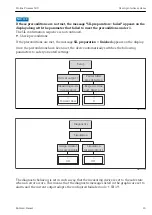
Page 22: ...ol local display and WLAN Follow the specified locking sequence 1 Ensure preconditions are met unit user defined unit Partial filled pipe detection Assign process variable Current output 1 Setup Assign current output 1 Partial filled pipe detection Current span Failure mode Assign process variable Mass flow or Vol flow or Density 4 20 mA or or 4 20 mA US 4 20 mA NAMUR Min or Max Off Density or Sel...

Page 23: ...nditions have been met the device automatically switches the following parameters to safety oriented settings Setup Current output 1 Partial filled pipe detection Measuring mode 4 mA value Forward flow Response time part filled p d 0 A0015326 EN Simulation Assign simulat process variable Simulation current output 1 Off Diagnostics Off A0015327 EN The diagnostic behavior is set in such a way that t...

Page 24: ...e 140 Sensor signal diagnostic message 274 Main electronic failure diagnostic message 374 Sensor electronic ISEM faulty diagnostic message 830 Sensor temperature too high diagnostic message 831 Sensor temperature too low diagnostic message 834 Process temperature too high diagnostic message 835 Process temperature too low diagnostic message 913 Medium unsuitable diagnostic message Density damping ...

Page 25: ...Sensor Sensor adjustment Mass flow offset Variable adjustment Mass flow factor Volume flow offset Volume flow factor Density factor Density offset 0 1 0 0 1 1 Expert A0023070 EN Sensor External compensation Temperture mode Expert Internal measured value A0031477 EN ...

Page 26: ...Use in protective systems Proline Promass 500 26 Endress Hauser Output Current output 1 Start up mode Min Communication HART configuration 0 HART address Expert A0015328 EN ...

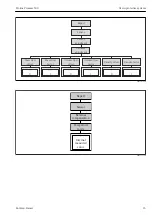
Page 27: ...d ipe et Low value part filled p d ipe et Temp coeff sound velocity 1 Reference sound velocity 1 Gas type 1 Failure mode Installation direction Assign urrent outpu c t Current span 4 mA value 20 mA value Damping Medium Pressure compensation Partial filled pipe detection Max damping part filled pipe det Assign low flow cutoff Off value low flow cutoff On value low flow cutoff Pressure shock suppres...

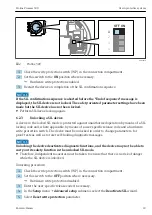
Page 28: ...firm that all the parameter values have been defined correctly If the SIL locking code has been entered correctly the message End of sequence appears on the display 7 Press the key to confirm The SIL mode is now activated Recommendation P o w e r I O 2 I O 3 I O 3 OFF ON 1 2 3 4 4 3 ES C 2 Po we r op en pres s op en pres s ES C E I O 4 Po we r I O 2 I O 3 1 A0029675 1 Proline 500 digital ...

Page 29: ...tion by means of a SIL locking code and where applicable by means of a user specific release code and a hardware write protection switch The device must be unlocked in order to change parameters for proof tests as well as to reset self holding diagnostic messages NOTICE Unlocking the device deactivates diagnostic functions and the device may not be able to carry out its safety function in the unlo...

Page 30: ...oline Promass 500 30 Endress Hauser 6 Enter the SIL locking code 7452 If the SIL locking code has been entered correctly the message End of sequence appears on the display 7 Press the key to confirm The SIL mode is now deactivated ...

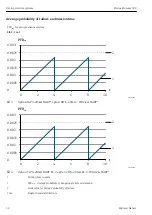
Page 31: ...erval and this must be taken into account when determining the probability of failure PFDavg of the sensor system In the case of a single channel system architecture the average probability of failure PFD avg of the sensor is derived from the proof test interval Ti the failure rate for dangerous undetected failures λ du the proof test coverage PTC and the assumed mission time by close approximatio...

Page 32: ... 0005 0 0 2 4 6 8 10 PFDa t A0031607 3 Option BA 4 20mA HART option BB 4 20mA Wireless HART 2 1 0 003 0 0025 0 002 0 0015 0 001 0 0005 0 0 2 4 6 8 10 PFDa t A0031609 4 Option CA 4 20mA HART Ex i option CB 4 20mA Ex i Wireless HART t Mission time in years 1 PFDavg Average probability of dangerous failure on demand 2 Limit value for average probability of failure 1oo1 Single channel architecture ...

Page 33: ...49 Device restart and testing of current output 1 34 98 Testing with a secondary standard volume flow and mass flow 37 98 Testing with a secondary standard density 39 99 Testing with a secondary standard and testing of current output 1 41 1 Proof Test Coverage Other recommendations It is advisable to perform a visual inspection on site As part of the visual inspection of the transmitter ensure tha...

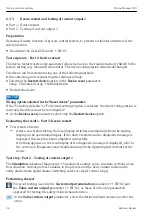
Page 34: ...e reconfigured In the Device reset parameter select only the Restart device option Evaluating the results Part 1 Device restart Test restart of device After a successful startup the local display switches automatically from the startup display to the operational display If the device restarts and no diagnostic message is displayed this step has been completed successfully If nothing appears on the...

Page 35: ...nts for the measuring equipment DC current measuring uncertainty 0 2 DC current resolution10 µA 2 1 A 3 4 A0034446 5 External verification taking the example of a passive current output 1 Automation system with current input e g PLC 2 Power supply unit 3 Ammeter 4 Transmitter 1 Connect the ammeter to the transmitter by looping it in series into the circuit 2 Connect the power supply unit Evaluatio...

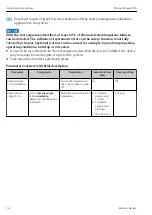
Page 36: ...ions build up or corrosion If one of the test criteria from the test sequences described above is not fulfilled the device may no longer be used as part of a protective system Take measures to reduce systematic errors Parameter overview with brief description Parameter Prerequisite Description Selection User entry Factory setting Current output 1 to n simulation Switch the simulation of the curren...

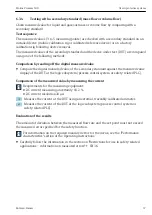
Page 37: ...d against the measured value display of the DUT at the logic subsystem process control system or safety related PLC Comparison of the measured value by measuring the current Requirements for the measuring equipment DC current measuring uncertainty 0 2 DC current resolution10 µA 1 Measure the current at the DUT using an external traceably calibrated ammeter 2 Measure the current of the DUT at the l...

Page 38: ...ot fully covered by the test Systematic faults can be caused for example by medium properties operating conditions build up or corrosion If one of the test criteria from the test sequences described above is not fulfilled the device may no longer be used as part of a protective system Take measures to reduce systematic errors Detailed information on Orientation Medium properties Operating conditio...

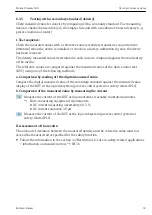
Page 39: ... DUT using one of the following methods a Comparison by reading off the digital measured value Compare the digital measured value of the secondary standard against the measured value display of the DUT at the logic subsystem process control system or safety related PLC b Comparison of the measured value by measuring the current 1 Measure the current at the DUT using an external traceably calibrate...

Page 40: ...ot fully covered by the test Systematic faults can be caused for example by medium properties operating conditions build up or corrosion If one of the test criteria from the test sequences described above is not fulfilled the device may no longer be used as part of a protective system Take measures to reduce systematic errors Detailed information on Orientation Medium properties Operating conditio...

Page 41: ...ss control system or safety related PLC Comparison of the measured value by measuring the current Requirements for the measuring equipment DC current measuring uncertainty 0 2 DC current resolution10 µA 1 Measure the current at the DUT using an external traceably calibrated ammeter 2 Measure the current of the DUT at the logic subsystem process control system or safety related PLC Evaluation of re...

Page 42: ...rent of the DUT at the logic subsystem process control system or safety related PLC Measure the current at the DUT using an external traceably calibrated ammeter Compare the current values Connecting the measuring equipment and external testing Connecting the measuring equipment in the measuring circuit External check of the passive current output Requirements for the measuring equipment DC curren...

Page 43: ...tic errors on the safety function is not fully covered by the test Systematic faults can be caused for example by medium properties operating conditions build up or corrosion If one of the test criteria from the test sequences described above is not fulfilled the device may no longer be used as part of a protective system Take measures to reduce systematic errors Detailed information on Orientatio...

Page 44: ...er option and can be retrofitted on all measuring devices Please contact your Endress Hauser service or sales organization to retrofit the device 7 Life cycle 7 1 Requirements for the personnel The personnel for installation commissioning diagnostics and maintenance must fulfill the following requirements Trained qualified specialists must have a relevant qualification for this specific function a...

Page 45: ... the Operating Instructions 11 Alternative monitoring measures must be taken to ensure process safety during configuration proof testing and maintenance work on the device 7 6 Repair Repair means restoring functional integrity by replacing defective components Components of the same type must be used for this purpose It is recommended to document the repair This includes specifying the device seri...

Page 46: ...h the note Used as SIL device in protection system when returning the defective device Please also refer to the Return section in the Operating Instructions 7 7 Modification Modifications are changes to devices with SIL capability already delivered or installed Modifications to devices with SIL capability are usually performed in the Endress Hauser manufacturing center Modifications to devices wit...

Page 47: ...Measuring device 3 Valve 4 Automation system An analog signal 4 20 mA proportional to the flow or density is generated in the transmitter This is sent to a downstream automation system where it is monitored to determine whether it falls below or exceeds a specified limit value The safety function mass flow volume flow or density monitoring is implemented in this way ...

Page 48: ... systems A Min alarm B Max alarm C Range monitoring Safety function is triggered Permitted operating status 8 2 Verification or calibration The SIL mode must be disabled in order to verify the measuring point with Heartbeat Technology or calibrate the measuring point NOTICE To use the device in a safety function again following a verification or calibration the configuration of the measuring point...

Page 49: ... insert a spacer between the two sensors The spacer must be at least half as long as the sensor NOTICE Note the following if a fault is detected in one of the redundantly operated devices during the proof test Check the other devices to see if the same fault occurs there 8 4 Version history Version Changes Valid as of firmware version SD01729D 06 xx 08 20 Addition Device Model A1 A2 option CC 4 to...

Page 50: ......

Page 51: ......

Page 52: ...www addresses endress com ...

Reviews: