background image

Oxymax H COS21

Maintenance

Hauser

9

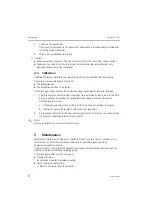
2. Clean and dry the membrane.

3. After about 10 minutes, measure the oxygen saturation index in air (without 

recalibration).

4. The measured value should be near to 102% SAT.

• If necessary, replace a defective membrane or one which cannot be cleaned any more.
• Recalibration.

(if desired or required)

5.1

Cleaning the sensor

To ensure reliable measurement, the sensor must be cleaned at regular intervals. The frequency 
and intensity of the cleaning operation depend on the measuring medium.

Clean the sensor:
• before every calibration
• at regular intervals during operation as necessary
• before returning it for repairs.

Depending on the type of soiling, proceed as follows:

"

Caution! 
After cleaning, rinse the sensor with copious amounts of clean water.

5.2

Regenerating the sensor

5.2.1

Replacing the sealing ring

Replacing the sealing ring is only necessary when it is visibly damaged. For replacement, use only 
original sealing rings.

5.2.2

Replacing the electrolyte

#

Warning! 
Risk of acid burns!
The electrolyte is very caustic. You must follow the appropriate occupational safety regulations. 
Always wear protective gloves and goggles with handling electrolytes.

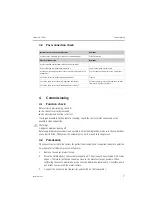
Type of soiling

Cleaning

Salt deposits

Immerse the sensor in drinking water or in 1-5% hydrochloric acid 
for a few minutes. Afterwards, rinse it with copious amounts of water.

Dirt particles on the sensor body

(not cap!)

Clean the sensor body mechanically with water and a suitable brush.

Dirt particles on the membrane cap or the 
membrane

Clean with water and a soft sponge.

Summary of Contents for Oxymax H COS21

Page 1: ...BA244C 07 en 09 06 71032330 Operating Instructions Oxymax H COS21 Dissolved oxygen sensor...

Page 2: ...tified electrician Technical personnel must have read and understood these Operating Instructions and must adhere to them Before commissioning the entire measuring point check all the connections for...

Page 3: ...e contents are undamaged Inform the supplier about damage to the delivery contents Keep the damaged products until the matter has been settled Check that the scope of delivery is complete and agrees w...

Page 4: ...2 2 Mounting location Select the installation location so that there is easy access for later calibration Make sure that upright posts and assemblies are secured safely and vibration free For immerse...

Page 5: ...ll and connect the oxygen sensor Caution Do not install the sensor suspended from the cable Screw the sensor into the assembly so that the cable is not twisted Avoid exerting excessive tensile force o...

Page 6: ...Wiring Warning The electrical connection must only be carried out by a certified electrician Technical personnel must have read and understood the instructions in this manual and must adhere to them...

Page 7: ...eric air The air should be saturated with water vapour Therefore install the sensor as close to the water surface as possible When calibrating the sensor membrane make sure the membrane remains dry Th...

Page 8: ...peration by taking it out of the fluid drying it and then measuring the oxygen saturation index at air after 10 minutes Decide using the results a If the measured value is not at 102 2 SAT you have to...

Page 9: ...ing proceed as follows Caution After cleaning rinse the sensor with copious amounts of clean water 5 2 Regenerating the sensor 5 2 1 Replacing the sealing ring Replacing the sealing ring is only neces...

Page 10: ...the membrane cap 4 If necessary clean the cathode or replace the sealing ring if it is damaged 5 Rinse the electrode holder with drinking water Installing the new membrane cap 1 Make sure that there a...

Page 11: ......

Page 12: ...www endress com worldwide BA244C 07 en 09 06 Printed in Germany FM SGML 6 0 DT 71032330...

Reviews: