background image

18

www.uniquip.ca

Maintenance Procedures cont’d ...

Use Endura brand-name parts for compatibility and optimum performance.
Use of any other parts prior to consulting with Uniquip Canada will void all 
warranties expressed herein.


1.Replacing Individual Tines


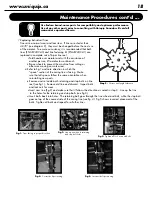
   Tines are a normal wear and tear item.  If tines are shorter than 


   4-3/8” (see diagram 2),  they must be changed before the next use 

               of the aerator.  To ensure consistency, it is recommended that both
 

   tines (ENAR24HC-40) and tine fastening kit (ENAR24HC-41) are


   replaced in complete sets of 6 per tine reel.    


 i.Fold handle over aerator and with the assistance of 


   another person, lift aerator to work bench.


ii.Brace wheels to prevent the machine from rolling or


   otherwise moving on work area.


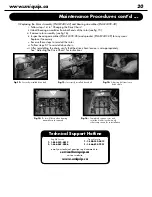
         iii.Refer to fi g.1 and note direction in which the 


   “spoon” section of the coring tine is facing.  Make 


   sure that all spoons follow the same orientation when 


   re-installing new parts.


iv.Remove and set aside both retaining and stop bolts on tine


   reel (see fi g.1).  Remove old tine and discard.  Inspect bolts 


   and lock nuts for wear.  


 v.Insert new tine (fi g.2) and make sure that it follows the direction as noted in step 3.  Line up the tine 


    to the holes for the retaining and stop bolts (see fi g.3).


vi.Insert bolts back into holes.  The retaining bolt goes through the tine wheel and bolt, while the stop bolt


   goes on top of the covered side of the coring tine (see fi g. 4). Fig.5 shows incorrect placement of the 


   bolts.  Tighten all bolts and repeat for all other tines.

Diag.2:

  Correct tine length reference

Fig.1:

  Tines facing in proper direction

Fig.2:

  Line-up new tine to retaining

           and stop bolt holes

Fig.3:

  Tighten all lock nuts and bolts

Fig.4:

  Correct bolt positioning

Fig.5:

  Incorrect bolt positioning

Summary of Contents for ENAR24HC

Page 1: ...t Uniquip Canada 2005 All rights reserved DO NOT operate this equipment until you have read and understood all the enclosed Operator s Manual English Service T 1 888 332 4012 F 1 866 567 0956 French S...

Page 2: ...da the unit and or parts should be shipped to Uniquip Canada or the specified Authorized Service Centre at the customer s expense Be sure to securely pack the unit and parts in a strong container Dam...

Page 3: ...participating in this program Registration helps to facilitate warranty service and notify you of any updates changes and service advisories on your product Complete this Warranty Registration Card a...

Page 4: ...Place Stamp Here Uniquip Canada Inc 4101 boul Industriel Laval QC H7L 6G9 ATTN SERVICE DEPARTMENT Fold along dotted line Fold along dotted line...

Page 5: ...ENAR24HC Aerator 12 Contents List 12 Pre Operation Procedures 12 Operation Procedures 14 A Transporting the ENAR24HC 14 B Preparing to aerate 14 C Aerating on Flat Surfaces 14 D Aerating on Inclined S...

Page 6: ...nvironment and operator It is imperative that the operator of this equipment be responsible for the operational environment of the aerator Please be prepared and well informed for all specific require...

Page 7: ...ay from moving parts of the machine e Avoid coming in contact with the muffler and other engine parts after the engine is started and the time immediately after the machine is turned off Machine and e...

Page 8: ...manner a Always start aerating a safe distance away from any object such as a fence foundation or any other structural obstructions The coring tines could possibly catch and climb on the object b Use...

Page 9: ...serves the right to update and modify the equipment without prior notification Prior to undertaking to perform any maintenance or repair procedures please contact our Technical Support Hotline for cla...

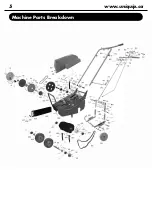
Page 10: ...5 www uniquip ca Machine Parts Breakdown...

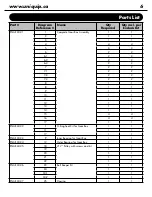
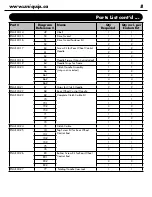
Page 11: ...2 2 7 2 2 2 7 3 2 2 8 1 1 8 1 1 9 1 1 10 1 1 11 1 1 12 1 1 13 1 1 14 1 1 15 4 4 16 4 4 17 1 1 ENAR24 02 1 O Ring Seal Kit for Gear Box 1 1 11 1 1 17 1 1 ENAR24 03 9 Inner Bearing for Gear Box 1 1 ENA...

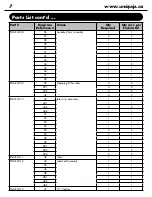
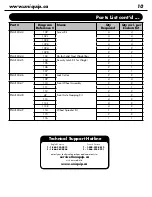
Page 12: ...1 1 34 2 2 35 1 1 36 1 1 37 1 1 38 1 1 ENAR24 09 39 Stamping Kit for Idler 4 2 39 1 4 2 39 2 4 2 42 4 2 ENAR24 10 40 Idler Arm Assembly 1 1 40 1 1 1 40 2 3 3 40 3 1 1 41 1 1 53 1 1 54 1 1 55 1 1 56 2...

Page 13: ...NAR24 20 65 Clutch Handle Assembly Grips not included 1 1 66 2 2 66 1 2 2 66 2 4 4 66 3 2 2 ENAR24 21 67 Grips for Clutch Handle 2 2 ENAR24 22 68 Rear Wheel Control Handle 1 1 ENAR24 23 69 Complete Cl...

Page 14: ...84 2 4 2 84 3 4 2 ENAR24 32 85 Lift Link 2 1 ENAR24 33 86 Axle Carriage Assembly 1 1 89 2 2 90 2 2 91 2 2 ENAR24 34 87 Rear Wheel Axle Kit 2 1 87 1 2 1 87 2 2 1 ENAR24 35 88 Axle Spring 2 1 ENAR24 36...

Page 15: ...2 1 107 2 1 ENAR24 46 108 Lock Collar 2 2 109 4 4 ENAR24 47 110 Front Wheel Assembly 2 2 111 1 1 112 2 2 ENAR24 48 42 Front Axle Stamping Kit 4 2 113 4 2 113 1 4 2 113 2 4 2 ENAR24 49 114 Wheel Sprock...

Page 16: ...erves as an unique identifier for warranty and support purposes If you have any questions please do not hesitate to contact Uniquip Canada at 1 888 332 4012 for further assistance ENAR24HC CAL Qty Req...

Page 17: ...y NEVER ATTEMPT TO LIFT THE MACHINE WITH ONLY ONE PERSON Before using the Endura ENAR24HC Professional Aerator please perform the following procedures for the personal and property safety of the opera...

Page 18: ...d condition and set to the appropriate tension Consult the Maintenance Procedures section of this manual for guidelines and instructions on taking care of the belt and chain iv The torque on the tine...

Page 19: ...es with more than 35 grade 3 If the removable weights are being used ensure that they are securely latched in by tightening the bolts on the security latch If the weights are not in use store them saf...

Page 20: ...esults Opeation Procedures cont d IF MACHINE IS USED ON EXTREME INCLINES THE MACHINE MAY BECOME UNBALANCED TO THE POINT OF PRESENTING THE DANGER OF ROLLING OVER Diag 1 Aerating on inclined site Diseng...

Page 21: ...Adjusting the Drive Belt for details Does the drive belt show signs of wear and tear Replace if necessary Are all tines in good condition Are any tines worn down to minimum length of 4 3 8 If so have...

Page 22: ...key components that may lead to serious damage to the machine and cause severe bodily harm to the operator or technician Before performing any service and maintenance procedures consult these general...

Page 23: ...te direction in which the spoon section of the coring tine is facing Make sure that all spoons follow the same orientation when re installing new parts iv Remove and set aside both retaining and stop...

Page 24: ...ignificant wear and tear Replace if necessary iii Ensure that pulleys are in alignment by engaging clutch to see if they line up If not re align before installing new belt iv Loop new V belt over smal...

Page 25: ...rive chain vii After re installing the chain verify that the drive chain tension is set appropriately See Adjusting the Drive Chain for instructions Fig 12 Correctly installed drive belt Fig 13 Incorr...

Page 26: ...lug wire is disconnected or improperly connected Engine oil level too low Oil Alert Dirty air cleaner Check that all switches are on Verify that throttle and choke position are in proper setting Fill...

Page 27: ...22 www uniquip ca Notes...

Page 28: ...866 567 0956 French Service T 1 800 332 4012 F 1 866 825 2221 Technical Support Hotline email your technical questions and comments to service uniquip ca visit our website www uniquip ca Copyright Uni...

Reviews: