background image

25

DE
EN

FR

PL

RU

25

DE
EN

FR

PL

RU

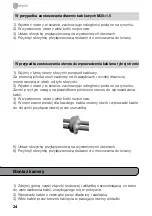
uszczelniającej. Zamknij nieużywane otwory za pomocą dostarczonych 

zatyczek uszczelniających.

4) Przykręć kamerę do pokrywy i wsuń wkładkę uszczelniającą w dławnicę 

kablową. Uszczelnij otwór, zakładając zaślepkę.

5) Włóż kable równolegle i nawiń je na szpulkę. Przymocuj kable za 

pomocą dołączonych opasek kablowych.

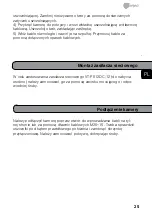
W celu zastosowania zasilacza sieciowego VT-PS12DC-12 (do nabycia 

osobno) należy zamocować go za pomocą zacisku mocującego i odpo-

wiedniej śruby.

Montaż zasilacza sieciowego

Należy podłączyć kamerę poprzez otwór do wprowadzania kabli na tyl-

nej stronie lub za pomocą dławnic kablowych M20×15. Trzeba sprawdzić 

uszczelki pod kątem prawidłowego położenia i zamknąć skrzynkę 

przyłączeniową. Należy zamocować pokrywę, dokręcając śruby. 

Podłączenie kamery

Summary of Contents for AK-4

Page 1: ...Quick installation guide Camera junktion box for Candid Small Medium and Large AK 4 DE EN FR PL RU...

Page 2: ...e 3 Lieferumfang 3 Beschreibung der Teile 4 Installationsanleitung 5 Montage 5 Kameramontage 6 Bei Verwendung der M20x15 Kabelverschraubungen 6 Bei Verwendung der r ckseitigen Kabeleinf hrung 6 Netzte...

Page 3: ...Membrant lle 32 mm 2x Kabelbinder 2x Dichteinsatzstopfen 5 5 mm 6 2 mm 1x Dichteinsatzstopfen 2 7 mm 1x Netzteil Befestigungsb gel 1x M4x6 Schraube f r Netzteil Befestigungsb gel Lieferumfang Sicherh...

Page 4: ...4 4 Beschreibung der Teile i Candid Medium Large 4mm Candid Large Wandarm rund 5mm Candid Small 4mm...

Page 5: ...die jeweiligen Montage Hinweise und verschlie en Sie die nicht ben tigten ffnungen mit den M20x1 5 Verschlusskappen Installationsanleitung Montage Geh usedeckelschrauben Verschraubung M25 mit Dichtei...

Page 6: ...in den Anschlusskasten 5 Positionieren Sie den Anschlusskasten auf den Bohrl chern 6 Befestigen Sie den Anschlusskasten mit den Wandbefestigungsschrau ben Bei Verwendung der r ckseitigen Kabeleinf hr...

Page 7: ...eren Sie die Kabel mit den beiliegenden Kabelbindern Zur Verwendung des Netzteils VT PS12DC 12 separat erh ltlich setzen Sie das Netzteil ein und fixieren Sie es anschlie end mit der Halteklemme und d...

Page 8: ...8...

Page 9: ...ie 2x Waterproof stopper 5 5 mm 6 2 mm 1x Waterproof stopper 2 7 mm 1x Power supply fastening bow 1x M4x6 Screw for power supply fastening bow Scope of delivery Notes on Safety Please also pay attenti...

Page 10: ...10 Description of parts a b c d e f g h i Candid Medium Large 4mm Candid Large round bracket 5mm Candid Small 4mm...

Page 11: ...relevant assembly notes and seal all of the unused openings with the M20x1 5 caps Installation instruction Assembly a Container lid screws b Screw fitting M25 with waterproof insert c Screwed cable g...

Page 12: ...the seal into the terminal box 5 Position the terminal box over the bore holes 6 Secure the terminal box with the wall fixing screws When using the rear side cable entry 1 Drill the wall holes in acco...

Page 13: ...the cables with the supplied cable ties To make use of the VT PS12DC 12 Power Supply available separately insert the power supply and secure the power supply to the relevant screw using the retaining...

Page 14: ...14 14...

Page 15: ...e 32 mm 2x attache c bles 2x bouchons d tanch it 5 5 mm 6 2 mm 1x bouchon d tanch it 2 7 mm 1x trier de fixation pour bloc secteur 1x vis M4x6 pour trier de fixation bloc secteur Contenu Consignes de...

Page 16: ...16 16 Description des pi ces a b c d e f g h i Candid Medium Large 4mm Candid Large Wandarm rund 5mm Candid Small 4mm...

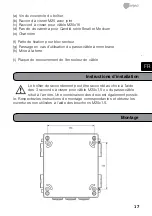
Page 17: ...montage correspondantes et obturez les ouvertures non utilis es l aide des bouchons M20x1 5 Instructions d installation Montage a Vis du couvercle du bo tier b Raccord visser M25 avec joint c Raccord...

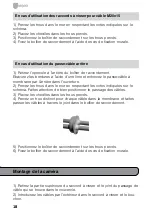
Page 18: ...de raccordement 5 Positionnez le bo tier de raccordement sur les trous perc s 6 Fixez le bo tier de raccordement l aide des vis de fixation murale En cas d utilisation du passe c ble arri re 1 Percez...

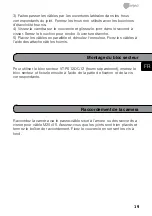
Page 19: ...les c bles en parall le et d roulez l enrouleur Fixez les c bles l aide des attache c bles fournis Pour utiliser le bloc secteur VT PS12DC 12 fourni s par ment ins rez le bloc secteur et fixez le ens...

Page 20: ...20 20...

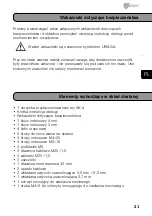
Page 21: ...lniaj ce 5 5 mm 6 2 mm 1 wk adana zatyczka uszczelniaj ca 2 7 mm 1 uchwyt mocuj cy do zasilacza sieciowego 1 ruba M4 6 do uchwytu mocuj cego do zasilacza sieciowego Elementy wchodz ce w sk ad dostawy...

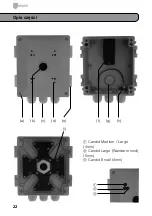
Page 22: ...22 22 Opis cz ci a b c d e f g h i Candid Medium Large 4mm Candid Large Wandarm rund 5mm Candid Small 4mm...

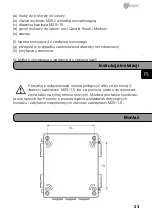
Page 23: ...eganie wskaz wek dotycz cych monta u i zatykanie niepotrzebnych otwor w za lepkami M20 1 5 Instrukcja instalacji Monta a ruby do pokrywy obudowy b z cze rubowe M25 z wk adk uszczelniaj c c d awnica ka...

Page 24: ...zynk przy czeniow na wywierconych otworach 6 Przykr skrzynk przy czeniow rubami do mocowania do ciany W przypadku zastosowania otworu do wprowadzenia kabla na tylnej stronie 1 Wywier otwory w cianie z...

Page 25: ...zymocuj kable za pomoc do czonych opasek kablowych W celu zastosowania zasilacza sieciowego VT PS12DC 12 do nabycia osobno nale y zamocowa go za pomoc zacisku mocuj cego i odpo wiedniej ruby Monta zas...

Page 26: ...istribution through spe cialised trade channels only Videor E Hartig GmbH Carl Zeiss Stra e 8 63322 R der mark Germany Tel 49 0 6074 888 0 Fax 49 0 6074 888 100 www videor com www eneo security com Te...

Reviews: