background image


MODES / PROGRAMS 


Start up quick (manual) 


1.1  Turn on the power at the base of the unit and attach the safety cord.  

1.2  Press START button, the system will enter into a 3 second count down and commence at 0.8 km/h.  

1.3  After start-up, you can use the SPEED +/- button to adjust the speed.  


Manual program 


1.  If you do not choose a pre-set program and press the START button directly, the treadmill will start to 

run from a speed of 0.8km/h, the window display will start an ascending count from zero, press 

“SPEED+”, “SPEED-” to change the speed. The setting range is 0.8 – 12 km/h. 

2.  At standby mode, press the “MODE” button, the time window will display a flashing “30:00 min” 

indication. Press “SPEED+”, “SPEED –“to set the exercise time.  

3.  Press the “MODE” button again, the distance window will display a flashing “1.0” indication. Press 

“SPEED+”, “SPEED-” to set the exercise distance. The setting has to be between 0.5 and 99.5 km.  

4.  Press the “MODE” button again, the calorie window will display a flashing “50” indication. Press 

“SPEED+”, “SPEED-“to set the target calorie consumption. The setting range has to be between 10 and 

995 kcal.  

5.  When the settings are finished, press the “START” button to begin, the treadmill will enter into a three 

second count down before commencing. The “SPEED+”, “SPEED-” button can still be used to adjust 

the workout speed.  


Pre- set programs 


At standby mode, press the “PROGRAM” button and the window will display P1-P12. After selecting the 

program, set the target exercise time by pressing the “SPEED+”, “SPEED-“ button. After this please press the 

START button to start the exercise in the individual program.  


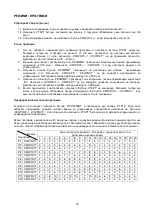
Each program is divided into 20 different sections with the same length. In each section, the speed will be 

changed and adjusted by the treadmill automatically. Below table is visualizing how the speed is adjusted in the 

individual sections by the treadmill (in km/h) automatically. 


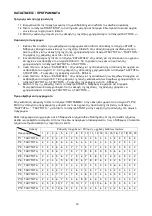
             Time 

Program 

To set time / 20 time = running time of each period 

1  2  3  4  5  6  7  8  9  10  11  12  13  14  15  16  17  18  19  20 

P1 

SPEED 

2  3  3  4  5  3  4  5  5  3  4  5  4  4  4  2  3  3  5  3 

P2 

SPEED 

2  4  4  5  6  4  6  6  6  4  5  6  4  4  4  2  2  5  4  2 

P3 

SPEED 

2  4  4  6  6  4  7  7  7  4  7  7  4  4  4  2  4  5  3  2 

P4 

SPEED 

3  5  5  6  7  7  5  7  7  8  8  5  9  5  5  6  6  4  4  3 

P5 

SPEED 

2  4  4  5  6  7  7  5  6  7  8  8  5  4  3  3  6  5  4  2 

P6 

SPEED 

2  4  4  4  5  6  8  8  6  7  8  8  6  4  4  2  5  4  3  2 

P7 

SPEED 

2  3  3  3  4  5  3  4  5  3  4  5  3  3  3  6  6  5  3  3 

P8 

SPEED 

2  3  3  6  7  7  4  6  7  4  6  7  4  4  4  2  3  4  4  2 

P9 

SPEED 

2  4  4  7  7  4  7  8  4  8  9  9  4  4  4  5  6  3  3  2 

P10  SPEED 

2  4  5  6  7  5  4  6  8  8  6  6  5  4  4  2  4  4  3  3 

P11  SPEED 

2  5  8  10  7  7  10  10  7  7  10  10  6  6  9  9  5  5  4  3 

P12  SPEED 

2  5  9  12  6  5  3  4  5  3  4  5  6  4  4  2  5  6  6  4 


Summary of Contents for POWER RUN 1.8

Page 1: ...POWER RUN 1 8 EN EL ES IT RU BG RO...

Page 2: ...o se hace responsable de los errores que se produzcan debido a la traducci n o cambio de las especificaciones t cnicas del producto IT Il presente manuale solo per riferimento dell acquirente ENERGETI...

Page 3: ...netic safety key is attached to the console press the START button to start the treadmill 4 STOP Press this button to stop the treadmill at any time of the exercise 5 SPEED SPEED To adjust the speed l...

Page 4: ...three second count down before commencing The SPEED SPEED button can still be used to adjust the workout speed Pre set programs At standby mode press the PROGRAM button and the window will display P1...

Page 5: ...immediately The window will display and the buzzer will make a 15 times bi sound Attach the safety key again and you can adjust the weight which is displayed in the window POWER SAVE FUNCTION Without...

Page 6: ...colocada en el monitor pulse el bot n de comienzo START para que la cinta empiece a girar 4 PARO Pulse este bot n para detener la cinta en cualquier momento del ejercicio 5 VELOCIDAD VELOCIDAD Para aj...

Page 7: ...tres segundos hasta cero antes de comenzar Los botones de VELOCIDAD VELOCIDAD pueden ser usados para ajustar la velocidad del ejercicio Programas preconfigurados En el r gimen de orden de marcha presi...

Page 8: ...N DE AHORRO DE ENERG A Si es que durante unos 10 minutos no habr ning n movimiento el aparato pasa al r gimen de reposo y el display se apaga Presione cualquier pulsador para activar el display ATENCI...

Page 9: ...rsa e dopo aver inserito la chiave magnetica di sicurezza nella consolle premete il pulsante START per mettere il nastro di corsa in moto 4 STOP Il pulsante per arrestare il nastro di corsa in qualsia...

Page 10: ...pulsante VELOCIT o VELOCIT Le calorie impostate devono essere comprese in un intervallo dalle 10 alle 995 kcal 5 Dopo aver terminato le impostazioni premete il pulsante START il nastro di corsa verr a...

Page 11: ...iene immediatamente interrotta l alimentazione dell apparecchio Sul display comparir e la cicala si far sentire per 15 volte Dopo aver nuovamente collegato la funicella di protezione potrete modificar...

Page 12: ...12 1 12 P1 P2 P12 2 START 3 START START 4 STOP 5 0 1 km h 0 5 6 3 6 9 12 EL START STOP 3 6 9 12...

Page 13: ...6 4 5 6 4 4 4 2 2 5 4 2 P3 2 4 4 6 6 4 7 7 7 4 7 7 4 4 4 2 4 5 3 2 P4 3 5 5 6 7 7 5 7 7 8 8 5 9 5 5 6 6 4 4 3 P5 2 4 4 5 6 7 7 5 6 7 8 8 5 4 3 3 6 5 4 2 P6 2 4 4 4 5 6 8 8 6 7 8 8 6 4 4 2 5 4 3 2 P7 2...

Page 14: ...14 km h 0 8 km h 12 km h min sec 30 00 30 00 5 00 99 00 0 00 99 59 km 1 00 km 0 5 km 99 5 km 0 00 km 99 9 km 50 kcal 10 kcal 995 kcal 0 kcal 999 kcal 5 15x 10 1 2 3 STOP...

Page 15: ...15 1 12 P1 P2 P12 2 START 3 START START 4 STOP 5 0 1 0 5 6 3 6 9 12 START STOP 3 6 9 12 RU...

Page 16: ...5 4 2 P3 2 4 4 6 6 4 7 7 7 4 7 7 4 4 4 2 4 5 3 2 P4 3 5 5 6 7 7 5 7 7 8 8 5 9 5 5 6 6 4 4 3 P5 2 4 4 5 6 7 7 5 6 7 8 8 5 4 3 3 6 5 4 2 P6 2 4 4 4 5 6 8 8 6 7 8 8 6 4 4 2 5 4 3 2 P7 2 3 3 3 4 5 3 4 5...

Page 17: ...17 0 8 12 30 00 30 00 5 00 99 00 0 00 99 59 1 00 0 5 99 5 0 00 99 9 50 10 995 0 999 5 15 10 1 2 3 STOP...

Page 18: ...18 1 12 P1 P2 P12 2 3 4 5 0 1 0 5 6 3 6 9 12 BG 3 6 9 12...

Page 19: ...6 6 4 7 7 7 4 7 7 4 4 4 2 4 5 3 2 P4 3 5 5 6 7 7 5 7 7 8 8 5 9 5 5 6 6 4 4 3 P5 2 4 4 5 6 7 7 5 6 7 8 8 5 4 3 3 6 5 4 2 P6 2 4 4 4 5 6 8 8 6 7 8 8 6 4 4 2 5 4 3 2 P7 2 3 3 3 4 5 3 4 5 3 4 5 3 3 3 6 6...

Page 20: ...20 0 8KM 12KM 30 00 30 00 5 00 99 00 0 00 99 59 KM 1 00KM 0 5KM 99 5KM 0 00KM 99 9KM 50 10 995 0 999 5 15 1 2 3...

Page 21: ...agnetic de siguran este ata at de consol ap sa i START pentru a ncepe rularea benzii de alergat 4 STOP Ap sa i acest buton pentru a opri banda de alergat n orice moment al exerci iului 5 VITEZA VITEZA...

Page 22: ...secunde nainte de a ncepe num r toarea invers Butonul VITEZA VITEZA poate fi utilizat pentru a ajusta viteza de antrenament Programe pre setate La modul de a teptare ap sa i butonul PROGRAM iar ecranu...

Page 23: ...anul va afi a iar soneria va produce timp de 15 ori sunetul bi Ata a i din nou cordonul de siguran i pute i ajusta greutatea care este afi at pe ecran FUNC IA ECONOMISIRE DE ENERGIE Neav nd de executa...

Page 24: ...Woelflistrasse 2 CH 3006 Bern Switzerland www energetics eu Copyright ENERGETICS 2012...

Reviews: