background image


8/20

energysistem.com

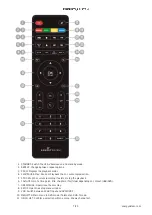
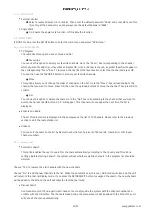
GUIDE: Displays the actual channel schedule.

12.

VOL+/-: Change the volume in normal play mode.

13.

Zoom: Enlarges the image.

14.

TECLAS NUMÉRICAS: SSelect channel numbers or input numbers in menus.

15.

AUDIO: Select the available audio track or set the sound mode as LR(stereo), LL(left), RR(right).

16.

MUTE: Mute/unmute the sound.

17.

SLOW: Fast forward at selectable speeds.

18.

ANGLE: Selects a DVD camera angle if available.

19.

REV: Fast backward at selectable speeds.

20.

FWD: Avance.

21.

PREVIOUS: Go to previous chapter/track/file or to the beginning of the currently playing one.

22.

NEXT: Go to the next chapter/track/file.

23.

TV/RADIO: Switch between TV channels and Radio stations.

24.

RECALL: Return to the previous channel.

25.

EXIT: Return to the previous screen or menu.

26.

SOURCE: Changes between DVD, USB and DVB-T mode.

27.

INFO: Display information about the channel being viewed or further information about the program when in

28.

normal play mode
CH+/-: Move around the menu screens or change the channels in normal play mode.

29.

SUBTITLE: Switch among different available subtitles.

30.

NOTE: SUBTITLES/TEXT/AUDIO may not be available for all channels.

3.2. INSTALLING THE BATTERIES

Remove the battery cover from the remote control and put 2xAAA size batteries inside the compartment.
The diagram inside the battery compartment shows the correct way to install the batteries.

Precautions when using batteries

Only use the batteries recommended by the manufacturer.
Ensure the correct polarity when installing the batteries (see compartment). Reversed polarity may damage the
remote control.
Exhausted batteries must be removed to prevent possible battery leakage.
Dispose of batteries properly according to environmental regulations.

3.3. USING THE REMOTE CONTROL

To use the remote control point it towards the front of the digital set top box.
The remote control has a range of up to 5 metres from the set top box at an angle of up to 60 degrees.

Summary of Contents for Combo d5 AV

Page 1: ...TING STARTED 10 5 1 POWER SUPPLY FOR THE UNIT 10 5 2 INSERTING A DISC 11 5 3 INSERTING A USB DEVICE 11 5 4 DVB T FIRST TIME INSTALLATION 11 6 MAIN MENU 11 6 1 CONFIGURACIÓN DVD 11 6 1 1 CONFIGURACIÓN DEL IDIOMA 11 6 1 2 CONFIGURACIÓN DEL AUDIO 11 6 1 3 CUSTOM SETUP 12 6 2 DVB T MENU 12 6 2 1 LISTA DE PROGRAMAS 12 6 2 2 Channel Search 12 6 2 3 Parental control 13 6 2 4 System Setting 13 6 3 SYSTEM ...

Page 2: ...2 20 energysistem com ...

Page 3: ... we wish you to enjoy it The perfect mix for home entertainment DVD player plus DVB T tuner Play all the usual video audio and picture formats from CD DVD or USB devices We suggest you read this user manual to get the most out of your product safely using all its features 1 SECURITY INSTRUCTIONS ...

Page 4: ...or damp conditions Do not allow the d5 AV to get wet Do not expose the d5 AV to dripping or splashing Do not place water filled objects such as vases on top of the d5 AV Do not place naked flame sources such as candles on the top of the d5 AV Ventilation The slots and openings on the set top box are for ventilation Do not cover or block them as it may cause overheating NEVER let children push anythi...

Page 5: ...5 20 energysistem com 2 PRODUCT 2 1 FRONT PANEL ...

Page 6: ...This socket connects to your external aerial 1 RF LOOPTHROUGH This socket will bypass the RF signal to either your TV or another video system 2 CVBS OUT Composite video 3 COAXIAL This socket connects to a S PDIF RCA socket on your surround sound system 4 STEREO OUT Analog stereo left and right audio 5 SCART OUT This socket connects to your TV 6 SCART IN This socket connects to either a VCR or othe...

Page 7: ...oduction 4 STOP Stop the current recording if exists or stop the playback 5 FAV GOTO Go to time point title chapter or file folder depending on context USB DVD 6 OPEN CLOSE Open close the disc tray 7 SETUP Open the setup menu window 8 VCR Switch between SCART input and DVD DVB T 9 MENU TTX Main menu in DVD mode Teletext en DVB T mode 10 OK CH LIST Confirm a selection within a menu Shows channel list...

Page 8: ...ing viewed or further information about the program when in 28 normal play mode CH Move around the menu screens or change the channels in normal play mode 29 SUBTITLE Switch among different available subtitles 30 NOTE SUBTITLES TEXT AUDIO may not be available for all channels 3 2 INSTALLING THE BATTERIES Remove the battery cover from the remote control and put 2xAAA size batteries inside the compar...

Page 9: ...tage of the wall outlet has the same rating than the receiver To prevent the risk of electric shock do not open the cover or the back of the receiver When connecting the receiver to other equipment e g TV VCR and amplifier make sure to refer to relevant user manual for instruction Also make sure you disconnect all the equipments from the mains supply before the connection 4 1 ANTENNA CONNECTION 4 2...

Page 10: ...V RECEIVER WITH DIGITAL INPUT 5 GETTING STARTED 5 1 POWER SUPPLY FOR THE UNIT Connect the unit as shown in CONNECTIONS 1 Insert 2 AAA batteries supplied into the battery compartment in the remote control taking care to follow the 2 correct polarity ...

Page 11: ...page This will guide the user through the initial DVB mode setup First choose Yes then press the OK button The system will then start the initial setup Then select the relevant regional information country OSD language and Time Zone The system will automatically scan through the channels according to the information you have entered Select Yes to start the automatic search At the end of the search...

Page 12: ...o to the Del box corresponding to the channel that you want to delete then press the OK button An X will appear This channel will not appear the next time the list is displayed Emisoras de Radio The list of radio stations is displayed in the same way as the list of TV Channels Please refer to the previous section to edit the radio station list Ordenar You can sort channels on the list by Name chan...

Page 13: ...es DVB Language The Language submenu has 3 options Audio 1 and Audio 2 The user can choose the audio language from Audio 1 or Audio 2 Subtitle Select this option to choose the subtitle language The Language option only works when the channel offers several languages Otherwise the preset language of that channel will be chosen automatically GMT Usage Select this option to turn GMT usage on off When i...

Page 14: ...VB USB User Select Last Operating Type Select the default source when the unit is switched on Default Restore the factory default settings System Info The system information includes the Model HW hardware SW software and Date 6 4 JUEGOS Three games Mine Tetris and Rush Hour and Calendar 7 PLAYING DVD CD VCD DISCS Open Close Press to open the disc tray Press this button again to close the disc tray...

Page 15: ...mage is magnified use the arrow keys to pan the image for viewing To return to the normal view press the Zoom button until the message x1 appears Angle Change the viewing angle on a DVD This button enables you to view a scene from different angles the availability of this function depends on the DVD Press Angle repeatedly to select different viewing angles Audio Select from the audio languages availa...

Page 16: ... start of the section point A Press the A B button again to set the end of the section point B The unit will then immediately begin replaying the selection A to B repeatedly Press the A B button again to clear the programmed repeat playback and return to normal playback Note The A B repeat function can only be used within the same title or track If points A and B are defined in different titles or t...

Page 17: ...m the JPEG file currently selected You can then zoom or rotate the images displayed Press the ANGLE button repeatedly to select a different transition mode During playback you can press the MENU button to return to the root menu or press the Stop button to display the JPEG files in thumbnail mode and you can then select Rotate or Slide Show 9 DVB T OPERATION Press the SOURCE button on the remote cont...

Page 18: ...on between the unit and the antenna Poor quality picture Check the disc for fingerprints and clean with soft cloth wiping from the center to the edge Check that the disc is compatible with the TV format PAL NTSC Check the antenna cable and the antenna installation using an amplifier may improve signal quality Black and white picture Check that the disc is compatible with the TV format PAL NTSC Check...

Page 19: ...ase 13 WARRANTY PROCEDURE Visit the Support section at http support energysistem com and select your product to view the FAQ Frequently Asked Questions The solution to your problem is very likely to have been already published there You will also be able to download user manuals user guides drivers and updates If you cannot find an appropriate solution in the Support section you may send us your en...

Page 20: ... product names are trademarks or registered trademarks of their respective companies 15 DECLARATION OF CONFORMITY Nombre del suministrador Energy Sistem Soyntec S A NIF A53107488 Address Pol Ind Finestrat C Calpe 1 03509 Finestrat Alicante Tel 902 388 388 Fax 902 119 034 We declare under our own exclusive responsibility that the product Energy Sistem Reproductor DVD andDVB T Tuner Energy d5 AV Man...

Reviews: