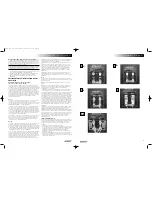
1) Using your choice of speaker wire and termination method, connect one speaker
cable from the amplifier (minding the positive and negative polarities) to the top
set of connectors. Ensure the terminals are tight.
2) Next, connect the second cable, from the same channel of your amplifier to the
lower set of terminals.
3) Repeat the procedure for the second speaker.
BI-AMPLIFICATION METHOD
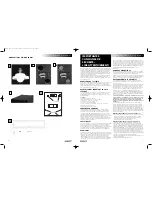
(Please see diagram 6)
This connection system involves the use of two separate two channel amplifiers to
power one set of speakers. The idea is to have one stereo amplifier connected to
one speaker, and another identical amplifier powering the second speaker. This is
often referred to as “Vertical” Bi-amplification. It is the only method ENERGY
®
recommends.
NOTE: Before starting, remove the gold “shorting straps”, which connect the top
and bottom set of input terminals. To remove the straps, loosen all of the
connectors and pull the straps away from the binding posts. Make sure you put
them in a safe place for future use.
1) Using your choice of speaker wire and termination method, connect one speaker
cable from the amplifier (minding the positive and negative polarities) to the top
set of connectors. Ensure the terminals are tight.
2) Next, connect the second cable, from the amplifier's other channel to the bottom
set of terminals, again ensuring a tight connection.
3) Repeat Steps 1 and 2 for the second speaker using the second amplifier.
POSITIONING AND INSTALLING
YOUR SPEAKERS
Left and Right Main Speakers (RC-10, RC-30, RC-50, RC-70, RC-LCR)
The main speakers are usually placed in the front of the room, on either side of the
TV or video projector. They should be placed a minimum of 6 feet apart, and if the
furniture placement allows, keep them at least 12 inches from all walls. To calculate
the best placement, measure the distance between the speakers themselves and the
listening position. Your distance from the speakers should be roughly 1.5 times the
distance the speakers are apart from each other. For example: If the distance
between each speaker and the listening position is 9 feet, then the speakers should
be 6 feet apart from one another. This will provide excellent stereo separation and
imaging for music playback. This is just a starting point, the room's acoustics and
furniture placement will vary the placement of the speaker. Use your best judgment
and experiment with speaker placement. Slight adjustments can provide significant
improvements in performance.
RC-10
The RC-10 is designed to be used as a front left or right speaker, or as a rear channel
speaker. When installing the RC-10 bookshelf speaker to a wall, there is an insert built
into the back of the speaker, located above the input terminals. The threaded insert is
designed specifically for the Energy Macromount
TM
bracket, which is available from
your local authorized Energy retailer. Please see diagram 7.
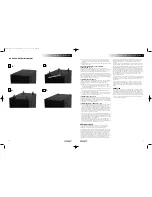
The RC-10 includes two foam plugs in the carton, which are designed to be inserted
into the ports on the rear of the speaker, should the speaker be installed near a wall
or in a cabinet. Since the RC-10 is a rear ported speaker, placing it too close to a
reinforcing boundary, like a wall, will cause undesirable effects. Placing the speaker in
a bookshelf cabinet will also generate issues with low frequency reproduction. To
solve this problem simply insert a foam plug into the port on the rear of the speaker.
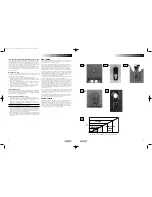
Please see diagram 8.
When the RC-10 is to be installed on a bookshelf or on a stand, please attach the 4
rubber bumpers to the bottom of the speaker, as this will protect both the mounting
surface and the speaker from damage. Simply peel the bumper off its sheet and stick
it in place on the bottom of the speaker, one bumper per corner. The rubber bumpers
also help decouple the speaker from the bookshelf or stand. Please see diagram 9.
RC-LCR
The RC-LCR is a left, center, right speaker, meaning it has been designed to be used in
both a horizontal or vertical fashion. This design means it can be mounted in either
plane, while exhibiting the same dispersion characteristics. Out of the box the Energy
logo is
NOT
attached to the grille, as this speaker can be positioned in various
directions. Once the final orientation of the speaker has been determined, select the
appropriate location on the grille, remove the adhesive protector and apply the logo
directly to the grille. Please see diagram 10.
When the RC-LCR is used as a center speaker, it is ideally placed as close to the center
of the TV or video projector as possible. This is to ensure that voices and all sounds
come from the performer's placement on screen. This may be on top, underneath, or
on a shelf within a wall unit or other furniture. Use the position that provides the best
sound quality, but keep in mind safety and room décor as well. The center channel
works best when the front of the speaker is flush with the TV, or the shelf it rests on. If
the center speaker is recessed in its placement, it will sound distant, and undefined in
character. Please see diagram 11.
When installing the RC-LCR into a cabinet, please insert the two included port plugs
into the ports on the rear of the speaker. When the speaker is inserted into a cabinet,
the rear ports will cause an overemphasis of low frequencies and must be plugged, in
order to achieve the best possible sound. Care should also be taken to fill the cabinet,
flush to the front of the speaker, with insulation as this helps to avoid diffraction
issues. Your authorized Energy retailer can assist you further with any issues. Please
see diagram 8.
When the RC-LCR is to be installed on top of a television, in a cabinet or on a shelf,
please attach the 4 rubber bumpers to the bottom of the speaker, as this will protect
both the mounting surface and the speaker from damage. Simply peel the bumper off
its sheet and stick one bumper in each corner on the speaker. Please see diagram 9.
RC-R
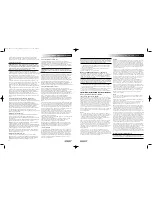
The rear speakers can vary greatly in position depending on the room layout, and
the furniture placement. The ideal position is either on the side walls, or rear walls.
Side Wall:
This position utilizes the rear walls of the room to reflect sound and
create the "surround" effect.
Rear Wall:
This is generally used when the side wall position is not available to you,
due to furniture placement or room dimensions. It is also used in a 6.1 or 7.1
surround configuration.
Both mounting positions have their advantages and disadvantages, the position
offering the best coverage of the entire room should be chosen. The goal of the
surround speakers during movie reproduction is to create an "atmosphere" around
you. The rear channel speakers are ideally placed an equal distance from you as
compared to the front speakers. But this is not always possible in a home
environment. The RC-R will emit sound from both sides of the speaker, and is best
placed where it can use the walls to reflect the sound around the listeners. The best
mounting position for a 5.1 system is the Side Wall position, as it makes use of the
rooms' rear walls, and side walls. It will create a lifelike surround effect and make
the room sound larger than it is. In this position, try to mount the speaker so that it
is beside you or slightly behind you. The height should be above ear level, at
approximately 2/3 of the height of the wall. 6 feet off of the ground is typically a
good starting point, and the speaker should be 2 feet above your head when
seated. These general guidelines should aid in positioning choices. Please see
diagram 12.
You can also achieve excellent results in the rear position. Try not to place the
speakers directly into a corner. Leave 2 or more feet between the edge of the
cabinet and the side wall, so the sound can reflect into the room environment. The
rear position is usually chosen when your room will not accommodate the side wall
position due to unequal walls, a doorway, or a large opening, etc. It is
recommended that the rear center (6.1 system) or dual rear surrounds (7.1) be
placed at the same height as the other two rear surround speakers wherever
possible.
MOUNTING YOUR RC-R SPEAKERS
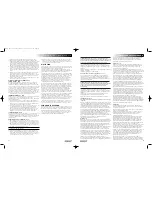
NOTE: The RC-R features a very simple wall mounting system. Careful attention
must be made to mount it securely as the speaker is heavy and damage to the
product and/or injury could result from improper mounting. Please follow the
directions carefully! Please see diagram 13.
1) Select the mounting position best suited for your room.
2) Place the wall mounting bracket against the wall in the desired mounting
location and mark the center of the two holes with a pencil. This is where you
need to insert the appropriate mounting hardware to securely fasten a load of
15 lbs. Hardware is not included with the speaker, as building materials vary
greatly in different countries, but the recommended screw head size is a #8.
Screw length is to be determined by the wall material.
3) If you are mounting directly to drywall, please ensure that you use the
appropriate anchors, as screws into drywall itself will not provide a secure mount.
Insert the anchors, and then hold the mounting bracket up to the wall. Insert the
screws until tight. Try to locate into wall studs wherever possible.
4) Screw the included bolt into the insert in the back of the RC-R speaker, located
above the terminal cup. Hand tighten the bolt all the way, and then loosen a few
turns counter clockwise. Place the two included rubber bumpers on the back of
the speaker, on either side of the back label.
5) Hold the speaker upright, and insert the bolt head into the large hole. Let the
speaker slide down into place.
o w n e r s m a n u a l
3
Energy Ref. Conn.-9 lang printers 6/20/05 10:04 AM Page 5


