24
Call 1-
800-347-9575
for Technical Support
4.6 Burner/Vessel Assembly
Now, the burner can be installed on the boiler vessel. This is done as follows:
The burner assembly is heavy. Handle with care.
1. Remove the four (4) nuts from the studs on the boiler door
2. Install the burner gasket onto the studs. NOTE: Gasket sealer should not be used on
this gasket. Apply a thin film of anti-seize compound to the vessel side of the burner
gasket to help reduce gasket sticking when servicing.
3. Inspect the retention head and electrodes for proper settings (refer to Section 8.5.6).
4. Mount the burner assembly onto the vessel by inserting the burner over the studs.
5. Reinstall and tighten the four (4) nuts.
6. Plug the burner harness into the vessel wiring box (refer to figure). The plug fits only
one way. This completes this step for the EL-200B. If you are installing an EL-375B or
EL-500B, continue to step 7 to connect the preheater to the burner.
Always unplug the burner before doing any service work on it. Attempting to swing the
vessel door open while the burner is plugged in may damage the plug or cable.
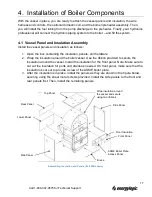
Install
Preheater
Long Bolt (goes
here)
Installation of Preheater (to vessel door) for EL-375B and EL-500B
NOTE: The Preheater Mounts on Top of the Bolt.

