56
Call 1-
800-347-9575
for Technical Support
6. Open the Preheater Valve and drain fuel into your tank.
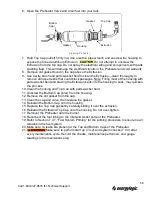
7. Hold Top Cap (outlet) firmly in a vice or with a pipe wrench and unscrew the housing to
expose the finned aluminum Extrusion.
Do not attempt to unscrew the
Extrusion from the top cap. Do not spray the electrical wiring and components with parts
washing fluid. This will damage the electrical circuits in the Preheater and void warranty.
8. Remove old gasket found in the cap above the Extrusion.
9. Use a wire brush and parts washer fluid to clean the Extrusion
—clean thoroughly to
remove all loose debris that could block passages. Note: Filling most of the housing with
parts washer fluid and placing the Extrusion back into the housing to soak, may quicken
the process.
10. Clean the housing and Top Cap with parts washer fluid.
11. Unscrew the Bottom Cap (inlet) from the housing.
12. Remove the old gasket from the cap.
13. Clean the cap and valve, then replace the gasket.
14. Reinstall the Bottom Cap onto the housing.
15. Replace the Top Cap gasket by carefully sliding it over the extrusion.
16. Reinstall the Extrusion/Top Cap onto the housing. Do not over-tighten.
17. Remount the Preheater onto the burner.
18. Reconnect the fuel tubing to the Inlet and Outlet ports of the Preheater.
19. Refer to Section 7.4.1.
“Fuel System Priming” for the priming procedure to ensure no air
remains in the fuel system.
20. Make sure no leaks are present at the Top and Bottom Caps of the Preheater.
21.
Make sure to perform start up (7.4.2) and system checks (7.4.3) after
every maintenance cycle. Record the checks, maintenance performed, and gauge
readings in the maintenance log.
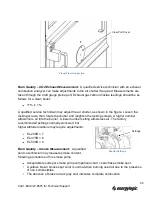
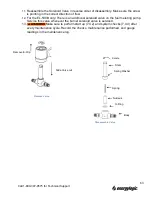
Top Cap
Extrusion
Gasket
Gasket
Bottom
Cap
Housing
Cleaning Preheater

