64
Call 1-
800-347-9575
for Technical Support
8.5.8 Air Compressor Maintenance
How often?
Once per year. More often for dusty conditions.
Tools Required:
1/8 inch Allen wrench, 7/16 inch wrench, flat-blade screwdriver, EnergyLogic Air Compressor
Pressure Gauge Kit (PN 05000092), Gast compressor cleaning fluid, shop towel, rubber
gloves, safety glasses.
Procedure - All Models (refer to figures):
1. Wear all safety equipment.
2. Replace the compressor air filter annually
(PN 20210112).
3. Check the air compressor output by using
the EnergyLogic compressor test kit (PN
14012100). Remove the copper tubing
from the outlet of the compressor and from
the bulkhead fitting on the burner. Attach
one of the tubes in the
kit to the 3/16”
outlet fitting on the compressor, and the
other tubing to the bulkhead fitting. Attach
both tubes to the gauge in the kit. Be
careful to not make kinks in the tubing.
4. Start the burner by moving the wall thermostat above room temperature and note the air
compressor output on the gauge. If the gauge reading is in the 9-11 PSI range for the
EL-200B or in the 13-15 PSI range for the EL-375B or EL500B, the air compressor is
operating as designed and no further maintenance is required. Remove the test kit and
reinstall the
3/16” tubing, for normal operation.
5. If the gauge reading is below the normal range, check/do the following:
A. Coupling
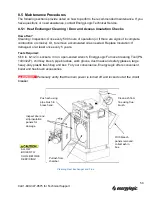
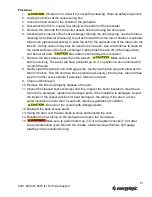
1. Inspect the air compressor coupling by unplugging the burner, loosening the Ignition
transformer screws, then lifting it back on its hinge.
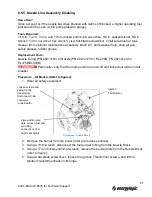
Coupling to Compressor
2. Spin the squirrel cage and note if the coupling slips on the burner motor or air
compressor shaft.
3. If the coupling is slipping, use a 1/8 inch Allen wrench to tighten the set screw.
4. If the set screws are tight, inspect the metal ends of the coupling for damage. Replace
as necessary.
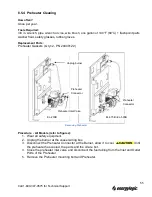
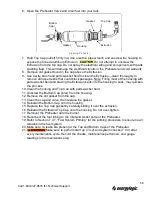
Air Compressor
Coupling
(Parts removed from
illustration for clarity.)
Set Screws
Remove Filter
Inlet
3/16” Outlet Fitting

