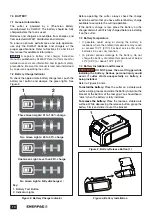
background image

9

1 2 3 

4

6

7 8

9

13

10

11

12

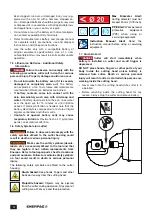
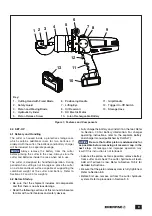
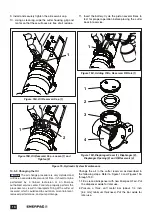
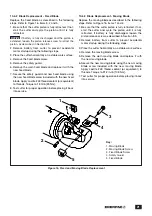
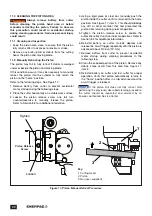
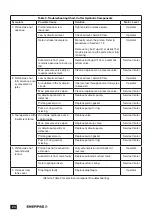
Figure 1, Features and Components

Key:

1.  Cutting Head with Fixed Blade
2.  Safety Guard
3.  Piston and Moving Blade
4.  Hydraulic Cylinder
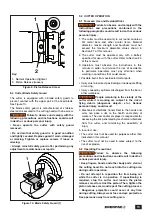
5.  Piston Release Screw

11. Grip/Handle
12.  Trigger On-Off Switch
13.  Storage Case

6.  Positioning Handle
7.  Lifting Eye
8.  Oil Reservoir
9.  DC Electric Motor
10.  Li-Ion Rechargeable Battery

6.0  SET-UP

6.1 Delivery and Handling

The cutter is housed inside a protective storage case 

which contains additional room for two batteries. If 

ordered with the cutter, the batteries and battery charger 

will be included in a separate package.


NOTICE

Always remove the battery from the cutter 

before placing the cutter in the case. Always store the 

cutter and batteries inside the case when not in use.
The cutter is designed for handheld operation. During 

periods when cutting is not in progress, place the cutter 

on a stable and level surface capable of supporting the 

combined weight of the cutter and battery. Refer to 

Sections 2.2 and 2.4 for weights.

6.2 Before Startup

•  Be sure that the shipment includes all components 

and that there is no obvious damage.

•  Read the following sections of this manual to become 

familiar with cutter features and safety devices.

•  Fully charge the battery and install it on the tool. Refer 

to Section 7.0 for battery information. For charger 

operating instructions, refer to the separate battery 

and charger manual (published by D

e

WALT).


NOTICE

Be sure that cutter piston is advanced as far 

as possible before removing oil reservoir cap in the 

next step. 

Oil leakage and improper operation may 

result if this instruction is not followed.

•  Advance the piston as far as possible, remove battery 

from cutter and check the cutter hydraulic oil level. 

Add oil if oil level is low. Refer to Section 10.5.2 for 

detailed instructions.

•  Be sure that the piston release screw is fully tightened. 

Refer to Section 8.3.

•  Before first use, remove air from the cutter hydraulic 

system. Refer to procedure in Section 9.3.

Summary of Contents for EBC20B

Page 1: ...his symbol to avoid the possibility of death or serious personal injury Safety Alert Symbols are used in conjunction with certain Signal Words that call attention to safety messages or property damage...

Page 2: ...or jammed moving parts broken components and any other condition that could make the tool operate incorrectly Place the 1 2 Hydraulic Cutter Safety Precautions NOTICE WARNING Failure to observe and c...

Page 3: ...t into tool or charger Do not crush drop or damage the battery Do not use a battery that has received a sharp blow cutter back into operation only after the fault has been identified and the identifie...

Page 4: ...atteries Additional Safety Information NOTICE DANGER Failure to observe and comply with the following precautions will result in death or serious personal injury Property damage could also occur Do no...

Page 5: ...A moment of inattention while operating power tools may result in serious personal injury b Use personal protective equipment Always wear eye protection Protective equipment such as dust mask non ski...

Page 6: ...y maintained power tools f Keep cutting tools sharp and clean Properly maintained cutting tools with sharp cutting edges are less likely to bind and are easier to control g Use the power tool accessor...

Page 7: ...f burns and or electric shock Death or serious personal injury could occur 2 5 Charger Specifications Manufacturer DeWALT Industrial Tool Co Region Americas Europe and Asia DeWALT Model No DCB115 DCB1...

Page 8: ...witch mounted on the cutter grip starts and stops the electric motor The trigger must remain pressed during the cutting process An automatic retract feature moves the piston to the fully retracted hom...

Page 9: ...ace capable of supporting the combined weight of the cutter and battery Refer to Sections 2 2 and 2 4 for weights 6 2 Before Startup Be sure that the shipment includes all components and that there is...

Page 10: ...you have sufficient battery charge available to complete the cutting operation If the battery charge is low place the battery on the charger and wait until it is fully charged before reinstalling it...

Page 11: ...sure that battery is removed from tool 2 Firmly grasp the grip handle with one hand 3 With your other hand firmly grasp the positioning handle and rotate the cutting head twisting it in either directi...

Page 12: ...d that the piston release screw is intended for occasional use only If the piston repeatedly fails to retract automatically after it is fully extended have the tool inspected by an Enerpac Authorized...

Page 13: ...e risk of accidents In particular operators must pay attention when working in conditions that could cause Possible burns from overheated metal parts Injury due to incorrect positioning or inadequate...

Page 14: ...igure 8 Position the material to be cut between the cutter blades so that it is perpendicular to the piston axis as shown in Figure 12 This will provide the best quality cut while placing the least am...

Page 15: ...e cutter is designed with an electronic protection system that will protect the battery against overloading overheating or deep discharge The cutter will automatically turn off if the electronic prote...

Page 16: ...ned with water NOTICE CAUTION To prevent possible injury always wear safety glasses or face mask when using compressed air Be sure there are no traces of oil grease or corrosive substances on the tool...

Page 17: ...fer to Figure 14 and Figures 15A through 15C during the following steps 1 Operate the cutter and advance the piston until there is a 1 8 inch 3 4 mm gap between the xed and moving blades until just be...

Page 18: ...ter back into service 10 5 3 Changing the Oil NOTICE The oil change procedure is very detailed and will take a considerable amount of time It should only be performed by a trained technician at an Ene...

Page 19: ...easy to cut but not brittle The bar material must be soft enough so that the bar will not break into two pieces before it is fully cut Later in this procedure the bar will be partially cut so that it...

Page 20: ...piston release screw to retract the piston If the piston is stuck use the bar to manually push the piston back until it retracts 38 Using a clean rag wipe the cutter housing grip and motor so that su...

Page 21: ...Nm 8 Test cutter for proper operation before placing it back into service 10 6 3 Blade Replacement Moving Blade Replace the moving blade as described in the following steps Refer to Figure 16 items 1...

Page 22: ...ace 3 Loosen the piston release screw one full turn counterclockwise to manually release the piston Refer to Section 8 3 for additional information 4 Using a rigid piece of steel bar manually push the...

Page 23: ...piston release screw is turned fully clockwise Refer to Section 8 3 6 Check that the battery is in good condition and not damaged Be sure that the battery is fully charged before installing it on the...

Page 24: ...full cycles to bleed air Operator Max pressure valve open Clean or replace max pressure valve Service Center Hydraulic pump dirty or defective Replace hydraulic pump Service Center Piston gasket worn...

Page 25: ...25 Notes...

Page 26: ...26 Notes...

Page 27: ...27 Notes...

Page 28: ...199 Gateway Ct Columbus WI 53925 USA www enerpac com Made in Italy WWW ENERPAC COM...

Reviews: