background image

8

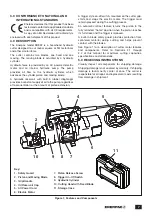
8.0  MAJOR FEATURES AND COMPONENTS

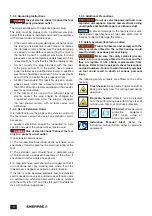
8.1  Trigger On-Off Switch


NOTICE:

  WARNING

To prevent serious personal injury, be 

certain that hands, fingers and other body parts are 

away from the cutting area before depressing the 

cutter trigger.

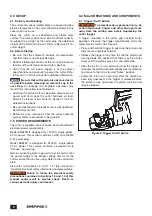
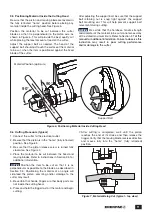
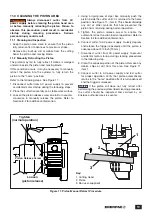
A trigger mounted in the cutter grip controls cutter 

operation. Pressing the trigger automatically starts the 

cutter electric motor. See Figure 2.
•  Press and hold the trigger to advance the piston and 

slide the moving blade forward.

•  Release the trigger at any time to stop the piston and 

moving blade. Be advised that there may be a brief 

delay until the piston comes to a complete stop.

•  After the piston is fully advanced and the trigger is 

released, the piston will automatically reverse direction 

and move to the fully retracted “home” position.

•  Automatic return can occur only after the piston has 

been fully advanced. If the trigger is released before 

the piston is fully advanced, the piston will stop and 

remain stopped.

Figure 2, Trigger On-Off Switch

6.0  SET-UP

6.1  Delivery and Handling

The cutter and various related items are housed inside a 

plastic storage case. The cutter should be stored in this 

case when not in use.
Place the cutter on a substantial and stable work 

surface. The work surface must be of sufficient capacity  

to support the weight of the cutter plus the additional 

weight of the material to be cut. Refer to Section 2.2 for 

cutter weight.

6.2  Before Startup

•  Be sure that the shipment includes all components 

and that there is no obvious damage.

•  Read the following sections of this manual to become 

familiar with cutter features and safety devices.

•  Verify that the AC power supply is of the correct 

specifications and capacity to power the cutter. Refer 

to Section 7.0 of this manual for additional information.


NOTICE

Be sure that cutter piston is advanced as far 

as possible before removing oil reservoir cap in the 

next step. 

Oil leakage and improper operation may 

result if this instruction is not followed.
•  Advance the piston as far as possible, disconnect AC 

power cord and check the cutter hydraulic oil level. 

Add oil if oil level is low. Refer to Section 10.5.2 for 

detailed instructions.

•  Be sure that the piston release screw is fully tightened. 

Refer to Section 8.2.

•  Before first use, remove air from the cutter hydraulic 

system. Refer to procedure in Section 9.3.

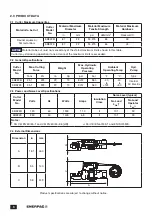
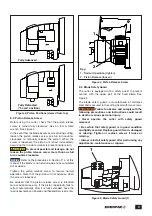
7.0  POWER REQUIREMENTS

The cutter is available in two versions, each with different 

electrical power requirements:
Model EBE22B is designed for 120VAC, single-phase, 

60 Hz power. This version contains a USA style NEMA 

6-15 power plug.
Model EBE22E is designed for 230VAC, single-phase 

50 Hz power. This version contains a European style 

“Schuko” power plug.
Before connecting electric power to tool, be certain that 

the power supply is the proper voltage and Hz for the 

cutter version that you are using. Refer to the cutter data 

plate.
Also refer to Sections 1.3 and 1.4 of this manual for 

important electrical safety information and precautions.


NOTICE:

  WARNING

Failure to follow the electrical safety 

precautions contained in Sections 1.3 and 1.4 of this 

manual could result in electric shock. Death or 

serious personal injury could occur.

Summary of Contents for EBE22

Page 1: ...is manual are DANGER WARNING CAUTION and NOTICE NOTICE DANGER Indicates a hazardous situation that if not avoided will result in death or serious personal injury NOTICE WARNING Indicates a hazardous s...

Page 2: ...gned to fit properly and to withstand high loads Non Enerpac parts may break or cause the product to malfunction Keep this manual for future reference in a place that is accessible to all persons oper...

Page 3: ...s when they become dull Suitably maintained cutting tools with sharp edges are less likely to jam and are easier to control CAUTION Failure to observe and comply with the following precautions and ins...

Page 4: ...the extension cord should be at least as great as the electrical rating of the tool 2 The extension cord should have a polarized plug at one end and a polarized receptacle at the other It should be w...

Page 5: ...dy inside the cutting head unless cutter is disconnected from AC power supply Death or serious personal injury will result if cutter is started while persons are working inside the cutting head Never...

Page 6: ...more of the maximum limits is exceeded 2 2 General Specifications Cutter Model No Max Cutting Force Weight Max Hydraulic Operating Pressure Ambient Operating Temp Hyd Pump Tons kN lb Kg psi bar F C Ty...

Page 7: ...ow to the hydraulic cylinder which advances the cylinder piston and moving blade A hydraulic reservoir with built in rubber diaphragm provides a constant supply of oil to the pump regardless of tool o...

Page 8: ...e is no obvious damage Read the following sections of this manual to become familiar with cutter features and safety devices Verify that the AC power supply is of the correct specifications and capaci...

Page 9: ...nce when the screw is loosened Be advised that the piston release screw is intended for occasional use only If the piston repeatedly fails to retract automatically after it is fully extended have the...

Page 10: ...al diameter tensile strength and hardness must not exceed the maximum allowable values shown in Section 2 1 of this manual 2 The cutter may be used only if powered by an electrical system compliant wi...

Page 11: ...Failure to observe this instruction may result in poor cutting performance and or damage to the cutter 90 90 Figure 6 Positioning Material Inside Cutting Head Material Position optimum Support Bolt 9...

Page 12: ...maintenance procedures must be performed under the following conditions Material must be removed from the cutting head The cutter must be disconnected from the AC power supply The cutter must be given...

Page 13: ...n oil dispenser with new Enerpac HF oil Put the dispenser aside for later use 2 Procure a thick soft metal bar about 1 4 inch 6 4 mm minimum thickness Put the bar aside for later use 10 5 1 Hydraulic...

Page 14: ...Cap Loosen 1 and Tighten 2 2 1 Figure 8B Vent Screw Loosen 1 and Tighten 2 2 1 1 Figure 8D Adding Oil to Reservoir Fill Hole 1 1 2 3 4 Figure 8E Diaphragm cover 1 Diaphragm 2 Diaphragm Opening 3 and O...

Page 15: ...with oil Wear eye and face protection to avoid injury due to splashing oil 14 Connect the cutter to the AC power supply 15 Cover the diaphragm opening with a rubber gloved hand to help prevent oil spl...

Page 16: ...sure cutter is positioned so that the oil reservoir cap is facing upwards Do not operate cutter for several hours preferably overnight to allow any remaining air to separate from the oil 33 Place the...

Page 17: ...to prevent accidental motor startup during the following steps 3 Place the cutter horizontally on a stable work surface with the oil reservoir cap facing upwards 4 Remove the fixed blade screws 5 Rem...

Page 18: ...Remove the worn moving blade and replace it with the new moving blade NOTICE If needed use a screwdriver or small pry bar to separate the worn moving blade from the mating surface of the piston 6 Sec...

Page 19: ...act after performing the previously described cleaning procedure the cutter should be inspected and serviced by an Enerpac authorized service center 11 0 CLEANING THE PISTON AREA NOTICE WARNING Always...

Page 20: ...ic storage case in a clean and dry location accessible only to authorized personnel 12 2 Return to Use after storage Before using the cutter after an extended period of storage or inactivity perform t...

Page 21: ...tor brushes worn Replace motor brushes if worn less than 0 2 inch 5 mm long Service Center Commutator worn Replace rotor and commutator assembly Service Center Motor fan damaged Replace motor fan Serv...

Page 22: ...asket worn Replace piston gasket Service Center Pump malfunction Repair or replace pump Service Center 3 Tool performs with insufficient force Max pressure valve open Clean or replace max pressure val...

Page 23: ...Notes...

Page 24: ...WWW ENERPAC COM...

Reviews: