19
1. Be sure that the cutter piston is fully retracted. If not, start
the cutter and cycle the piston until it is fully retracted.
NOTICE
If the piston will not retract in step 1, move the
piston release lever to position 2 to manually retract the
piston. Refer to instructions in Section 8.4. Also see
Figure 8.
2. Disconnect cutter from AC power supply to prevent
accidental motor start-up during the following steps.
3. Place the cutter horizontally on a stable work surface
with the handle facing upwards.
4. Open the cutter safety guard.
5. Remove the moving blade screws and blade holder.
6. Remove the worn moving blade and replace it with
the new moving blade.
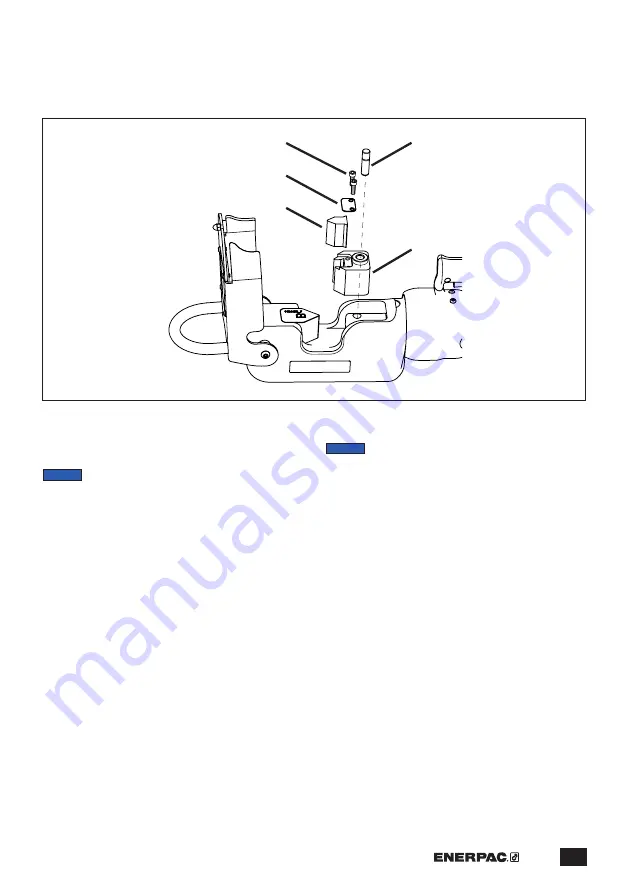
10.6.3 Blade Replacement - Moving Blade
Replace the moving blade as described in the following
steps. Refer to Figure 14, items 1 through 5.
Figure 14, Moving Blade Replacement
1
2
3
4
5
Key:
1. Moving Blade Screws
2. Blade Holder
3. Moving Blade
4. Positioning Pin
5. Moving Blade Support
NOTICE
In some instances it is possible for the moving
blade to become wedged into the moving blade support.
If needed, remove the positioning pin, remove the
moving blade support and pry or tap out the moving
blade from the blade support.
7. Secure the new moving blade with the new moving
blade screws included with the new moving blade
and blade holder. Apply Loctite 243 thread sealant (or
equivalent) to the screw threads. Torque to 91 in-lb
[10 Nm].
8. Close the cutter safety guard.
9. If piston release lever is in position 2, move lever
to position 1 to allow normal operation. Refer to
instructions in Section 8.4. Also see Figure 8.
10. Test cutter for proper operation before placing it
back into service.
Summary of Contents for ECCE26
Page 24: ...WWW ENERPAC COM...


