16
10.5.3 Changing the Oil
NOTICE
The oil change procedure is very detailed and
will take a considerable amount of time. It should only
be performed by a trained technician at an Enerpac
authorized service center. Failure to properly perform
the procedure may result in incomplete filling of the
cutter oil reservoir, which could lead to cavitation, air
entrainment, reduced performance and pump damage.
Change the oil in the cutter hydraulic reservoir as
described in the following steps. Refer to Figures 13A
through 13E and Figure 14:
1. Before beginning this procedure, purchase a new
ECCE32 seal kit from your Enerpac authorized
service center or distributor. Some of the seals in this
kit will be used later in this procedure. Refer to the
cutter repair parts sheet for a description of seal kit
items.
2. Fill a clean oil dispenser with new Enerpac HF oil. Put
the dispenser aside for later use.
3. Operate the cutter and extend the piston all the way
forward.
4. Disconnect the cutter from the AC power supply to
prevent accidental motor start-up during the following
steps.
5. Place the cutter in the horizontal position, on a stable
and level work surface, with the oil reservoir cap and
diaphragm cover pointing upwards. Place a pan or
suitable container under the cutter to catch any
spilled oil.
6. To prevent contamination, remove any built-up dust
and dirt from the oil reservoir cap, diaphragm cover
and surrounding area.
NOTICE
A small amount of hydraulic oil leakage may
occur when the diaphragm cover and reservoir cap are
removed in the next step. Be prepared to catch this oil in
a pan or with a clean rag. Dispose of spilled oil in
accordance with all applicable laws and regulations.
7. Remove the oil reservoir cap and, using an adjustable
face spanner wrench, loosen and remove the
diaphragm cover.
8. Remove the diaphragm from the diaphragm opening.
9. Completely drain all old oil from the cutter, turning
it upside down and using a suitable oil extraction
system (used oil extraction pump) if necessary, so
that no oil remains in the cutter hydraulic reservoir.
NOTICE
Dispose of all used oil in accordance with all
applicable regulations and laws.
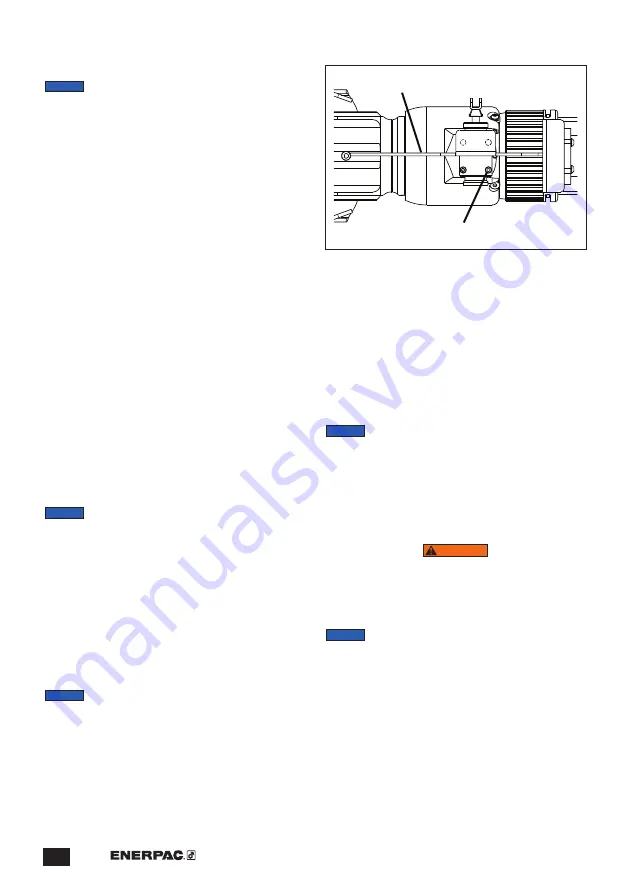
10. After all oil is evacuated, remove the three screws
for the standoff bracket and remove the standoff
bracket from the bottom of the cutter. See Figure 14.
11. Remove the directional control valve by removing
the four screws retaining it.
1
2
Figure 14, Standoff Bracket (1) and Directional
Control Valve Screws (2)
12. Position the cutter with the control valve oil holes
pointing straight down, and allow the remaining oil
to drain for 30 to 60 minutes. Toward the end of this
time, the end of the cylinder opposite the oil holes
can be elevated slightly to aid in the draining.
13. Reinstall the directional control valve, using the
new O-Ring seals from the ECCE32 seal kit (refer to
step 1 of this procedure).
14. Install the standoff bracket using the three screws.
Torque to 18 ft-lbs [25 Nm].
NOTICE
Use only new Enerpac HF oil in the following
step. Use of other oils may damage the cutter and may
invalidate the Enerpac product warranty.
15. Using the oil dispenser prepared in step 1, slowly
add new Enerpac HF oil through the oil drain/fill hole
and diaphragm opening until oil level is up to the top
of the drain/fill hole.
16. Install and securely tighten the oil reservoir cap.
NOTICE:
WARNING
To avoid serious personal injury, stay clear of cutting
head and blades during the following procedures.
Wear rubber gloves to prevent contact with oil. Wear
eye and face protection to avoid injury due to
splashing oil.
NOTICE
During the following steps, refer to Figure 5 for
directional lever positions.
17. Connect the cutter to the AC power supply.
18. Move the directional lever to position 2 (retract).
19. Cover the diaphragm opening with a rubber-gloved
hand to help prevent oil splashing.
20. Prime the pump by pressing and releasing the
trigger in short bursts. During this process, check
the oil level in the diaphragm opening and add oil
(as needed) to keep the reservoir filled. Failure to
keep reservoir full may result in cavitation and
pump failure. Pump is primed when piston starts
extending.
Summary of Contents for ECCE32
Page 23: ...Notes...
Page 24: ...WWW ENERPAC COM...


