If for any reason whatsoever, the installer of this product does not feel comfortable and/or safe, do not
proceed with the installation. The installation of this product involves walking on the roof as well as
climbing ladders. Do not attempt unless you understand all safety procedures involved with power tools,
climbing ladders and working on roofs. To obtain ladder safety, roof safety and power tool safety proce-
dures, contact your local hardware or building supply company and State or Provincial Workers’ Safety
Board.
The installation of Enersol Solar Panels may be performed on a low pitched shingle or metal roof. If an
installation varies from these types Enersol should be advised and asked for special installation instructions.
For example, with a flat roof installation, we do not advise cutting into the roof or drilling lag bolts into
the roof. On ground installations, panels should be insulated from the earth.
Enersol Products Inc., it’s agents, distributors and sales representatives are in no way responsible if safety
procedures, installation instructions and common senses are not followed or if Enersol is not consulted
should an unusual problem arise. If for any reason you question the installation instructions, DVD, safety
procedures and/or installation locations, do not proceed, and contact Enersol immediately at 905.659.2929.
Remember ...
SAFETY FIRST!
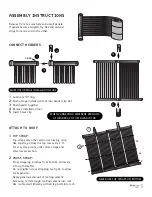
IN EACH
PANEL BOX
4 SECTIONS
WITH PRE-ATTACHED HEADERS
8 CLIPS
8 LAG BOLTS
8 O-RINGS
3 LONG STRAPS
2 SHORT STRAPS
SYSTEM KIT
(PURCHASED SEPARATELY)
1 ORANGE INSTALLATION TOOL
1 ENERSOL INSTALLATION DVD
1 TUBE ROOF LAGBOLT SEALANT
1 TUBE O-RING LUBRICANT
2 END CAPS
2 EXTRA O-RINGS
1 HEADER END CONNECTOR (HEC)
1 INSTALLATION GUIDE
1 WARRANTY CARD
SOLAR PANEL INSTALLATION GUIDE
2

