92
Do not connect an external bus to the
motherboard before the bus has been
programmed and is compatible with the control
of the unit.
CAUTION
Installation to the Modbus bus
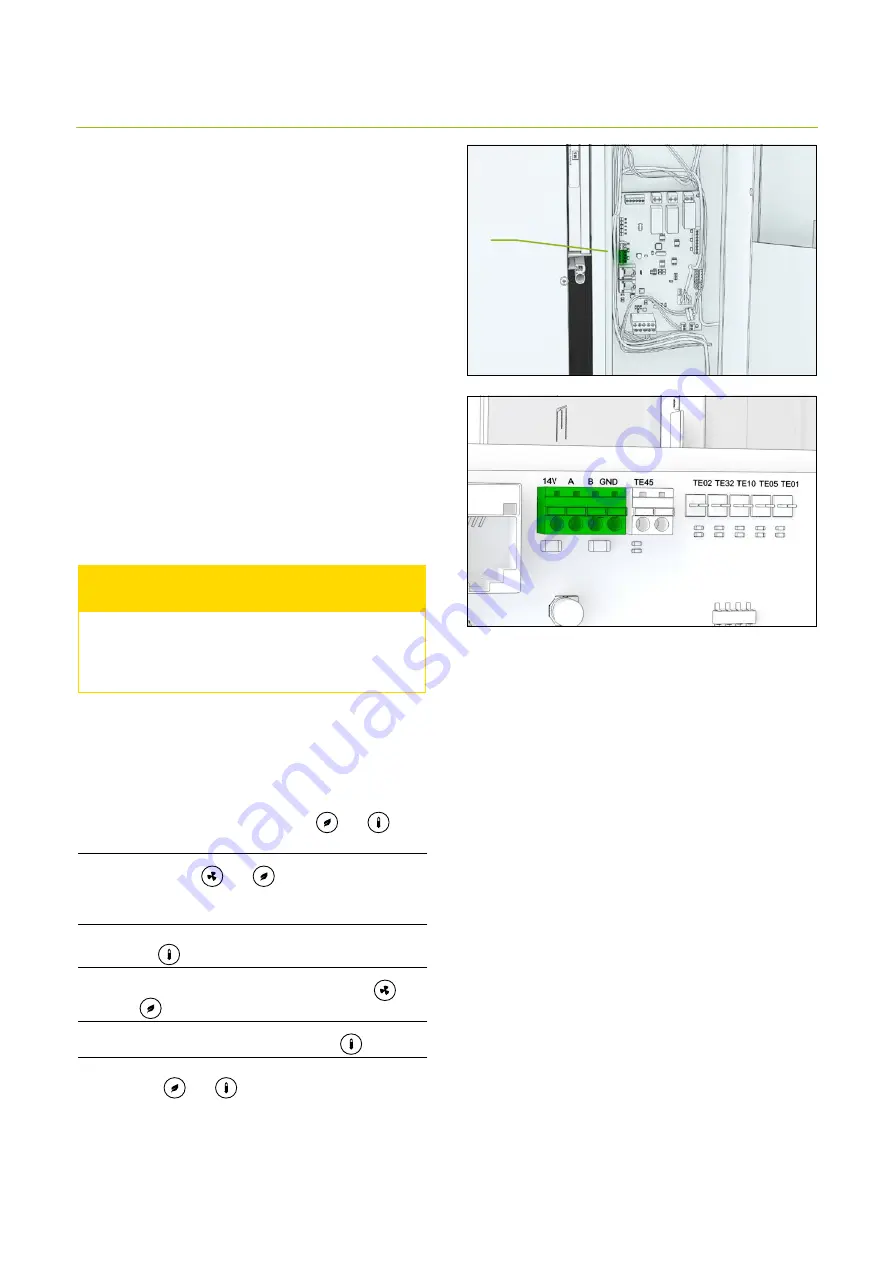
The ventilation unit can also be controlled via the Modbus
connector X26.
Modbus specification:
•
Modbus address 1 (default)
•
Data transmission protocol RS485
•
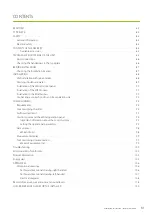
Modbus traffic via the motherboard’s Modbus
connector X26
•
Speed 9,600, 19,200 or 115,200 bps
•
8-bit
•
No parity or parity
The order of the poles in the Freeway connector is marked
in the controller board.
The Modbus registers are available on the Enervent
website at www.enervent.com.
X26
Setting the Modbus parameters to the
control system
1
Simultaneously press the buttons
and
three times in the control panel.
2
Using buttons
and
, choose the parameters
c31-c32.
• The meaning of each parameter is described in
section ‘Parameter list’ on page 16.
3
Select the parameter to be adjusted by pressing
button
for 3 seconds.
4
Change the parameter value using buttons
and
.
5
Confirm the value by pressing button
.
6
Exit the settings by simultaneously pressing
buttons
and
.
Summary of Contents for Alta eWind
Page 13: ...13 Ammattilaisen asennusohje Wifi moduulin asennus 1 2 A B A 3 4...
Page 24: ...24...
Page 26: ...26 2016 1254 2014 A A ENERGIA ENERGIJA ENERGY ENERGIE ENERGI ALTA A 44 dB 216 m3 h...
Page 27: ...27 Ammattilaisen asennusohje...
Page 28: ...28 Alta eWind Installationsanvisningar f r ventilationsaggregat Svenska...
Page 39: ...39 Installationsanvisningar f r yrkesfolk Installation av Wifi modulen 1 2 A B A 3 4...
Page 51: ...51 Ammattilaisen asennusohje...
Page 54: ...54 Installeringsinstruksjoner for ventilasjonsenheten Norsk Alta eWind...
Page 76: ...76...
Page 78: ...78 2016 1254 2014 A A ENERGIA ENERGIJA ENERGY ENERGIE ENERGI ALTA A 44 dB 216 m3 h...
Page 79: ...79 Installation instructions for professionals...
Page 80: ...80 Alta eWind Installation instructions for the ventilation unit English...
Page 91: ...91 Installation instructions for professionals Installation of the Wifi module 1 2 A B A 3 4...
Page 103: ...103 Ammattilaisen asennusohje...


