background image

7.5.3


Configure the Modem to Access the GPRS network. ....................27


7.5.4


Verify Registration Status ..............................................................28


7.5.5


Verify GPRS Activation..................................................................28


7.5.6


Configure the modem to access the Enfora Server. ......................29


7.5.7


Verifying Server connectivity. ........................................................31


8


GPS OPERATION AND VERIFICATION ....................................................34


8.1 

V

ERIFICATION OF 

GPS L

OCK

...................................................................34 

8.2 

V

ERIFY 

GPS 

OPERATION

.........................................................................34 

8.2.1


GPS Operation from Terminal .......................................................34


8.2.2


GPS Operation from Enfora Demo Server ....................................35


9


SAFETY INFORMATION FOR WIRELESS DEVICES ...............................36


9.1 

RF E

XPOSURE

.......................................................................................36 

9.2 

S

CIENTIFIC EVIDENCE ON 

RF 

EXPOSURE

...................................................37 

10


FCC COMPLIANCE STATEMENT ......................................................39


11


PRODUCT SAFETY INSTRUCTIONS .................................................40


REVISION HISTORY..........................................................................................41


Summary of Contents for Mini-MT GSM2228

Page 1: ...Application Note GSM2228AN001 Enfora Mini MT Quick Start Guide ver 1 01 ...

Page 2: ...9 6 MINI MT CONFIGURATION 10 6 1 DISPATCH NUMBER 10 6 2 SMS DESTINATION 10 6 3 SET GEO FENCE 11 6 4 USER DEFINED BUTTON S 11 6 4 1 User definable Button 11 6 4 2 User definable Button 11 6 5 SETTING THE EMERGENCY CALL NUMBER 11 6 6 DIALING THE EMERGENCY CALL NUMBER 12 7 PC SOFTWARE INSTALLATION 13 7 1 MINI MT USB COMPOSITE DEVICE DRIVER 14 7 2 MINI MT USB TO UART DEVICE DRIVER INSTALLATION 18 7 3 ...

Page 3: ...ng Server connectivity 31 8 GPS OPERATION AND VERIFICATION 34 8 1 VERIFICATION OF GPS LOCK 34 8 2 VERIFY GPS OPERATION 34 8 2 1 GPS Operation from Terminal 34 8 2 2 GPS Operation from Enfora Demo Server 35 9 SAFETY INFORMATION FOR WIRELESS DEVICES 36 9 1 RF EXPOSURE 36 9 2 SCIENTIFIC EVIDENCE ON RF EXPOSURE 37 10 FCC COMPLIANCE STATEMENT 39 11 PRODUCT SAFETY INSTRUCTIONS 40 REVISION HISTORY 41 ...

Page 4: ...Table of Figures Figure 1 Mini MT Features 3 Figure 2 Mini MT Front View 3 Figure 3 Mini MT Side View 4 ...

Page 5: ... tracking device This guide will provide basic instructions for configuring a Mini MT for evaluation purposes Advanced features are described in detail in the following reference documents Enabler IIG AT Command Set GSM0107PB001MAN Mobile Tracker AT Command Set GSM2000PB001MAN GSM2228AN001 Page 1 ...

Page 6: ...SB to mini USB cable not supplied CAW 6000 0006 Activated SIM card not supplied Personal Computer not supplied o Operating Systems Windows 2000 or XP o USB port Enfora Mini MT USB drivers available from support website www enfora com select Support select Downloads Accept choose GSM GSM2228AN001 Page 2 ...

Page 7: ...3 Overview of the Enfora Mini MT Geo Fence Volume Up PTC Push To Call User Defined Speaker LED s Volume Down Microphone Figure 1 Mini MT Features Figure 2 Mini MT Front View GSM2228AN001 Page 3 ...

Page 8: ...Headset Jack USB Connector Figure 3 Mini MT Side View GSM2228AN001 Page 4 ...

Page 9: ...w Blink 250mS 10Sec Low Battery less than 5 OFF Active Battery Blink when registering 500mS 1 Sec Blink for missed call 250mS 2 Sec Solid during call incoming or initiated Slow blink 500mS 10Sec Blink when locked 500mS 2 Sec Low Battery less than 20 Slow Blink 250mS 10Sec Low Battery less than 5 OFF Active Aux Same as above for Active Battery ON solid Same as above for Active Battery Fast Blink du...

Page 10: ...olatile memory If GPS is not available an error tone will be generated to alert the user that no geo fence was set 3 2 3 User Defined button The User Defined button is a programmable button that can be defined for various functions This button could be programmed to generate a call to a number different from the PTC button generate a geo fence with different parameters than the geo fence button se...

Page 11: ...de is not desirable See Figure 3 3 3 3 Speaker An integrated speaker allows the user to make a phone call to the pre configured dispatch number when in hands free mode The user can adjust the volume to a comfortable level using the volume up or down buttons WARNING The Mini MT is used in speaker phone or headset use only Do not use the device held up to the head The audio levels and SAR ratings ha...

Page 12: ...e retention clips Slide the battery away from the contacts and remove from the Mini MT NOTE The battery is initially provided with a red protective cover over the terminals Remove the protective cover by peeling off of the battery to expose the terminals Discard the protective cover after removal 4 2 Inserting the battery While the battery cover is removed insert the battery into the battery compa...

Page 13: ...under the battery Remove the battery door and the battery when accessing the SIM cardholder See battery Insertion Removal section of this document Note The SIM card is not provided with the Mini MT device The SIM must be obtained from the GSM GPRS service provider and must be provisioned by the operator for data and or voice Always take care to protect the SIM Without the SIM installed the Mini MT...

Page 14: ...ver installation 6 1 Dispatch Number The Dispatch Number is the phone number the Mini MT will call when the Push To Call PTC button is pressed To configure the Mini MT to call phone number 1 214 555 1212 enter the following command AT DSPATCH 12145551212 Enter After entering the dispatch number enter AT W Enter to save This will ensure that if the battery is removed the number will not need to be ...

Page 15: ... User definable Button The Mini MT button is user definable through the event engine The default state is to configure a mile radius geo fence at the current location 6 4 2 User definable Button The Mini MT button is user definable through the event engine This button function is not defined from the factory 6 5 Setting the Emergency Call number The Mini MT is capable of dialing an emergency numbe...

Page 16: ...PTC button and the button simultaneously The ON GPS and BAT LED s will flash in unison At this point momentarily release the PTC button and the CALL LED will flash Re depress the PTC button and confirm the LED s flash in unison again Release the and the PTC buttons The Mini MT will establish a call to the number configured in the AT EMERNUM command GSM2228AN001 Page 12 ...

Page 17: ...le Save this file to any location on your hard drive Double click the file to extract the twenty 20 included files Make a note of the location of these files on your hard drive You will need to access these drivers during installation Your first step will be double clicking on the PreInstaller exe file which you have just unzipped Click on OK after a successful installation Windows will find two s...

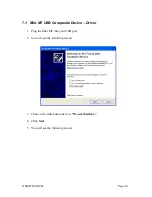
Page 18: ...omposite Device Driver 1 Plug the Mini MT into your USB port 2 You will see the following screen 3 Click on the radio button next to No not this time 4 Click Next 5 You will see the following screen GSM2228AN001 Page 14 ...

Page 19: ...6 Click on the radio button next to Install the software automatically Recommended 7 Click Next You will see the following screen GSM2228AN001 Page 15 ...

Page 20: ...ee the following screen if you do follow Step 10 otherwise proceed to Step 11 10 Click the Continue Anyway button 11 You will see the following screen while the drivers install 12 You may be prompted to point to the location of the files from this screen GSM2228AN001 Page 16 ...

Page 21: ...13 Browse to the correct location of the drivers and click OK 14 When the drivers have completed installing you will see the following screen 15 Click on Finish GSM2228AN001 Page 17 ...

Page 22: ...for the USB to UART Device should automatically start The following steps will help guide through the driver installation 1 You will see the following screen 2 Click on the radio button next to No not this time 3 Click Next You will see the following screen GSM2228AN001 Page 18 ...

Page 23: ... Next You may see the following screen if you do follow Step 6 otherwise proceed to Step 7 6 Click the Continue Anyway button NOTE You may be prompted to search for a specific driver file If you see the following screen browse to the location of the Mini MT driver files GSM2228AN001 Page 19 ...

Page 24: ...7 Click OK 8 When the drivers have completed installing you will see the following screen 9 Click on Finish to complete the installation GSM2228AN001 Page 20 ...

Page 25: ...Stop Bits 1 Parity None Flow Control None 7 3 2 Determine which COM port to use On older computers there is usually a built in COM port This is normally COM1 With a USB connection you will need to determine which COM port it is using 1 Open up the System Properties window This is done through the Control Panel System or right click on My Computer and select Properties Select the Hardware Tab On Wi...

Page 26: ... Expand the Ports section by selecting the sign beside Ports COM LPT Your window should look similar to the following 3 Plug the Mini MT into your USB port The window should change to show Mini MT USB to UART Device GSM2228AN001 Page 22 ...

Page 27: ...operly installed and will not work 7 4 Start HyperTerminal The following configuration steps assume that you are using the Windows XP Operating System Follow these steps 1 Click Start Programs Accessories Communications HyperTerminal You should see the following screen 2 Enter a name for the connection In this example the name is Enfora MiniMT 3 Click OK The next window that will appear is the Con...

Page 28: ...tion 7 3 2 Step 2 For the example we are using COM3 5 Click OK The next window is the Port Settings window 6 Set the communication port to 115200 bits per second 8 data bits no parity 1 stop bit and no flow control 7 Make sure the settings match the example GSM2228AN001 Page 24 ...

Page 29: ...Type the command ATI in the main window and press the Enter key You should see the following screen with the response from the Mini MT The response Enfora Inc indicates that you are successfully communicating with the Enfora Mini MT GSM2228AN001 Page 25 ...

Page 30: ... to factory defaults send the following command AT F CR To save the current configuration to memory send the following command AT W CR Reset the modem with the following command AT RESET CR 7 5 2 Connecting the Mini MT to the Enfora Test Server The following information will be required from the SIM card provider refer to GSM0000AN019 Network Configuration Worksheet APN Username if required Passwo...

Page 31: ... isp cingular Set the username and password with the following command AT CGPCO 1 username password 0 CR NOTE Substitute the correct username and password if your cellular carrier requires a username and password Example AT CGPCO 1 ISP CINGULARGPRS COM CINGULAR1 0 CR Configure the Mini MT for auto GPRS registration with the following command AT AREG 2 CR Save the changes to memory with the followi...

Page 32: ...home network OR CGREG 0 5 GPRS registered roaming 7 5 5 Verify GPRS Activation Enter the following command to verify that the Mini MT is activated on the GPRS network AT NETIP CR The Mini MT is activated if it has been assigned an IP address Example of successful GPRS activation at netip NETIP 166 217 226 214 066 102 163 231 066 209 010 201 NOTE The above IP addresses will be different for each de...

Page 33: ...only The mobile modem must initiate a conversation with a remote server before the remote server can talk to the modem IP addresses are dynamically assigned and can change Some IP addresses are NAT and are non routable These issues are addressed with the following configuration commands The examples will use the following information Modem ID name MT_Test Remote Server IP address 67 103 214 214 Re...

Page 34: ...with the following command AT FRIEND 1 1 67 103 214 214 Set the port number with the following command AT UDPAPI 1721 Enable periodic messages wakeup to be sent to the server every 60 seconds with the following command AT WAKEUP 1 1 GSM2228AN001 Page 30 ...

Page 35: ... the computer To install Java Runtime please visit the Java website here http www java com en download manual jsp 1 Start Internet Explorer and enter the following URL http 67 103 214 214 udpapp 2 Enter the name used in the Modem ID MDMID command in the box 3 Select Connect GSM2228AN001 Page 31 ...

Page 36: ...oximately 60 seconds wakeup messages should be seen in the window NOTE Selecting the Clear button will erase the contents of the ASCII Data window 5 Enter the following command in the Command Data text box ATI 6 Click on the Write button GSM2228AN001 Page 32 ...

Page 37: ...7 Verify that you see the following modem response showing Enfora Inc If so you have successfully configured the modem to talk with the server GSM2228AN001 Page 33 ...

Page 38: ... operation The Mini MT GPS status may be obtained locally through the USB connection or through the GPRS connection to a server The following steps allow the user to determine GPS operation through a terminal program and also through the Enfora Demonstration web server 8 2 1 GPS Operation from Terminal From the terminal window send the following command AT GPSRD 10 CR The modem should respond with...

Page 39: ...ommand Data text box then selecting Write The following screen shot shows the command and the response NOTE The third field is a single character field representing the status of the GPS reading There are three valid character for this field and are described below A OK V Warning 9 Enfora Specific response that GPS solution is not valid and the last known GPS location is being substituted GSM2228A...

Page 40: ...less RF devices such as the Mini MT employs a unit of measurement known as the Specific Absorption Rate or SAR The SAR limit set by the FCC is 1 6W kg SAR values at or below that limit are considered safe for the general public Before a wireless RF device is made available for sale to the Public it must be tested and certified to the FCC that it does not exceed the SAR limits established by the FC...

Page 41: ...velopments and identify research needs related to RF biological effects It is generally agreed that further research is needed to determine what effects actually occur and whether they are dangerous to people In the meantime standards setting organizations and government agencies are continuing to monitor the latest scientific findings to determine whether changes in safety limits are needed to pr...

Page 42: ...site www nrpb org Again the scientific evidence does not show a danger to users of wireless phones including children and teenagers If you want to take steps to lower exposure to RF the measures described above would apply to children and teenagers using wireless phones Specifically reducing the time of wireless phone use and increasing the distance between the user and the RF source will reduce R...

Page 43: ... uses and can radiate radio frequency energy and if not used in accordance with instructions can cause harmful radiation to radio communication However there is no guarantee that interference will not occur in a particular installation If the equipment does cause harmful interference in radio and television reception which can be determined by turning the equipment on and off the user is encourage...

Page 44: ...s FCC regulations prohibit using your wireless device during any air flight Turn off your Mini MT during flight and at all other times as requested by the flight crew by removing the battery Do not use the Mini MT in the vicinity of blasting areas where it might interfere with remote control RF devices used to set off explosives Although it is rare wireless phones can generate sparks Do not use or...

Page 45: ...Revision History Date Rev Author Description 08 30 06 D O Neil Draft 12 01 06 1 00 S Ollmann Edits 02 06 07 1 01 S Ollmann Added safety FCC and RF exposure information GSM2228AN001 Page 41 ...

Reviews: