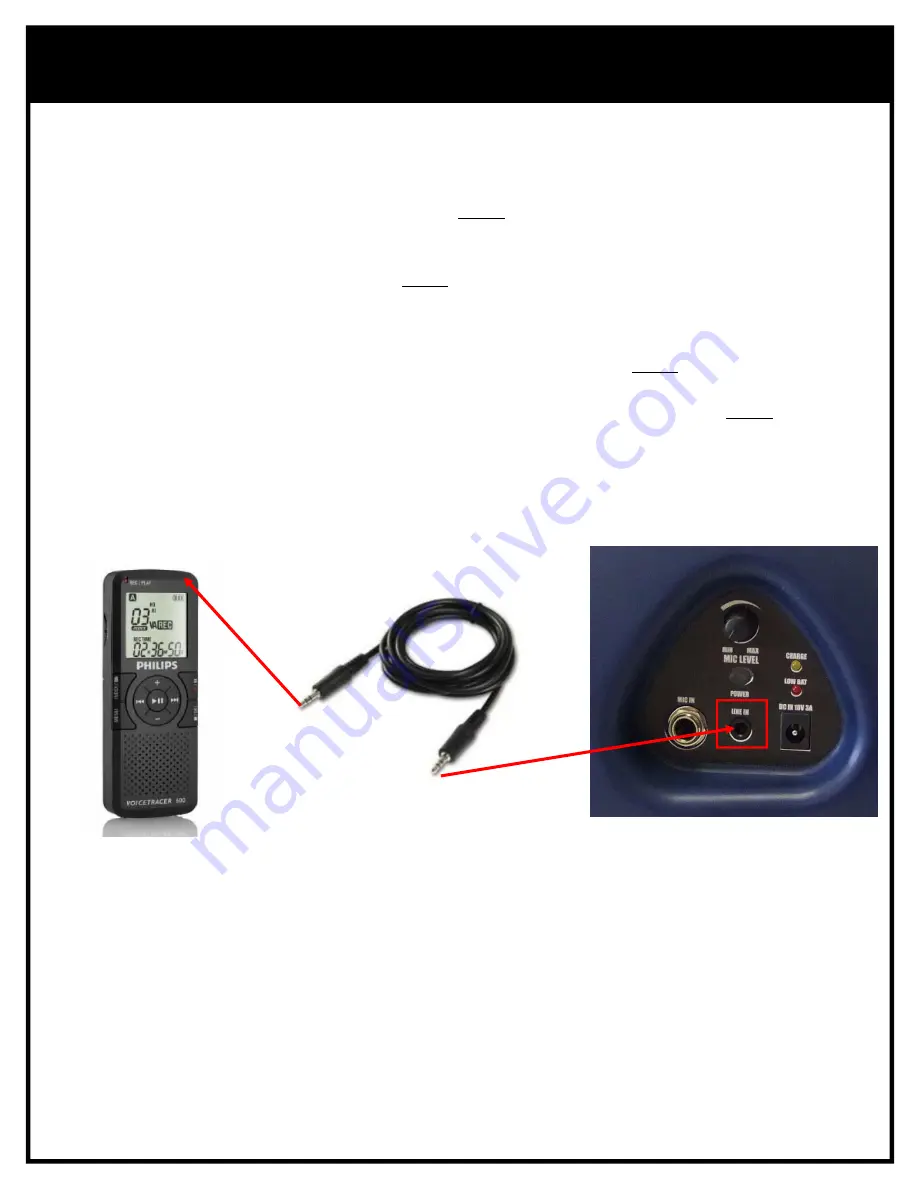
Connecting an External Audio Device Source (i.e. Digital Voice Recorder) to the Loudspeaker:
1.
Insert either male plug of the “
1/8” (3.5mm) Patch Cable
” into the Loudspeaker’s “
LINE IN
” jack.
2.
Check that the Loudspeaker’s “
MIC LEVEL
” dial is set to a low/mid volume output level and then power the
Loudspeaker unit by pressing the “
POWER
” button.
NOTE:
The “
POWER
” button will turn
green
signaling that
the unit is receiving power.
3.
Insert the remaining male plug of the “
1/8” (3.5mm) Patch Cable
” into the “
HEADPHONE
” or “
EAR
” audio
output jack of the “
Digital Voice Recorder
.”
NOTE:
To connect the Loudspeaker to an External Audio Device
Source equipped with a ¼” (6.35mm) or RCA/Composite audio output jack an adapter MUST be used (not
included).
4.
Power up the connected “
Digital Voice Recorder
” and set the volume output level of the device to a mid/high
level and press the device’s “
PLAY
” button to be begin the audio broadcast.
NOTE:
Adjust the Loudspeaker’s
“
MIC LEVEL
” dial until the audio broadcast volume output level has been achieved.
5.
After operations, power down the Loudspeaker by pressing the unit’s “
POWER
” button.
NOTE:
The “
POWER
”
button LED will turn off signaling that the device is powered off.
6.
Disconnect the “
1/8” (3.5mm) Patch Cable
.”
7.
Perform the “
LOUDSPEAKER BATTERY CHARGING
” procedure provided in this manual.
LOUDSPEAKER LOCAL/WIRED OPERATIONS
(continued):
Loudspeaker’s
“LINE IN” Jack
1/8” (3.5mm) Patch Cable
Digital Voice Recorder
(External Audio Source Example)
10.


