ENFORCER LOW-VOLTAGE BATTERY CUT-OFF
2
SECO-LARM U.S.A., Inc.
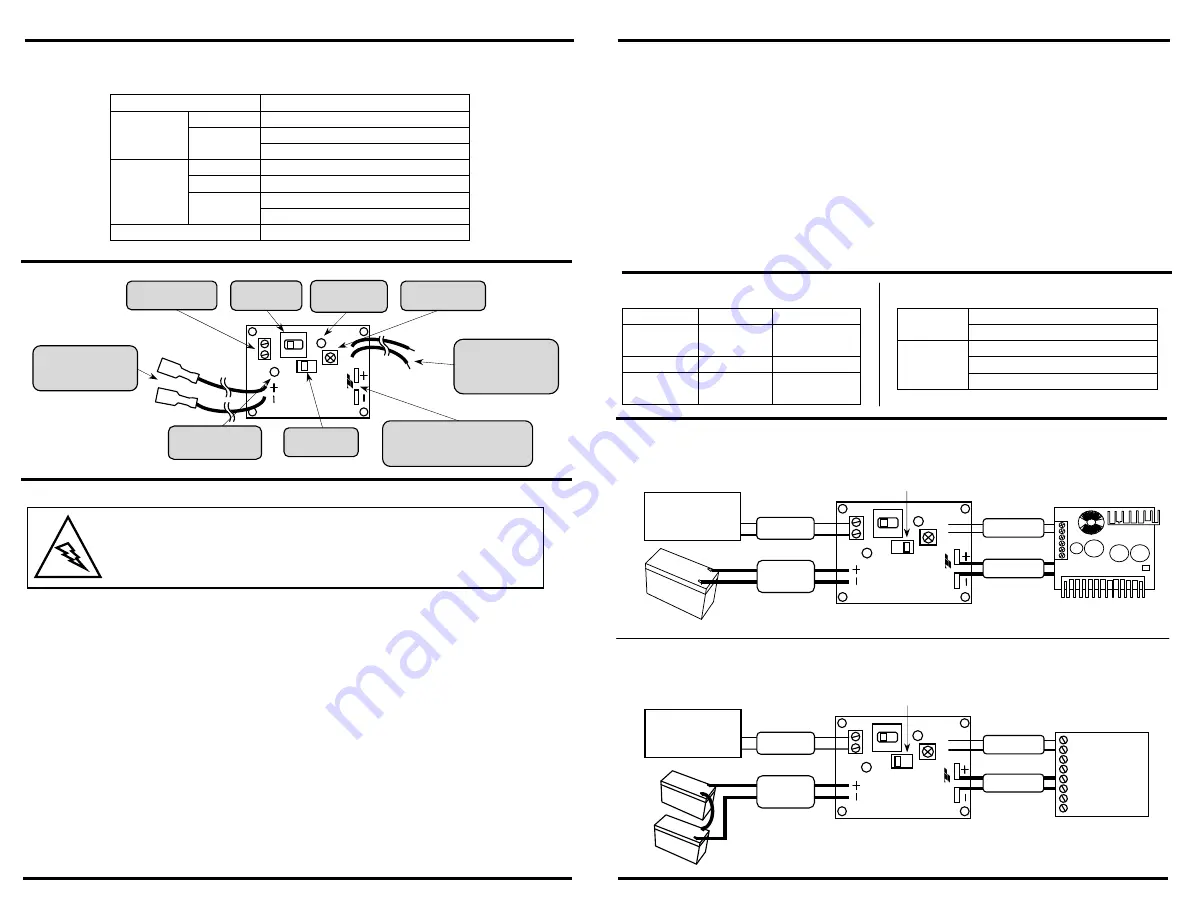
Overview:
Relay contact rating
7Amp@30VDC
LED
indicators
AC
Green
DC
Red: 12VDC
Blue: 24VDC
Connections
AC input
Terminal block
AC output
Gray wire leads
DC
Quick-connect terminal (battery side)
On-board male spade terminal
*
Dimensions
2
3
/
8
” x 1
3
/
4
” x
7
/
8
” ( 60 x 45 x 22 mm)
*Must connect for proper operation.
IMPORTANT: The polarity on all wiring connections MUST be
connected properly; incorrect polarity connection will damage the
unit. When using 24VDC the voltage selector switch MUST be set
at 24VDC, incorrectly setting the unit may cause damage.
Specifications:
For operating voltages please see Table 1 on Page 3.
Installation:
1.
Disconnect the AC power and back-up battery from the control panel or power supply.
2.
Turn the master switch of the ST-BD01Q OFF (factory default is OFF).
3.
Select the correct voltage setting (12 or 24 VDC) via the 12/24 VDC selector switch (factory
default is 12VDC).
4.
If necessary, connect the low voltage AC to the AC input terminal block.
5.
Connect the AC output gray wires from the ST-BD01Q to the AC input of the control panel or
power supply.
6.
Connect the male spade terminals of the ST-BD01Q to the DC output terminals of the control
panel or power supply.
Must connect for proper operation.
7.
Connect the female spade lugs of the battery wires to the back-up battery.
Observe correct polarity.
8.
Use the included double sided tape and secure the ST-BD01Q module on the desired location.
9.
Double check all connections before turning the master switch ON.
S
T
-B
D
01
Q
1
2
1
2
AC input
(green terminal block)
AC Output
to
AC input of control
panel or power supply
(9” gray wires)
12/24 VDC
selector switch
Master
ON/OFF switch
Green LED AC
power indicator
DC connector
male spade terminal connects to
control panel or power supply
Dual-color DC
power indicator LED
Adjustable voltage
cut-off knob
Battery wires
to
back-up battery
(10” red and black wires)
ENFORCER LOW-VOLTAGE BATTERY CUT-OFF
SECO-LARM U.S.A., Inc
3
Green LED
Off, AC power not present
On, AC power present
Dual-color
LED
Off, DC power not present
Red, 12VDC present
Blue, 24 VDC present
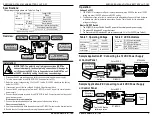
Sample Application #1: Connecting to a 12VDC Power Supply
or Control Panel
Sample Application #2: Connecting to a 24 VDC Power Supply
or Control Panel
1.
The ST-BD01Q turns off both AC and DC power to the control panel or power supply.
2.
The green LED indicates AC power is present.
3.
The dual-colored LED indicates DC power is present and if it is 12 or 24VDC (see Table 2).
Master ON/OFF Switch:
1.
The ST-BD01Q’s voltage cut-off point is preset at approximately 9.6VDC when set at 12VDC
setting and about 19.6VDC when set at 24VDC setting.
2.
To adjust the voltage cut-off point, carefully turn the adjustable voltage cut-off knob clockwise
to increase and counter-clockwise to decrease. See the Table 1 below for the adjustable
voltage cut-off range.
Table 1: Operating Voltage
12VDC
24VDC
DC operating
voltage
10~14 VDC
22~28 VDC
AC input
12~18 VAC
24~30 VAC
Adjustable
cut-off range
9~10 VDC
19.2~20.3 VDC
Table 2: LED Indicators
Operation:
Voltage Cut-Off:
S
T
-B
D
01
Q
Control
Panel
ST-UVDA-W180Q
Open-frame
Transformer
Two 12VDC Backup
batteries in series
ST-BD01Q
AC Input
Battery
wires
S
T
-B
D
01
Q
1
2
1
2
Set at 24VDC
AC Output
24 VDC
ST-2406-5A
Power supply / charger
or control panel
12VDC Backup
battery
ST-BD01Q
Set at 12VDC
ST-UV16-W100Q
Open-frame
Transformer
AC Input
Battery
wires
AC Output
12VDC
1
2
1
2


