background image


8

Chapter 2: Installation Guide 

2.1 Hardware Installation 

2.1.1 54/108M Wireless MINIPCI Adapter Hardware Installation 

To install the adapter, follow these steps listed below:


1.  Turn off your desktop PC and disconnect the power. 

2.  Open your PC case and locate an available MINIPCI slot on the motherboard. Remove the 

metal  slot  cover  on  the  back  of  the  PC.  Check  with  your  computer  manufacturer  for 
instructions if needed. 

3.  Slide the MINIPCI Adapter into the PCI slot. Make sure that all of its pins are touching the 

slot's  contacts.  Once  the adapter  is  firmly  in  place,  secure  its  fastening  tab  to  your  PC's 
chassis with a mounting screw. Then, close your PC case. 

4.  Reconnect your PC’s power and turn on your desktop PC. 

2.2 Software Installation 

2.2.1 Overview 

The Adapter’s Setup Wizard will guide you through the Installation procedure for Windows 2000, 
XP. The Setup Wizard will install the Wireless Client Utility (WCU) and drivers. 

When  you  install  the  hardware  before  installing  the  software,  the  system  will  prompt  “Found 
New  Hardware  Wizard”  window,  click  Cancel,  and  run  the  Setup  Wizard  program  on  the 
CD-ROM.   

The Setup steps for Windows 2000 and Windows XP are very similar. The following setup steps 
are for Windows 2000. 

2.2.2 Software Installation for Windows 2000 

1.  Insert the Resource CD into your CD-ROM drive, click Start and choose Run. In the field 

that  appears,  enter  F:\WCU\Win2000_XP\Setup.exe  (if  “F”  is  the  letter  of  your  CD-ROM 
drive), figure 2-1 should then appear.   

2.  You  can  click  Cancel  to  end  the  installation  on  the  Preparing  Setup  screen,  figure  2-1. 

Otherwise, the Setup Wizard will display a screen similar to that shown in figure 2-2 after a 
moment. 

Summary of Contents for EMP-8603

Page 1: ...IEEE 802 11a b g Wireless MiniPCI Card User s Manual V1 0...

Page 2: ...ouraged to try to correct the interference by one of the following measures Reorient or relocate the receiving antenna Increase the separation between the equipment and receiver Connect the equipment...

Page 3: ...y Domain change As long as 3 conditions above are met further transmitter test will not be required However the OEM integrator is still responsible for testing their end product for any additional com...

Page 4: ...dule is authorized only for use in device where the antenna may be installed such that 20 cm may be maintained between the antenna and users The final end product must be labeled in a visible area wit...

Page 5: ...formity For the following equipment Wireless Adapter Is herewith confirmed to comply with the requirements set out in the Council Directive on the Approximation of the Laws of the Member States relati...

Page 6: ...2 2 1 Overview 8 2 2 2 Software Installation for Windows 2000 8 Chapter 3 Configuration 14 3 1 Current Status 14 3 2 Profile Management 15 3 2 1 Add or Modify a Configuration Profile 16 3 2 2 Remove a...

Page 7: ...6 Package Contents The following contents should be found in your box One 54 108M Wireless MiniPCI Adapter in Bulk Pack...

Page 8: ...imes It adopts 108M Super GTM WLAN Transmission Technology which offers the highest throughput performance available on the market today link rates of up to 108Mbps In dynamic 108M mode the device can...

Page 9: ...nstallation 2 2 1 Overview The Adapter s Setup Wizard will guide you through the Installation procedure for Windows 2000 XP The Setup Wizard will install the Wireless Client Utility WCU and drivers Wh...

Page 10: ...allation Program 4 The Setup Wizard will ask you to choose a Setup type in figure 2 3 It is recommended that you select Install Client Utilities and Driver Select Install Driver Only to install driver...

Page 11: ...igure 2 4 should appear Click Yes to continue the Installation or click No to end the Installation Figure 2 4 Question 6 Click Browse to change the destination location for the software in figure 2 5...

Page 12: ...return to the previous page or click Cancel to end the Installation Figure 2 6 Select a Program Folder 8 The Setup Wizard will notify you of how to proceed with the installation shown in figure 2 7 C...

Page 13: ...e warning box is similar to that shown figure 2 8a Please select Continue Anyway to continue installation Figure 2 8a Windows XP Warning Box 10 After the files have been successfully copied the screen...

Page 14: ...13 Figure 2 9 Finish...

Page 15: ...is yellow there is poor signal strength and the RSSI is between 5dB and 10dB If the icon is green there is good signal strength and the RSSI is between 10dB and 20dB If the icon is green there is exce...

Page 16: ...Data Encryption Displays the encryption type the driver is using Configure the encryption type on the Security tab of Profile Management Server Based Authentication Shows whether server based authenti...

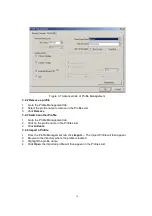
Page 17: ...dify The Profile Management dialog box will display a screen similar to that shown in Figure 3 4 1 Edit the General tab Profile Name Identifies the configuration profile This name must be unique Profi...

Page 18: ...encryption keys choose the Shared Key radio button and click Configure to fill in the Define Shared Keys window None No security not recommended Note If the access point that the wireless adapter is a...

Page 19: ...of the access point with which it associates Wireless Mode when Starting an Ad Hoc Network Specifies Super G Only for 108M Wireless MINIPCI Adapter or 2 4 GHz 54 11Mbps to start an Ad Hoc network if...

Page 20: ...Switch another Profile 1 Go to the Profile Management tab 2 Click on the profile name in the Profiles List 3 Click Activate 3 2 4 Import a Profile 1 From the Profile Management tab click Import The Im...

Page 21: ...ation Figure 3 9 Export Profile Dialog 3 2 6 Scan Available Networks 1 Click Scan on the Profile Management the Available Infrastructure and Ad Hoc Networks window will appear 2 Click Refresh to refre...

Page 22: ...ile will appear in the Auto Selected Profiles box 4 Highlight a profile in the Auto Selected Profiles box 5 Click Move Up or Move Down as appropriate Note The first profile in the Auto Selected Profil...

Page 23: ...mes transmitted and received Total bytes transmitted and received Figure 3 12 Diagnostics tab 3 3 1 Check Driver Information The Adapter Information contains general information about the wireless net...

Page 24: ...nsmit Statistical Information The Advanced Statistics show receiving and transmitting statistical information for the following receive and transmit diagnostics for frames received by or transmitted t...

Page 25: ...g in the unlicensed radio spectrum at 2 4GHz and backward compatibility with IEEE 802 11b devices and WEP encryption for security Ad hoc Network An ad hoc network is a group of computers each with a w...

Page 26: ...phanumeric key identifying a wireless local area network For the wireless devices in a network to communicate with each other all devices must be configured with the same SSID This is typically the co...

Page 27: ...CI Selection A External DC power in support V 5V a Red pin connects to V 5V Max power 5W b Black pin connects to GND Selection B External DC power in support V 9 24V a Red pin connects to V 9 24V Max...

Page 28: ......
Reviews: