Ritchie Blackmore Signature
- an all-tube guitar amp head featuring the sound and the
look that fascinates a guitar legend such as Ritchie Blackmore.
The Ritchie Blackmore Signature amp is based on a classic, proven design, but is also
equipped with a number of innovative features. For instance, you can vary the amount
crunch for the two channels Clean and Lead via the Gain Lo/Hi switch. More special features:
Two Master Volume controls, the Contour button and a Custom Footswitch Port for the
connection of a compact footpedalboard that enables the direct access to all important
switching functions of the amp.
With its high-quality components and superior finishing, this amp is built to last.
You will find guidelines on care and maintenance of tube amps on the last page of the
manual. Please read and heed these before operating your amp.
The ENGL team is absolutely convinced you will be just as facinated by this amp as Ritchie
Blackmore is.
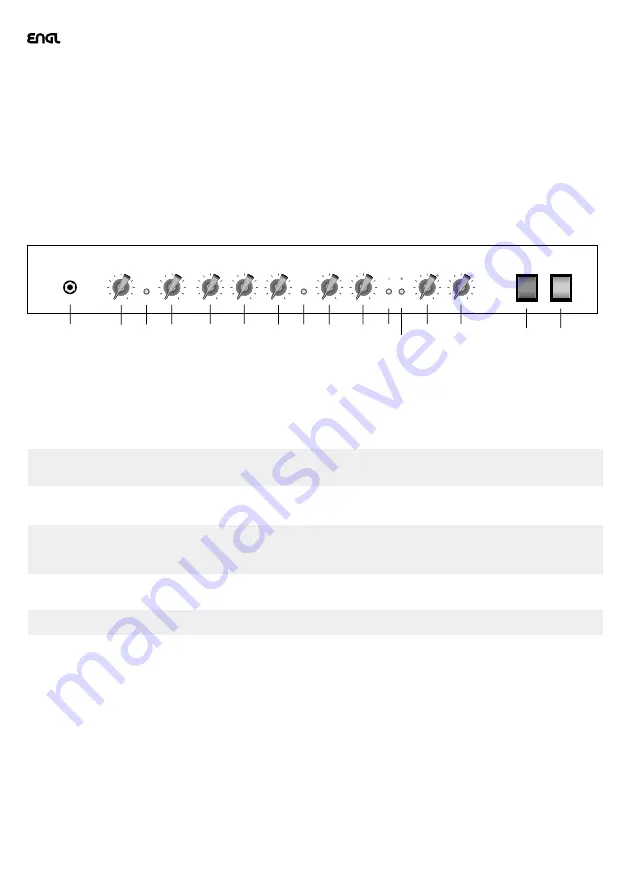
1 Input:
Unbalanced 1/4" input jack.
2 Clean:
Input sensitivity control for the Clean channel, adjust the volume by means of this control and
the Lo Gain Master (13); in the Hi Gain mode use the Hi Gain Master (14) for adjusting the volume.
3 Bright:
Alters the EQ by boosting the upper treble range;
effectiveness decreases at higher Clean Gain (2) settings.
4 Lead:
Gain control for the Lead channel, controls the amount of preamp overdrive in the Lead mode.
CAUTION:
Extremely high gain and volume levels in the Lead mode can produce strong
feedback. Avoid feedback squeals, they lead to hearing loss and damaged speakers!
A TIP from the Designer: To get Crunch or Rhythm sounds, set this control between the 9 and 1
o´clock´s position (depending on the type of pick-up) and leave the Gain Boost pushbutton in
the Off-position.
5 Bass:
Bottom end voicing control of the preamps´s passive EQ.
6 Middle:
Mid-range voicing control of the preamp´s passive EQ.
7 Treble:
Upper range voicing control of the preamp´s passive EQ.
A TIP from the Designer: To get an idea of this amp’s capabilities, I suggest you set all control pots to
the 12 o’clock position. For hi-gain Lead sounds, your best bet is to turn the treble and presence knobs
well down to prevent the pickups and speakers from interacting at hi levels and generating feedback
(the recommended setting is somewhere in the 8 to 12 o'clock range).
8 Contour:
Press this button to alter the mid-EQ. When the button is pressed, frequencies between 300
and 500 Hz are boosted slightly. You can also activate this function via the respective footswitch
connected to Jack 19 or 21.
A TIP from the Designer: The tone is better audible while you are playing a Lead solo, when Contour is
activated. I recommend the other option (Contour off) for metal style power chords.
9 Lead Presence:
This control defines the Treble response in the poweramp stage for the Lead channel.
10 Lead Volume:
Volume control for the Lead channel (pre-FX loop, influences the Send level).
Use this knob to dial in the desired balance of levels between the Lead and Clean channels.
11 Gain Lo - Hi:
When you press this button, the input sensitivity of both channels is increased. The
Hi-Gain function actually turns Clean into a "Crunch" channel, and Lead into a "Heavy Lead" channel.
It can also be activated via a suitable footswitch connected to Jack 19 or 20; the Gain Lo/Hi button is
automatically disabled when you connect a footswitch. The yellow LED illuminates to indicate "Hi-Gain"
mode is active.
12 Clean - Lead:
Channel selector pushbutton for Clean and Lead modes, red LED indicate Lead mode;
This function can also be activated via the respective footswitch connected to jack 20 or 21.
Once a footpedal is connected, the channel selector pushbutton is deactivated.
13 Master A - Lo Gain:
Located after the effects loop in the signal chain, this knob determines the
overall volume of the power amp when Lo Gain preamp mode is selected. Note that this is a dedicated
knob with a fixed assignment to Lo Gain mode. However, when you connect the respective footswitch to
jack 19 or 21, the knob is no longer assigned exclusively to Lo Gain mode. This means that you can select
the master A or the master B volume knob via footswitch to activate two different master volumes for
each preamp mode. To learn more about selecting modes and master levels, see section 19 or 21.
The red LED next to the knob lights up when this knob determines the master volume level.
Front Panel
1
2
3
4
5
6
7
8
9
10
11
13
14
15
16
12
Input
Lead
Presence
Lead
Volume
Clean
Lead
Bass
Middle
Treble
Bright
Contour
Gain
Lo / Hi
Clean
Lead
Power
Stand By
Master A
Lo Gain
Master B
Hi Gain
Ritchie Blackmore
Signature 100


