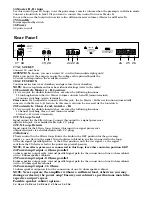
Rear Panel
19 20
21 22 23
24
17 18
17 AC SOCKET
Connect AC cord here
ATTENTION:
Ensure you use an intact AC cord with an insulated plug only!
Before you power the amp up, ensure the voltage value printed beside the
AC socket corresponds to the available current.
18 AC FUSE BOX
Contains mains fuse (rear chamber) and spare fuse (front chamber).
NOTE:
Ensure replacement fuses bear identical ratings (refer to the table)!
19 Footswitch: Master A - B; Contour
1/4" stereo jack for double footswitches, executes the following functions:
1.Switching between the two Master volume controls A and B (mono terminal)
2.Contour switching (stereo terminal).
Please note:
If a footpedal is connected to this jack, the Lo Master - Hi Master function automatically
converts to the Master A - B feature. In this case it can only be accessed via the footswitch.
20 Footswitch: Clean - Lead; Gain Lo - Hi
1/4" stereo jack for double footswitches, executes the following functions:
1.Channel switching Clean - Lead (mono terminal)
2.Gain Lo - Hi (stereo terminal).
21 F.X. Loop: Send
Signal output for the Effects loop. Connect this output to a signal processor’s
input/return jack via a shielded cable with 1/4" plugs.
22 F.X. Loop: Return
Signal input for the Effects loop. Connect this input to a signal processor’s
output/send jack via a shielded cable with 1/4" plugs.
23 Balance
FX mix control for the Effects loop: Rotate the knob to the DRY position for the pure amp
signal, i.e. no effect on the signal. Turn clockwise to blend in an effect connected to the loop
to the dry signal (parallel/passive). At the Effect position, only the wet signal, i.e. the signal
sent from the FX device is fed to the power amp (serial/passive).
NOTE:
If no effects processor is connected to this loop, leave this control in position DRY!
24 Poweramp Output: 4 Ohms parallel
4 ohms speaker output jacks, internal parallel signal path for the connection of one 4 ohms cabinet
or two 8 ohms speaker cabinets.
25 Poweramp Output: 8 Ohms parallel
8 ohms speaker output jacks, internal parallel signal path for the connection of one 8 ohms cabinet
or two 16 ohms speaker cabinets.
26 Poweramp Output: 16 Ohms
16 ohms speaker output jack, for the connection of one 16 ohms speaker cabinet.
NOTE: Never operate the amplifier without a sufficient load, otherwise you may
damage or destroy the power amp! Ensure your cabinet’s specifications match the
espective output’s specs.
Possible speaker cabinet options:
1 x 4z or 2 x 8z or 1 x 8z or 2 x 16z or 1 x 16z.
25
14 Master B - Hi Gain
Use this control (post FX Loop) to set the poweramp´s master volume when the preamp is in Hi-Gain mode.
Connect a footswitch to Jack 19 if you want to convert this control for use as Master B.
You can then use the footswitch to activate two different master volumes (Master A and Master B).
15 Stand By
Poweramp standby switch.
16 Power
AC power on/off.
Footswitch
F.X.Loop
Master A/B
Contour
Clean/Lead
Gain Boost
Send
Return
Balance
Poweramp Output
8 Ohms parallel
1 x 8 ohms
2 x 16 ohms
16 Ohms
Dry
Effect
SERIAL NUMBER:
WIRED FOR:
REPLACE FUSE
ONLY WITH SAME TYPE
AND RATING !
VOLTAGE
FUSED
100-120 V
220-240 V
5 A
2,5 A
4 Ohms parallel
1 x 4 ohms
2 x 8 ohms
DO NOT OPEN !
RISK OF ELECTRIC SHOCK !
DO NOT EXPOSE THIS EQUIPMENT
TO RAIN OR MOISTURE !
CAUTION !
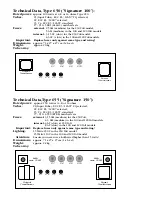
100 W All-tube Guitar Head Amp-TYPE 650
Ritchie Blackmore
Signature 100
,
designed by Horst Langer
MADE IN GERMANY
!
26


