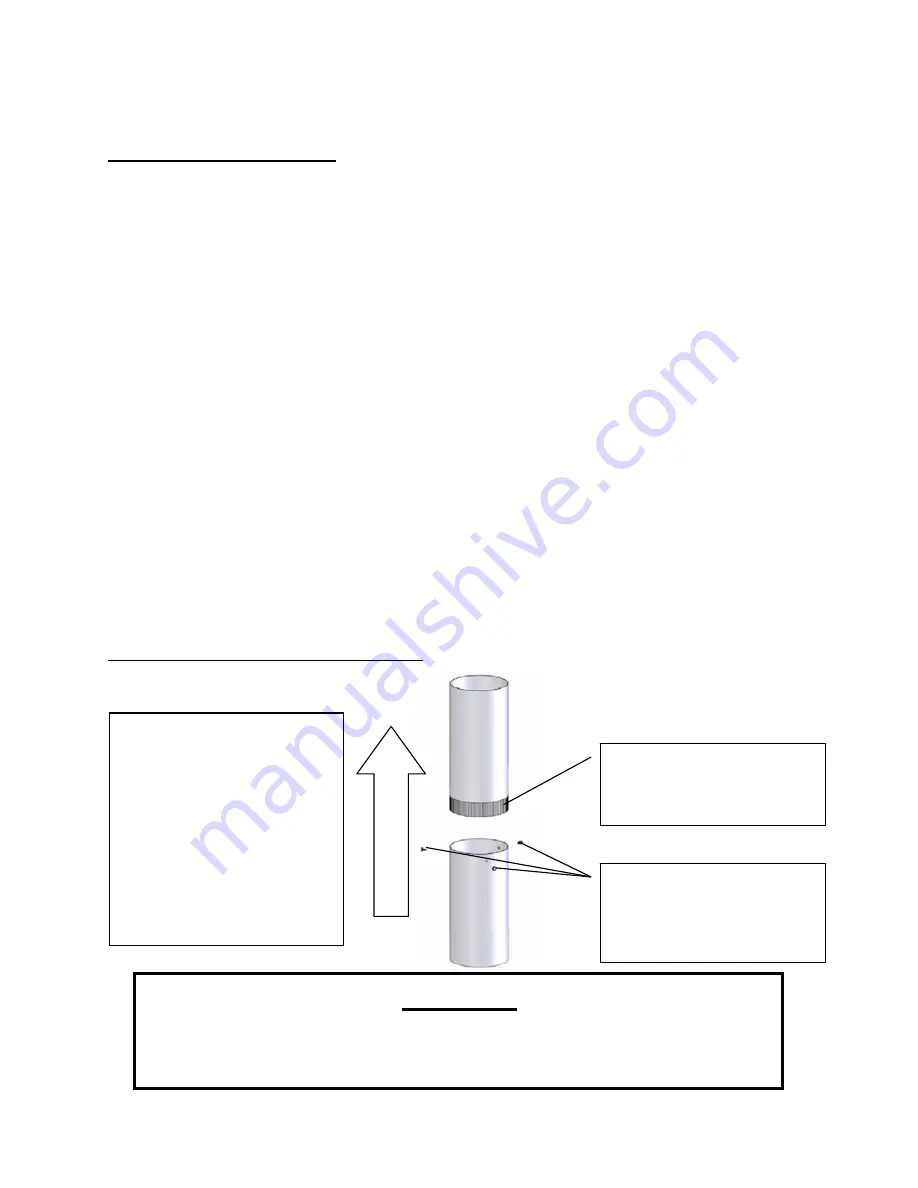
background image

Page | 9 


Flue


Gas


Dire

ct

ion


Additional


Venting


Information


INSTALLATION


• 

Do


not


mix


and


match


components


from


different


pipe


manufacturers


when


assembling


your


venting


system


(i.e.


Do


NOT


use


venting


pipe


from


one


manufacturer


and


a


thimble


from


another).


• 

We


require


a


minimum


chimney


height


of


15.0


ft.


Chimney


systems


shorter


than


this


may


not


create


the


amount


of


draft


which


is


required


to


operate


this


wood


burning


unit.


• 

Do


not


use


makeshift


compromises


when


installing


the


venting


system;


have


existing


chimney


systems


inspected


before


use


and


be


certain


all


new


chimney


systems


are


installed


to


the


manufacturer’s


specifications


and


with


only


UL


listed


components


(ULC


if


Canada).


• 

Prefabricated


venting


systems


used


for


this


stove


must


be


listed


to


ULC


S629


(Canada)


and


UL


103HT


(US).


• 

Never


install


a


draft


inducer


or


any


other


system


which


increases


the


natural


draft


of


the


chimney;


similarly,


do


not


install


a


barometric


or


stovepipe


damper


with


this


unit.


• 

Never


use


single


wall


or


double


chimney


connector


as


a


chimney


system;


never


pass


either


type


of


chimney


connector


through


a


combustible


wall


without


carefully


following


the


manufacturer’s


instructions


and


those


listed


in


the


following


page


on


Wall


Pass

‐ 

Throughs.


NEVER


pass


chimney


connector


through


an


attic,


floor,


closet


or


roof.


• 

Only


use


24


gauge


MSG


black


single


wall


chimney


connector


or


UL


Listed


(ULC


if


Canada)


double


wall


chimney


connector.


Single


Wall


Chimney


Connector


Installation


The


male


end


of


single


wall


chimney


connector


is


installed


facing


down


so


that


any


liquid


creosote


in


the


flue


will


run


into


the


unit


instead


of


onto


the


outside


of


the


pipe


(the


natural


draft


in


the


chimney


system


will


prevent


smoke


leakage


at


the


joints).


Crimped


or


male


end


of


single


wall


chimney


connector


must


face


down.


Fasten


each


single


wall


chimney


connector


joint


with


three


sheet


metal


screws.


WARNING


• 

INSTALL


VENT


AT


CLEARANCES


SPECIFIED


BY


THE


VENT


MANUFACTURER

.


• 

HOT!


Do


not


touch!


Severe


burns


or


clothing


ignition


may


result.


• 

Glass


and


other


surfaces


are


hot


during


operation.


Summary of Contents for 32-NC

Page 1: ...wood fuel burning appliance Keep children furniture fixtures and all combustibles away from any heating appliance SAVE THESE INSTRUCTIONS SAFETY NOTICE Failure to follow these instructions can result in property damage bodily injury or even death For your safety and protection follow the installation instructions outlined in this manual Contact your local building or fire officials about restricti...

Page 2: ...Purchase Date of Manufacture Serial Number This information can be found on the safety tag attached to the rear of the unit Have this information on hand if you phone the factory or your dealer regarding this product Keep children away CAUTION Supervise children in the same room as this appliance Alert children and adults to the hazards of high temperatures Do NOT operate with protective barriers ...

Page 3: ...5 Troubleshooting Guide Troubleshooting 26 Parts List Parts List 27 Warranty Sample Tag 28 Warranty Details 29 Important Notice 30 Warranty registration Form 31 EPA Addendum follows Warranty Section This manual is available for free download on the manufacturer s web site It is a copyrighted document and resale is strictly prohibited The manufacturer may update this manual occasionally and cannot ...

Page 4: ... our web site and call our Technical Support department at 800 245 6489 if you need any help with your unit We are nearly always able to help walk you through any repairs problems or questions you may have PLEASE NOTE While information obtained on our web site and through our 800 number is always free of charge there will be a service charge incurred with any on site repairs or maintenance that we...

Page 5: ...issions 2 0 grams hr CO Emissions 2 3 grams min Heat Output Range 16000 39600 Btu hr Efficiency 70 HHV Certified To UL 1482 2011 R2015 and ULC S627 00 R2016 Notes for this unit Product may vary slightly from diagrams Clearances are the minimum for this unit and may need to be increased to have proper vent clearances Follow all venting manufacturer clearances and local codes The maximum heating cap...

Page 6: ...eeping the entire chimney system inside the heated envelope of the home will ensure a strong easy to initiate draft in the chimney Although exterior chimney systems often function properly they are more likely to suffer from cold down drafts at start up or provide weak draft to the unit Also consider the cross sectional area of the chimney although existing masonry chimneys can often be used a lar...

Page 7: ...5 87 6 15 38 1 11 27 9 12 30 5 21 53 3 Double Wall Chimney Connector Unprotected Surface 26 66 34 5 87 6 12 30 5 8 20 3 12 30 5 21 53 3 Single Wall Chimney Connector Unprotected Surface with side shields 22 55 9 30 5 77 5 15 38 1 11 27 9 8 20 3 17 43 2 Double Wall Chimney Connector Unprotected Surface with side shields 22 55 9 30 5 77 5 12 30 5 8 20 3 8 20 3 17 43 2 Notes for this unit The product...

Page 8: ...de official to be certain your installation meets local and national fire codes and if you re uncertain about how to safely install the stove we strongly recommend contacting a local NFI certified installer to perform the installation ALWAYS install vent pipe in strict adherence to the instructions and clearances included with your venting system DO NOT CONNECT THIS UNIT TO A CHIMNEY FLUE SERVING ...

Page 9: ...tric or stovepipe damper with this unit Never use single wall or double chimney connector as a chimney system never pass either type of chimney connector through a combustible wall without carefully following the manufacturer s instructions and those listed in the following page on Wall Pass Throughs NEVER pass chimney connector through an attic floor closet or roof Only use 24 gauge MSG black sin...

Page 10: ...INSTALLATION Wall Pass Throughs In Canada the installation must conform to CAN CSA 8365 when passing through combustible construction Page 10 ...

Page 11: ...wall chimney connector joint check manufacturer s recommendations when double wall chimney connector is used Drill three holes in the flue collar of the unit and attach the chimney connector to the unit using sheet metal screws holes should be pre drilled in flue collar from factory Properly attach the prefabricated chimney system to the home in strict accordance with the prefabricated chimney sys...

Page 12: ...at each single wall chimney connector joint check manufacturer s recommendations when double wall chimney connector is used Drill three holes in the flue collar of the unit and attach the chimney connector to the unit using sheet metal screws holes should be pre drilled in flue collar from factory Properly attach the prefabricated chimney system to the home in strict accordance with the prefabrica...

Page 13: ...himney connector is used Drill three holes in the flue collar of the unit and attach the chimney connector to the unit using sheet metal screws holes should be pre drilled in flue collar from factory Avoid numerous elbows and excessive horizontal runs as both will lead to poor draft and increased creosote accumulation Horizontal runs of chimney connector must never exceed 4 0 ft and the overall le...

Page 14: ...is unit is direct connected it will require six inch 6 diameter 24 gauge pipe from the stove through the damper opening NOTE The chimney connector must be attached to the appliance with a minimum of three 3 screws and 3 screws should be used to attach each adjoining section We highly recommend having the chimney fully lined with a 6 inch liner to ensure proper draft This will make it necessary to ...

Page 15: ...Safety Standard Chimney Cap Spark Arrestor Class A Chimney System Roof Flashing and Storm Collar Joist Shield Firestop Mobile Home Approved Double Wall Chimney Connector Use silicone to create a vapor barrier where the chimney passes through to exterior HUD CFR 3280 Part 24 as well as any applicable local codes Outside Combustion Air The use of outside combustion air is mandatory when installing t...

Page 16: ...stible A hearth rug is NOT an approved substitute for a proper hearth pad For the US The floor protector must extend at least 16 in from the front of the fuel opening 8 in from the sides of the door opening and 8 in from the rear of the unit For Canada The floor protector must extend at least 450 mm from the front of the fuel opening 200 mm from the sides of the door opening and 200 mm from the re...

Page 17: ...as measured by a magnetic thermometer on the right or left side of the stove above the door Once this temperature has been reached allow the fire to die out with the air control open The second and third break in fires should be a bit larger with some small dry splits added to the kindling load The temperature goal during these fires is about 350 F 450 F don t let the fire get hotter than that Cre...

Page 18: ... in the firebox as possible o Avoid loading arrangements that result in tightly packed wood pieces Select orientations that result in gaps between wood pieces and or wood pieces sitting higher in the firebox o Any bark should face up to facilitate quick ignition o Once visible flame reaches the secondary tubes close the door and set air to maximum When visible secondary combustion is established t...

Page 19: ...her than cordwood particularly coal and charcoal can result in hazardous concentrations of carbon monoxide being emitted into the dwelling For these reasons NEVER burn coal or charcoal in this cordwood stove Installing a carbon monoxide detector and being aware of the symptoms of carbon monoxide poisoning can help reduce the risk of carbon monoxide related issues This unit was designed for operati...

Page 20: ...r Do not burn wet or green unseasoned logs Do not use logs made from wax and sawdust in your wood stove they are made for open hearth fireplaces If you use manufactured logs choose from those made from 100 percent compressed saw dust Build hot fires For most appliances a smoldering fire is not a safe or efficient fire Keep the doors to your wood burning appliance closed unless loading or stoking t...

Page 21: ...the chimney connector system Since the chimney connector is generally exposed to high exhaust temperatures inspect it carefully for leaks and weak spots replace any questionable pieces In the case of straight through the roof chimney system be certain to remove the ceramic fiber baffles before pushing the chimney sweeping brush down into the firebox Forcefully hitting the top of the baffle with a ...

Page 22: ...ets purchased from England s Stove Works specifically for this unit Gaskets 1 Door This unit comes with a 5 8 rope gasket around the door that should be replaced at least every year To replace the door gasket Part AC DGKNC the old gasket must first be removed entirely prior to adding the new adhesive you may have to scrape the old cement from the door channel Once the cement and gasket have been a...

Page 23: ...generally be light and water is normally sufficient to remove the deposits If stubborn soot persists use a cleaner made specifically for this purpose Do not scrape the glass or use abrasive cleaners 3 Rinse the glass with clean water and dry the glass before resuming normal operation Glass Replacement 1 Remove the door from the stove and rest it face down on a firm work surface 2 Using a 5 16 wren...

Page 24: ...le To replace reverse the above procedure make sure to install the tubes in the correct order Front to Back Ceramic fiberboard replacement There are four fiber boards located in the top of this stove in two layers While the bottom layer is oriented North South as shown the top layer is oriented East West To replace a cracked or broken board first remove the front burner tube Then remove the board ...

Page 25: ...ed holes in the Side Heat Shield with the existing holes in the Rear Heat Shield and fasten with the screws provided See Page 7 for clearances with and without side heat shields Diagram Number Brick Size Part Number Quantity per Stove 1 9 x 4 x 1 25 AC SB 24 2 8 x 2 x 1 25 AC SB8X2X1 25 2 3 9 x 4 x 1 25 with 1 x 3 Notch AC SBN1X3 1 4 4 x 3 75 x 1 25 AC SB4X3 75X1 25 1 5 4 x 2 5 x 1 25 AC SB2 5 1 R...

Page 26: ...rating Stove at Low Burn Rate 8 Wood Loaded Too Close to Glass Coals build up in firebox 9 Operating Stove at High Burn Rates 7 1 Operate the stove at higher burn rates to allow the air wash system to keep the glass clean 8 1 Never load wood so that it is touching the ceramic glass viewing window 9 1 Reduce combustion air control and allow coals to burn down before reloading Fire burns out of cont...

Page 27: ...nsity Rope AC SHN Nickel Spring Handle for Door Firebox Components AC 30BT4 Front tubes 1st and 2nd position AC 30BT2 Rear Tubes 3rd 4th and 5th position AC 30CFB Ceramic Fiber Board 4 total needed More AC 03BN Nickel Ash Pan Knob AC MBSP Hi Temp Black spray paint AC 30SHSB Side Heat Shield System FOR BRICK LAYOUT AND PART NUMBERS PLEASE SEE PAGE 25 ...

Page 28: ... unit s Manufacture Date and Serial Number in the blank spaces on this sample tag for future reference This sample tag also shows the safety info such as UL ULC testing standard etc for your local officials or anyone else who may need reference information ...

Page 29: ...r expense or service during periods of malfunction or non use Do NOT use substitute materials or components to replace original equipment 4 All liability for any consequential damage for breach of any written or implied warranty is disclaimed and excluded 5 This warranty does not cover internal wear parts of the combustion system including the firebrick lining and gaskets Some states do not allow ...

Page 30: ...to send your warranty information in Mailing Address England s Stove Works Inc Technical Support Department P O Box 206 Monroe Virginia 24574 Fax Number 434 929 4810 Twenty four hours a day Online Registration Visit our warranty registration website at http www heatredefined com WARRANTY CARD LOCATED ON NEXT PAGE For parts warranty replacement procedures may be found at our parts store site at hea...

Page 31: ... State Zip Code Unit Information Refer to the sticker on the back of the manual or box to complete this section IX Model Number Purchase Date X Purchase Price XI Serial Number Mfg Date Purchase Questions How did you first hear about our product Please check one Word of Mouth Burn Trailer Demonstration Internet Other Where did you receive information about our product Via Telephone Dealer Name of d...

Page 32: ...it is installed close to neighboring homes This wood stove operates on a natural draft system in which the chimney system pulls air through the stove This unit must be installed in accordance with the following detailed descriptions of venting techniques not installing the stove in accordance with the details listed here can result in poor stove performance property damage bodily injury or death A...

Page 33: ...essive horizontal runs and elbows as both will reduce the draft of the venting system and will result in poor stove performance INSPECT your venting system often to be certain it is clear of creosote fly ash and other restrictions CLEAN the venting system as detailed in the maintenance section of this manual ADHERE to the 10 3 2 rule regarding chimney terminations INSTALL single wall chimney conne...

Page 34: ...ght wood in the right amount and good fire building practices The following practical steps will help you obtain the best efficiency from your wood stove or fireplace Season wood outdoors through the summer for at least 6 months before burning it Properly seasoned wood is darker has cracks in the end grain and sounds hollow when smacked against another piece of wood Store wood outdoors stacked nea...

Page 35: ... BURN GARBAGE LAWN CLIPPINGS OR YARD WASTE MATERIALS CONTAINING RUBBER INCLUDING TIRES MATERIALS CONTAINING PLASTIC WASTE PETROLEUM PRODUCTS PAINT OR PAINT THINNERS OR ASPHALT PRODUCTS MATERIALS CONTAINING ASBESTOS CONSTRUCTION OR DEMOLITION DEBRIS RAILROAD TIES OR PRESSURE TREATED WOOD MANURE OR ANIMAL REMAINS SALT WATER DRIFTWOOD OR OTHER PREVIOUSLY SALT WATER SATURATED MATERIALS UNSEASONED WOOD...

Page 36: ... on the Proper Use of Air Controls in the Operation section ASH REMOVAL Follow your Owner s manual s instructions regarding removal and disposal of ashes REPLACEMENT of parts that are critical to emissions performance Follow your Owner s manual s instructions regarding replacement of gaskets and other parts that are critical to emissions performance Remember This wood heater needs periodic inspect...

Page 37: ...oxide is an odorless colorless gas which can be deadly The use of a carbon monoxide detector is strongly recommended Compliance EPA Certified to comply with 2020 particulate emission standards using cord wood Tamper Warning This wood heater has a manufacturer set minimum low burn rate that must not be altered It is against federal regulations to alter this setting or otherwise operate this wood he...

Reviews: