background image

•  Do NOT attempt to move or store this outdoor stove until ALL ashes and coals are completely extinguished.

•  Do NOT remove ashes until they are completely extinguished and cooled, and the stove is completely cooled.

•  Do NOT overload this outdoor stove.   NOTE: If ANY part of this outdoor stove is glowing red, it is overloaded  

     and is over-firing.

•  Use proper protection if moving or adding any fuel.

•  Do NOT place any utensils or any hot parts of this outdoor stove onto combustible surfaces, including grass,    

     wooden deck or furniture.

•  Avoid breathing smoke from the fire. Avoid getting smoke into your eyes.

•  This outdoor stove should be thoroughly inspected and cleaned on a regular basis.

•  After a period of storage or non-use, check for any signs of damage, and for creosote build-up. Do NOT operate  

     until all necessary repairs and/or cleaning is completed.

•  Do NOT use oven cleaners or abrasive cleaners, as they can damage this product.

•  Do NOT clean any part of this outdoor stove in a self-cleaning oven, as it may damage the finish.

•  Use only England’s Stove Works, Inc. factory authorized parts. The use of any other part can be dangerous, and  

     will void your warranty.

•  Do NOT force parts together. Doing so may cause injury and may damage the product.

•  Death, serious injury or damage to property may occur if the above instructions are not followed.

OPERATION:


 CAUTION: Do NOT add gasoline, kerosene, diesel fuel, lighter fluid, alcohol or ANY flammable liquid to light, 

enhance or relight a fire.

Operation

 of the Rocket Stove is simple by design.

1.  Be sure the stove is completely assembled, i

ncluding the cooking grate 

on top of the burn area. Position cooking  

 grate with tiers facing upward, as this will accommodate a variety of sizes of cookware.

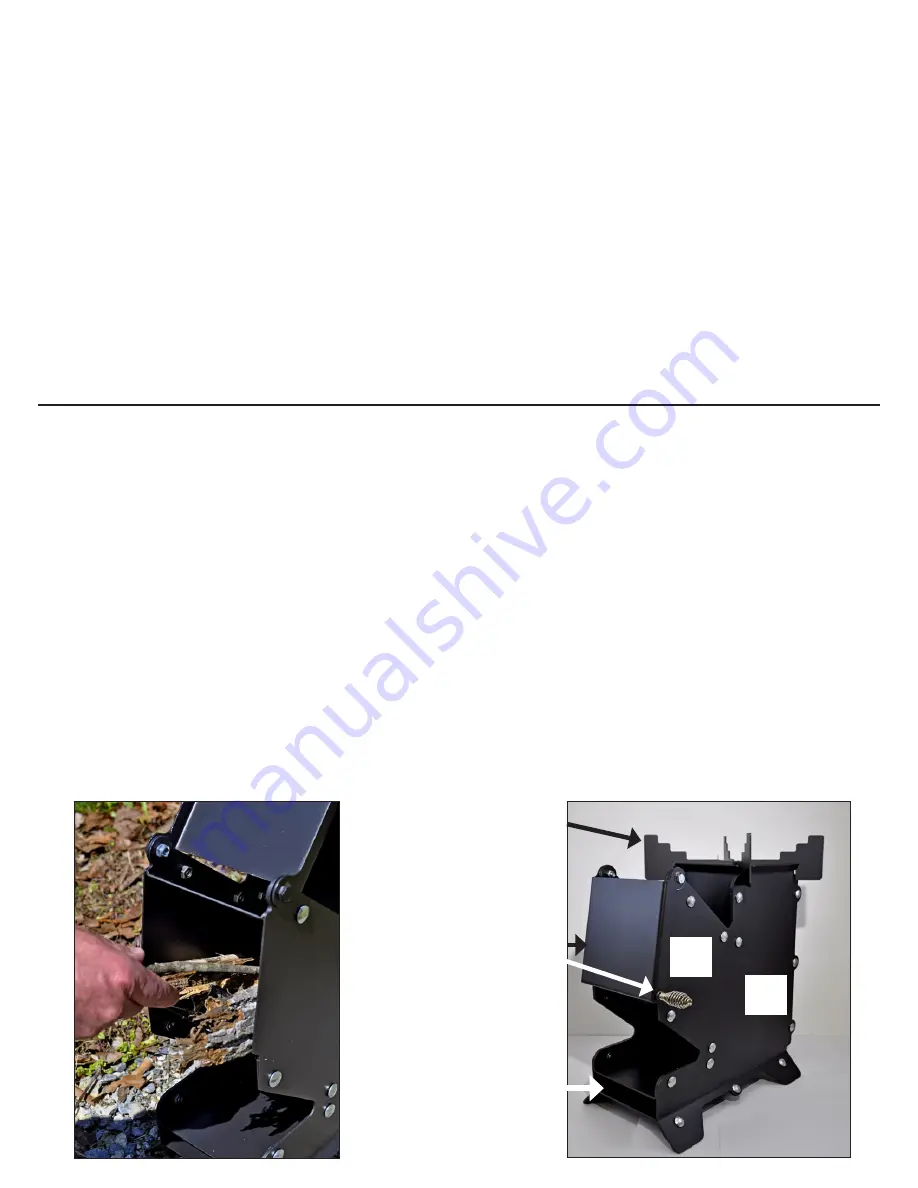
2.  Place small twigs or pine cones (and dry leaves or paper for initial ignition, if desired) into the fuel chute, all the  

 way down to the burn area (see below). 

3.  Ignite the fire by dropping a match into the burn area (through the cooking grate); use a fire starter if necessary. 

4.  Feed wood into the fuel chute as often as necessary. Finely chopped wood can be added once a fire is    


 established, but twigs, pine cones and small branches burn very well. 

5.  Pots, pans, woks and other cookware may be placed on the cooking grate for cooking. Do NOT overload the   

 cooking grate or place items on it that may tip over or fall, or are unsafe in any way.

6.  AFTER the fire is COMPLETELY cooled, remove the ashes after each use - the stove has a built-in ash grate so  

 that you can tilt the stove forward and ashes will exit the front of the stove, under the ash grate. 

7.  Wipe exterior surfaces with a cloth. Mild dishwashing detergent may be used - rinse and thoroughly dry.

8.  Creosote cleaner (Part No. RX-CR) and our wood stove cleaner (Part No. RX-WSC) may be used if necessary.

Multi-Tier Cooking Grate

Designed to accommodate

a variety of cookware

Fuel Chute Door

With safety handle

Ash Dump

Tilt stove forward 

to dump cooled 

ashes

Burn 

Area

Fuel 

Chute

Summary of Contents for SURVIVOR LIFESTYLE 12-RS

Page 1: ...OT light or operate this appliance within 10 feet 3 05 m of any structure Do NOT store or use gasolines or any flammables within 25 feet 7 62 m of this or any appliance Do NOT use in an explosive atmosphere Keep outdoor stove area clear and free from combustible materials including gasoline or other flammable liquids This outdoor stove is not to be used in or on ANY boats or recreational vehicles ...

Page 2: ...osene diesel fuel lighter fluid alcohol or ANY flammable liquid to light enhance or relight a fire Operation of the Rocket Stove is simple by design 1 Be sure the stove is completely assembled including the cooking grate on top of the burn area Position cooking grate with tiers facing upward as this will accommodate a variety of sizes of cookware 2 Place small twigs or pine cones and dry leaves or...

Page 3: ...Although we make every effort to eliminate sharp edges or burrs please use caution when handling ANY metal parts 2 Attach Rear Panel 2 to Left Side 1 Tab at top of 2 should face outward and 2 should fit in front of upward tab on Bottom 5 IMPORTANT Use provided bolts and nuts for each step with the bolt heads on the OUTSIDE and the nuts to the INSIDE of the stove FINGER tighten all bolts first then...

Page 4: ...ights which may vary from state to state REGISTER YOUR WARRANTY www heatredefined com click Support If you do not have access to the internet you may Fax 434 929 4810 OR Mail England s Stove Works Inc P O Box 206 Monroe VA 24574 the following information 1 Purchaser s Name Full Mailing Address Telephone Number Email Address 2 The Dealer s Name and Full Mailing Address 3 The Model Number of your pr...

Page 5: ...Ne l utilisez PAS comme appareil de chauffage intérieur Des vapeurs de monoxyde de carbone TOXIQUES peu vent s accumuler et causer l asphyxie Ce foyer extérieur n est PAS destiné à un usage commercial Ce foyer extérieur ne doit PAS être utilisé par des enfants N allumez PAS et n utilisez PAS cet appareil à moins de 3 05 m 10 pieds de toute structure ÉVITEZ d entreposer ou d utiliser de l essence o...

Page 6: ...risées par England s Stove Works Inc L utilisation de toute autre pièce peut s avérer dan gereuse et annulera votre garantie Ne forcez PAS pour que les pièces s emboîtent Vous risqueriez de causer des blessures et d endommager le produit Le non respect des consignes qui précèdent peut entraîner des dommages matériels des blessures graves ou la mort UTILISATION ATTENTION N ajoutez PAS d essence de ...

Page 7: ...ssemblez ce produit Notez qu il peut y avoir des bords coupants ou des bavures Bien que nous fassions tous les efforts possibles pour éliminer les bords coupants veuillez faire preuve de prudence lorsque vous manipulez des pièces de métal IMPORTANT Utilisez les boulons et les écrous fournis pour chaque étape avec les têtes de boulons à l EXTÉRIEUR du poêle et les écrous à l INTÉRIEUR Serrez À LA M...

Page 8: ...née à l arrière du poêle 5 Fixez le panneau supérieur du conduit 8 au panneau gauche 1 Les languettes latérales et celle d extrémité doivent être orientées vers le haut 6 Fixez le panneau avant 9 au panneau gauche 1 Les languettes doivent être orientées vers l avant du poêle avec la languette supérieure orientée vers l extérieur 1 5 2 6 1 1 7 1 6 8 1 9 1 ASSEMBLAGE 7 Fixez le panneau droit 3 avec ...

Page 9: ...liquer à vous Procédure L acheteur doit soumettre une réclamation pour défaut pendant la période de garantie et payer le transport vers le centre de service et à partir du centre de service désigné par le fabricant Le détaillant qui a vendu l appareil ou le fabricant à notre gré effectuera la réparation sous garantie Autres droits Cette garantie vous confère des droits précis Il est possible que v...

Reviews: