background image

LIMITED ONE (1) YEAR WARRANTY - From the date of purchase to the original owner

The manufacturer extends the following warranties:

One Year Period:

1. 

All parts in this product shall be free from defects in material and workmanship.

Conditions and Exclusions

1. 

Color and/or integrity of the finish or appearance are not covered. Rust and discoloration will eventually occur with normal use 

and are not covered by warranty.

2. 

This warranty does not apply if damage occurs because of an accident, improper handling, improper operation, abuse or unau-

thorized repair made or attempted to be made.

3. 

The manufacturer is not liable for indirect, incidental, or consequential damages in connection with the product including any 

cost or expense, providing substitute equipment or service during periods of malfunction or non-use.*

4. 

All liability for any consequential damage for breach of any written or implied warranty is disclaimed and excluded.

5. 

Warranty is void if product is used in any manner other than which it was intended.

*Some states do not allow the exclusion of limitations of incidental or consequential damages, so the above may not apply to you.
Procedure - Purchaser must give notice of claim of defect within the warranty period and pay transportation to and from a service center 

designated by the manufacturer. The dealer from which the unit was purchased or the factory, at our option, will perform the warranty 

service.

Other Rights - This warranty gives you specific legal rights; you may also have other rights, which may vary from state to state.


REGISTER YOUR WARRANTY - www.heatredefined.com (click Support)

If you do not have access to the internet, you may Fax (434) 929-4810

OR Mail (England’s Stove Works, Inc., P.O. Box 206, Monroe, VA 24574) the following information:

1. 

Purchaser’s Name, Full Mailing Address, Telephone Number, Email Address

2. 

The Dealer’s Name and Full Mailing Address

3. 

The Model Number of your product, the Date Purchased and the Purchase Price

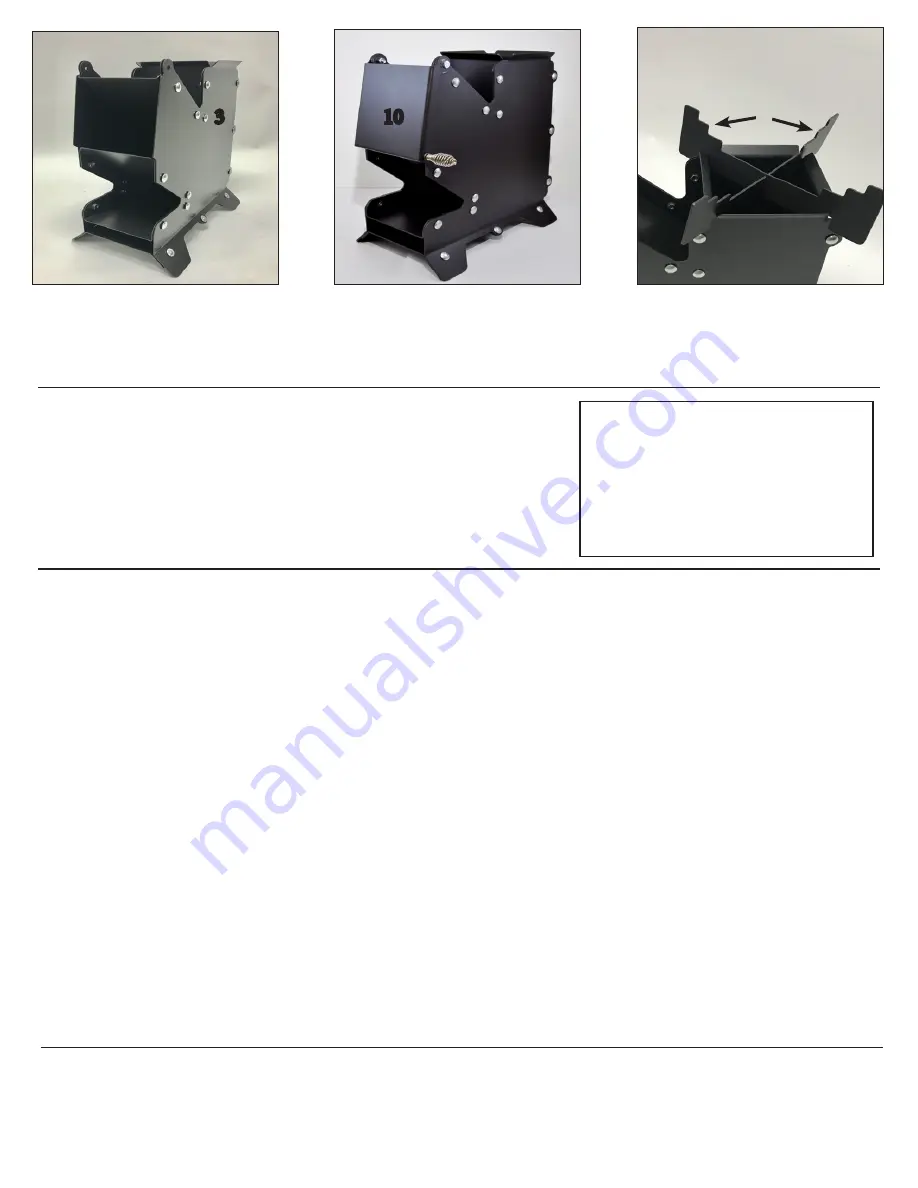
7. Attach Right Side (3) with top tab 

facing outward.

8. Attach Fuel Door (10), using the two 

1

/

4

-20 x 

3

/

4

 hex screws and 

1

/

4

-20 lock nuts 

(this is the only step that uses those two 

items). Holes for screws are at the top of the 

door, and handle post is at the bottom. 

Attach spring handle to post (screw on).

9. Install Cooking Grate (4). Position 

cooking   grate with tiers facing 

upward. Be sure grate is seated 

completely in all slots for stability. 

3

10

4

SPECIFICATIONS 

Assembled Unit

     13-in. (33 cm) L x 7 

3

/

4

-in. (19.69 cm) W x 13 

15

/

16

-in. (35.4 cm) H

     13 lbs. (5.9 kg)

Cooking Grate Tier Insets (to fit a variety of cookware sizes)

     Smallest: 5 

1

/2-in. (13.97 cm)

     Medium: 7 1/2-in. (17.78 cm)

     Largest: 9-in. plus (22.86 cm)

THANK YOU FOR YOUR PURCHASE!

Please check out our other Lifestyle Products, Wood Stoves, Pellet Stoves and more at www.heatredefined.com 

And find us on youtube, facebook, twitter and instagram - look for heatredefined

Parts: (800) 516-3636             Service: (800) 245-6489           service@englanderstoves.com

WARNING

All surfaces of this outdoor 

stove are hot while in operation. 

The 

handle may become hot during opera-

tion and refueling. 

To avoid burns, DO 

NOT touch this outdoor stove  until it is 

completely cool, unless you are wearing 

protective equipment (fire resistant gloves, 

barbecue mitts, etc.).

Summary of Contents for SURVIVOR LIFESTYLE 12-RS

Page 1: ...OT light or operate this appliance within 10 feet 3 05 m of any structure Do NOT store or use gasolines or any flammables within 25 feet 7 62 m of this or any appliance Do NOT use in an explosive atmosphere Keep outdoor stove area clear and free from combustible materials including gasoline or other flammable liquids This outdoor stove is not to be used in or on ANY boats or recreational vehicles ...

Page 2: ...osene diesel fuel lighter fluid alcohol or ANY flammable liquid to light enhance or relight a fire Operation of the Rocket Stove is simple by design 1 Be sure the stove is completely assembled including the cooking grate on top of the burn area Position cooking grate with tiers facing upward as this will accommodate a variety of sizes of cookware 2 Place small twigs or pine cones and dry leaves or...

Page 3: ...Although we make every effort to eliminate sharp edges or burrs please use caution when handling ANY metal parts 2 Attach Rear Panel 2 to Left Side 1 Tab at top of 2 should face outward and 2 should fit in front of upward tab on Bottom 5 IMPORTANT Use provided bolts and nuts for each step with the bolt heads on the OUTSIDE and the nuts to the INSIDE of the stove FINGER tighten all bolts first then...

Page 4: ...ights which may vary from state to state REGISTER YOUR WARRANTY www heatredefined com click Support If you do not have access to the internet you may Fax 434 929 4810 OR Mail England s Stove Works Inc P O Box 206 Monroe VA 24574 the following information 1 Purchaser s Name Full Mailing Address Telephone Number Email Address 2 The Dealer s Name and Full Mailing Address 3 The Model Number of your pr...

Page 5: ...Ne l utilisez PAS comme appareil de chauffage intérieur Des vapeurs de monoxyde de carbone TOXIQUES peu vent s accumuler et causer l asphyxie Ce foyer extérieur n est PAS destiné à un usage commercial Ce foyer extérieur ne doit PAS être utilisé par des enfants N allumez PAS et n utilisez PAS cet appareil à moins de 3 05 m 10 pieds de toute structure ÉVITEZ d entreposer ou d utiliser de l essence o...

Page 6: ...risées par England s Stove Works Inc L utilisation de toute autre pièce peut s avérer dan gereuse et annulera votre garantie Ne forcez PAS pour que les pièces s emboîtent Vous risqueriez de causer des blessures et d endommager le produit Le non respect des consignes qui précèdent peut entraîner des dommages matériels des blessures graves ou la mort UTILISATION ATTENTION N ajoutez PAS d essence de ...

Page 7: ...ssemblez ce produit Notez qu il peut y avoir des bords coupants ou des bavures Bien que nous fassions tous les efforts possibles pour éliminer les bords coupants veuillez faire preuve de prudence lorsque vous manipulez des pièces de métal IMPORTANT Utilisez les boulons et les écrous fournis pour chaque étape avec les têtes de boulons à l EXTÉRIEUR du poêle et les écrous à l INTÉRIEUR Serrez À LA M...

Page 8: ...née à l arrière du poêle 5 Fixez le panneau supérieur du conduit 8 au panneau gauche 1 Les languettes latérales et celle d extrémité doivent être orientées vers le haut 6 Fixez le panneau avant 9 au panneau gauche 1 Les languettes doivent être orientées vers l avant du poêle avec la languette supérieure orientée vers l extérieur 1 5 2 6 1 1 7 1 6 8 1 9 1 ASSEMBLAGE 7 Fixez le panneau droit 3 avec ...

Page 9: ...liquer à vous Procédure L acheteur doit soumettre une réclamation pour défaut pendant la période de garantie et payer le transport vers le centre de service et à partir du centre de service désigné par le fabricant Le détaillant qui a vendu l appareil ou le fabricant à notre gré effectuera la réparation sous garantie Autres droits Cette garantie vous confère des droits précis Il est possible que v...

Reviews: