background image

-6-

V087600-A02-M     07-09-2012

Kohler Co.

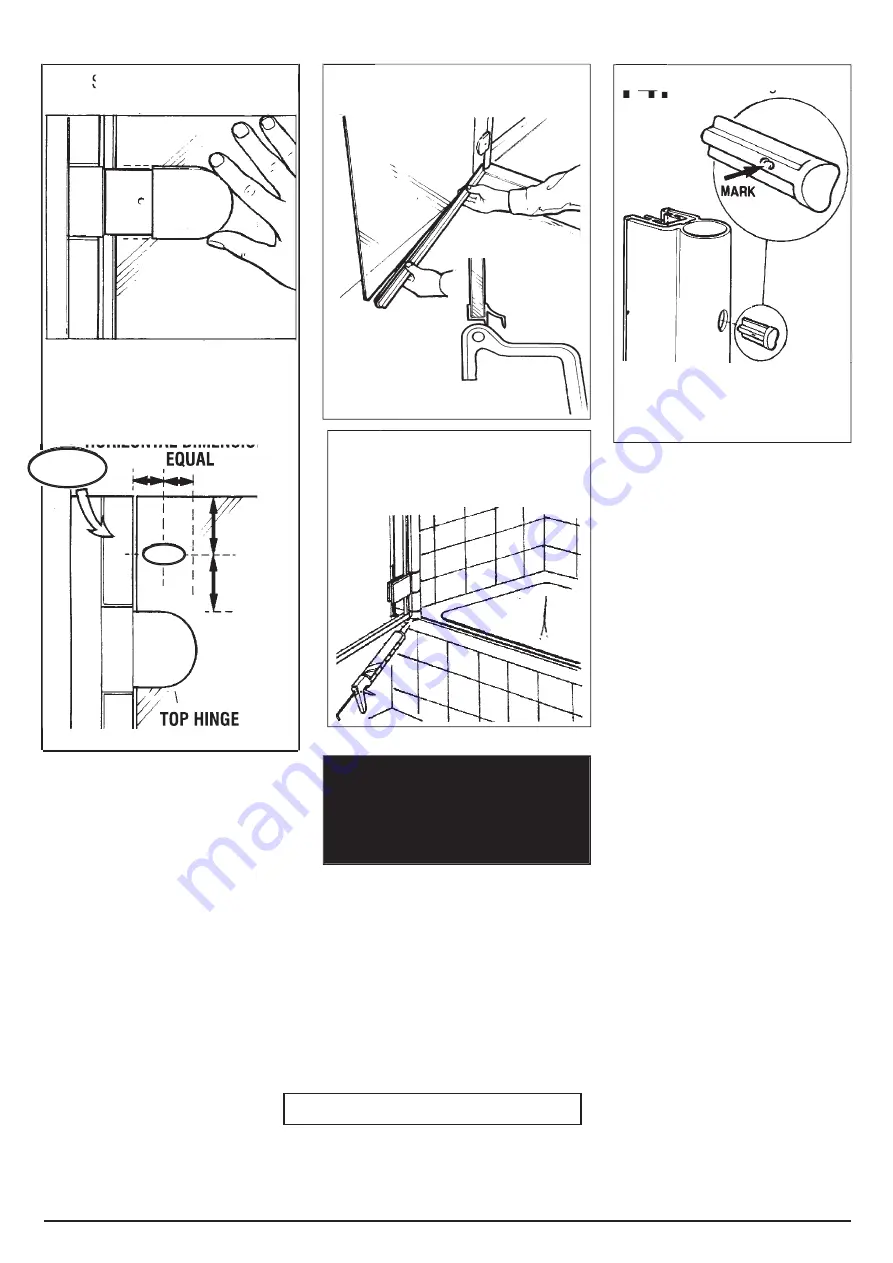
Position the logo as shown after

door installation.  One logo on 

the front of the door and one on 

the reverse.


HORIZONTAL DIMENSIONS

VERTICAL DIMENSIONS             EQUAL

IMPORTANT: NOTE ORIENTATION

         OF SCREW PLUG HEAD.

MARK SHOULD BE LOCATED TO 

           SIDE AS SHOWN.

Fit Screw Plugs

Using recommended Sealant, 

seal full height between walls 

and Wall Retainer Profiles, 

and all other exterior joins.

Using recommended Sealant, 

    IMPORTANT

SEALANT SHOULD BE APPLIED TO 

ALL OUTSIDE JOINTS - DO NOT

          SEAL FROM INSIDE.

Attach Door Drip Edge Seal.

11.

Slide on the. four Hinge Covers.

11.

11.

12.

12.

Slide on the. four Hinge Covers.

All rights reserved to alter designs and specifications without notice.
WARNING: Products in this leaflet are subject to Industrial Property Protection. All dimensions given are approximate only. 


©Copyright Kohler NZ Ltd 2009

 LOGO

LOGO

Follow the sealant manufacturer’s 

directions.

13.

13.

14.

14.

INSTALLATION COMPLETE

Summary of Contents for PREMIUM BATHSCREEN

Page 1: ...y Bath screens must be installed in situations where the floor of the bathroom has a waterproof membrane installed For New Zealand the bath screen must be installed in accordance with NZBC E3 AS1 clause 3 1 1 For other countries the bath screen must be installed in accordance with local building codes NOTE A floor waste is recommended Do not install in bathrooms where the floor is carpeted INSTALL...

Page 2: ... 2 V087600 A02 M 07 09 2012 Kohler Co Parts List Exploded View ...

Page 3: ...inge Post Screw Plug 2 Q6090XX Door Hinge Post 10 Q633250 Hinge Post Ajuster S S 2 Q6090XX Door Hinge Post 10 Q633250 Hinge Post Ajuster S S 3 Q6150XX Hinge Body 11 Q910100 Screw 8 x 65 Pan Head 3 Q6150XX Hinge Body 11 Q910100 Screw 8 x 65 Pan Head 4 Q6155XX Hinge Inner 12 Q634045 Seal Door Edge 4 Q6155XX Hinge Inner 12 Q634045 Seal Door Edge 5 Q633200 Hinge Pad 13 Q634080 Seal Wall 5 Q633200 Hing...

Page 4: ...through extrusion Fix with Screw No 8 x 65mm Insert Hinge Post over Wall Retainer and slide down into position on Bottom Cap 3 4 Set adjusting screws using 6mm spacer provided ASSEMBLED UNIT 1 1 2 Bath Bath WALL RETAINER HINGE POST L H SIDE PANEL R H SIDE PANEL Fit Bottom Cap to Hinge Post Retainer Fit Bottom Cap to Hinge Post Retainer CAUTION Fixing the retainer only to the backboard may void war...

Page 5: ... taken to avoid cross threading the cap screws in the Hinge Plate 8 On the inside of the Hinge On the inside of the Hinge Post fit slotted plastic bush Post fit slotted plastic bush Post fit slotted plastic bush Post fit slotted plastic bush Trim the top of the Door Edge Seal flush with the glass 9 For out of true walls level Hinge Post using adjusting screws 5 Max 22mm Max 22mm 6 Fit Top Cap in p...

Page 6: ...tainer Profiles and all other exterior joins Using recommended Sealant IMPORTANT SEALANT SHOULD BE APPLIED TO ALL OUTSIDE JOINTS DO NOT SEAL FROM INSIDE Attach Door Drip Edge Seal 11 Slide on the four Hinge Covers 11 11 12 12 Slide on the four Hinge Covers All rights reserved to alter designs and specifications without notice WARNING Products in this leaflet are subject to Industrial Property Prot...

Reviews: