background image

14

13

U

sinG

 m

ax

U

sinG

 m

ax

Using MaxTrak (Accessory not included) 

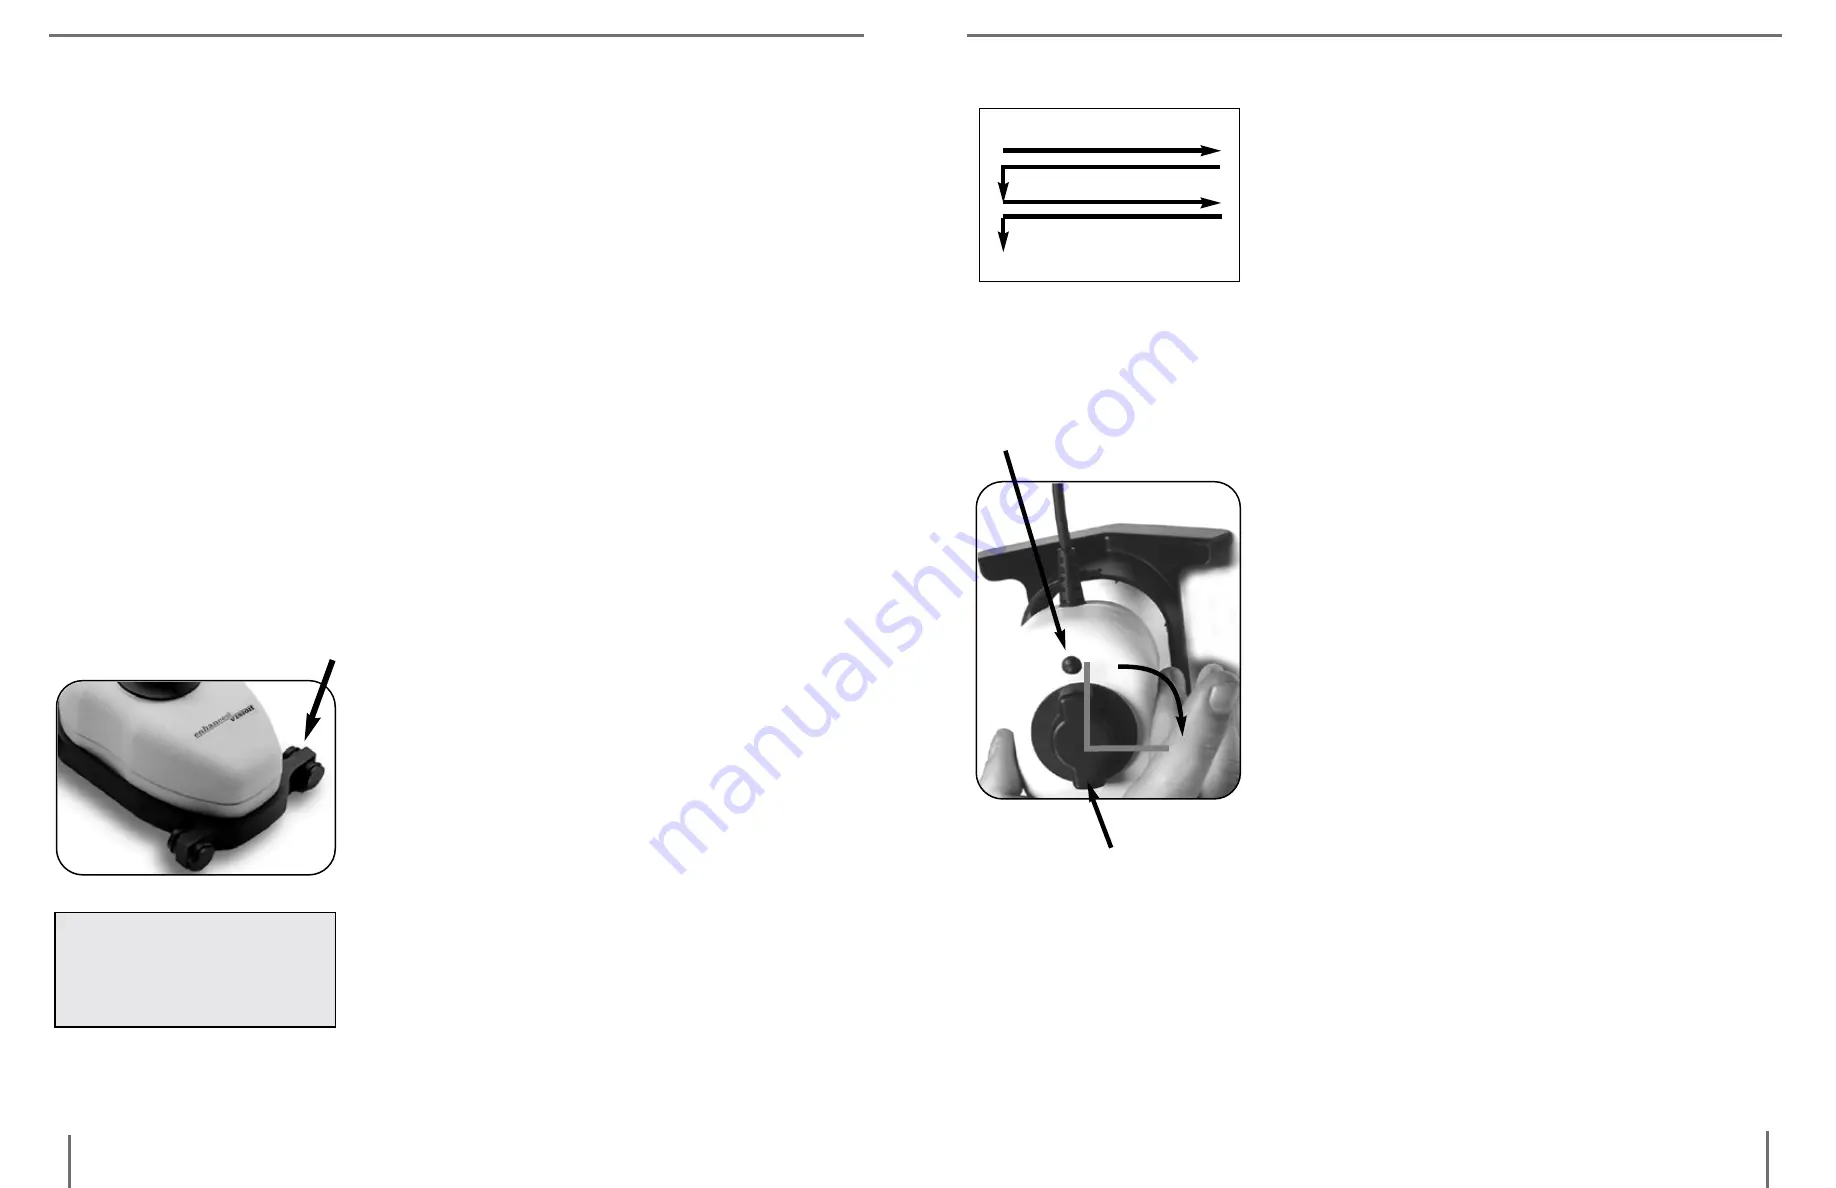
When you need the extra support to guide 

your reading across a page you can attach 

the MaxTrak to the Max. MaxTrak allows 

you to follow a straight line easier. 

Start by placing MaxTrak on your table 

with the wheels touching the table sur-

face. The small end of MaxTrak should be 

closest to you. If this is done correctly, you 

can roll MaxTrak easily from left to right 

and back again. Then place the Max on 

top of MaxTrak and slip it into place.

Reading with Max 

If you are using Max for reading purposes, place the Max on the text 

so the first line is located approximately in the middle of your TV 

screen. Slide the Max across, left to right, over the first line.  Once 

completed, slide the Max back to the beginning of the line, and then 

slide it down to the next line. 

Practice the motion of moving Max on a straight line by keeping the 

palm of your hand on the table and holding Max in your hand.  Re-

peat this exercise several times with different printed material varied 

in col-umn width and length.  As you learn to move Max in a straight 

line and as you gain more control over the unit, it will become easier 

to use. 

We highly recommend purchasing the MaxTrak if you are reading for 

extended periods of time.

 MaxTrak is designed to attach to your Max 

and help guide you in a straight line.  Please read the section below 

“Using MaxTrak”.  

For better image quality, 

the Max must sit all the 

way down into MaxTrak.  

To use MaxTrak, slowly glide straight across 

a page from left to right. When you have 

reached the end of a line, glide back from 

right to left to the beginning of the line. 

Then lift Maxtrak and slightly move it down 

to continue reading. When you need more 

flexibility in movement, remove MaxTrak 

from the magnifier. 

Using Max Writing Stand  (Accessory not 

included) 

Place the Max on top of the Max Writing 

Stand so that the camera cable is facing away 

from you.  If you have inserted it cor-rectly, 

the Max should fit perfectly in the Max Writ-

ing Stand. 
Move the Max on top of your desired object 

that you would like to sign or write on. 

With your non-writing hand, tilt the Max 

Writing Stand to the LEFT if you are RIGHT 

handed and to the RIGHT if you are LEFT 

handed. 
For the best focus, turn Max to the highest 

level of magnification by rotating the dial 

from 12 o’clock to 3 o’clock.  See 

Adjusting 

the Magnification

 on page 11. 

It is best to use Color or Black & White view-

ing modes when using the writing stand. 

Viewing Options Button  

Magnification Dial  

12  

3  

Summary of Contents for Max

Page 1: ...The MaxTM Family Users Manual Max Max Panel TM TM ...

Page 2: ...ul interference and 2 this device must accept any interference received including interference that may cause undesired operation This equipment has been tested and found to comply with the limits for a Class B digital device pursuant to Part 15 of the FCC Rules These limits are designed to provide reasonable protection against harmful interference in a residential installation This equipment gen ...

Page 3: ...d to restore vision correct eye conditions or halt degenera tive vision loss An eyecare professional can determine the suitabili ty of Max products for a patient s condition SYSTEM PRECAUTIONS Avoid exposing Max products to extreme or rapid changes in temperature or humidity as these conditions may cause fogging or damage to products Max products should never be placed near a radiator or heat regi...

Page 4: ...pt to use any other power supply doing so will void the warranty CARING FOR MAX PRODUCTS Always turn the power OFF when you are not using the system Make sure the power is OFF or unplug your Max product from the wall outlet before cleaning Do not use liquid cleaners The plastic surfaces of your Max product may be dusted with a dry cloth The optical surfaces should be cleaned as needed for best per...

Page 5: ... contrast positive or high contrast negative screen images 4 Magnification Dial increases size when turned clockwise 5 6 Foot RCA Video Cable connects Max control box to the TV via the Video Input jack 6 Power Supply connects Max control box to an outlet Additional Accessories not included 7 MaxTrak keeps your Max rolling in a straight line across a page 8 Max Writing Stand used for limited writin...

Page 6: ...ply into the Control Box Jack labeled POWER Be sure the plug is fully inserted into the Control Box Then plug in the other end of the Power Supply into an outlet 5 Turn the power on The ON and OFF switch is on the side of the control box Turn the TV ON You can switch between using Max and your TV with the TV re mote control by changing between Video and TV mode If you have a TV with a built in VCR...

Page 7: ...ption by pushing the black button on the top of the digital magnifier Each push will change your viewing option If you keep pushing the button you will cycle through all the options See Figure 2 There are different viewing options de pending on the Max model you have purchased Viewing Options For Black White Max Soft Contrast Positive Image B W This is a soft white back ground and a soft black for...

Page 8: ...come easier to use We highly recommend purchasing the MaxTrak if you are reading for extended periods of time MaxTrak is designed to attach to your Max and help guide you in a straight line Please read the section below Using MaxTrak For better image quality the Max must sit all the way down into MaxTrak To use MaxTrak slowly glide straight across a page from left to right When you have reached th...

Page 9: ... Button changes viewing options from color black white high contrast positive and high contrast nega tive depending on Max camera purchased 7 Magnification Dial increases size when turned clockwise Accessories included 8 Power Supply connects to LCD Power Pack and power cord 9 Power Cord connects to power supply and wall outlet 10 6 foot RCA Video Cable connects LCD Power Pack to a TV 11 Lens Clot...

Page 10: ...witch back to the 0 position However leave the power on for this training section Note If the battery is charged there is no need to plug in the power supply and cord If the battery is not charged then refer to Recharg ing the Battery section on page 22 Figure 3 Figure 4 2 Adjusting the LCD screen It is important to orient the LCD screen to provide the best viewing angle To lift the screen put one...

Page 11: ...ed the Max camera separate from the LCD Power Pack you will need to connect them together To do so simply plug the end of the cable connector which looks like a telephone connector coming from the Max camera into the open jack labeled Cam era on the back of the LCD Power Pack See Figure 1 Connecting LCD Power Pack to a TV Set with Video In To connect the LCD Power Pack to a TV set with Video In yo...

Page 12: ...ack and the outlet and the battery will automatically start charging If the light is solid then the battery is fully charged If the light is blinking then the battery is not fully charged The battery will charge while in use as long as the system is plugged into an outlet The battery will charge at the same rate whether the LCD Power Pack is ON or OFF You cannot over charge the battery The battery...

Page 13: ... manual for further details If your system is connected to the TV s video in jack check to see that your TV is on the proper video mode usually located on your remote control or your TV s menu options Some remote controls access this channel by pressing a TV Video Input Auxiliary AUX External EXT Game or Source Please note this channel differs depending on the TV maker Please consult your TV manuf...

Page 14: ...onnect the Max Panel to the TV set plug one end of the RCA cable into the yellow jack on the back of the power pack labeled Video Out and plug the other end into the yellow Video Input jack on the front or the back or front of your TV Then switch your TV to Video Mode General Q In case of a problem how can I get my system serviced A For questions or to arrange for product service please contact En...

Page 15: ...Vision at 714 374 1829 or 800 440 9476 Monday through Friday between 8 a m and 5 p m Pa cific Standard Time PST to request a return authorization number Warranty repairs will not be accepted without a valid return authorization number You may wish to keep the original product packaging in case warranty service is required The manufacturer cannot provide packaging for warranty repairs Merlin LCD Me...

Page 16: ...stem for those at work school or home Magnification 2 5X 65X 19 LCD Flipper Panel Integrated and Portable This powerful portable magnifier integrates the Flipper 225 degree rotating camera with a slim LCD platform Powered by an innovative battery pack the Flipper Panel runs up to 4 hours on a single charge The discrete camera projects a full color auto focus image on the screen for both near and d...

Page 17: ...tions or halt degenerative vision loss An eyecare professional can determine the suitability of Max products for a patient s individual con dition Max products are designed to be worn while sit ting or standing still and are not to be used while walk ing driving or mobility of any kind Part MAN 0400 00 March 2010 www enhancedvision com 800 440 9476 US Office toll free 714 465 3400 US Office 44 0 9...

Reviews: