7
8
Switching the appliance on and off
1. To switch on, slide the ON/OFF switch upwards.
2. Choose to use with or without accessories.
3. To switch off, slide the ON/OFF switch downwards.
Attaching accessories
1. Make sure that the appliance is off.
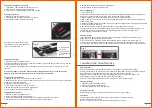
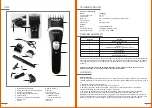
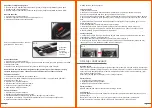
2. Turn the switch for clipping lengths to 5 (Fig. 1).
3. This makes it easier to attach accessories.
Press the tabs of the accessory onto
the attachment points and press until
they click into place (Fig. 2).
Accessory tab
correctly
engaged with
the attachment
point.
Removing accessories
1. Make sure that the appliance is off.
2. Hold the appliance with one hand, and use the other to grasp the top part and lift it up. Use the
correct amount of force required.
3. The accessory will disengage from the attachment points with a click, at which point you can
remove it.
Use: the hair clipper can be used with the built-in rechargeable battery, or with the adaptor
plugged in like when charging the battery, for the following operations:
Clipping with no accessories:
1. Clipping length with no accessories is around 0.8mm.
2. With this option, you can clip hair almost tight to the skin, or you can finish the areas at the base
of the neck and around the ears.
3. Make sure that the appliance is off.
4. Turn the thinning slider to the “0” position.
5. Switch the appliance on and begin clipping hair.
6. Once finished, switch the appliance off.
Clipping with accessories:
1. Make sure that the appliance is off.
2. Select the most suitable comb accessory.
3. Attach the comb accessory as described in the "Attaching accessories” section.
4. Use the 5 options on the switch to select the desired clipping length.
Fig. 1
Fig. 2
5. Switch the appliance on and begin clipping hair.
6. Once finished, switch the appliance off.
Tips for clipping hair
1. Only clip dry hair.
2. We recommend setting the accessory to the maximum clipping length position to begin with.
Then, you can gradually adjust until you reach the desired clipping length.
3. Before clipping, comb hair repeatedly so that it falls in a natural position.
4. Begin clipping from the base of the head upwards.If possible, cut in the direction opposite to
that of hair growth.
5. Hold the appliance slightly beneath the hair, so that the comb accessory is pointing upwards and
is in close contact with the head.
6. Pass the appliance multiple times over the sides of the head and at the back.
7. It takes practice to use the appliance correctly and obtain the desired length. Therefore, we
recommend leaving hair longer than your desired length the first few times you use it.
8. After clipping, finish with the scissors.
Thinning function
1. The appliance has a thinning function which can be used to reduce the volume of hair by
gathering and clipping certain sections of hair.
2. Turn the switch for the thinning function to the position with the comb symbol (Fig. 3).
3. Do not select this function when clipping hair normally.If you pass the thinner over the hair
multiple times, the result will be the same as the shortest cut achieved without using accessories.
Basic guidelines
Proper, regular cleaning improves the safety of the appliance and extends its lifespan.
Warning! Before carrying out cleaning or maintenance operations, switch the appliance off and
plug the adaptor out of the electric socket. Allow the appliance to cool down.
Attention! Do not clean the appliance using aggressive, alkaline or abrasive cleaners or
disinfectants, as they may damage the surface of the appliance.
Attention! Do not immerse the appliance or adaptor in water or other liquids.
Cleaning the blade
1. Make sure that the appliance is off.
2. Remove the accessory (if attached).
3. Clean the blades with the brush provided.
Cleaning accessories
Wash accessories under running water and allow them to dry thoroughly.
Lubrication
Lubricate the blades regularly to ensure that the appliance functions correctly.
Use the lubricating oil provided.
Do not use hair oil or gel, or oil mixed with pure paraffin or solvents.
CLEANING AND MAINTENANCE
Fig. 3

