CD-1300-ST
ENMET
Manual Revision Date – June 15, 2017
P a g e
|
5
Manual Part No. – 80003-134
3.3.1 Power supply
The
CD-1300-ST
series will operate from an AC or DC input voltage between the values called out in the specifications in
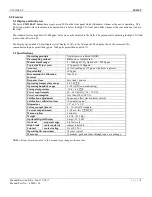
section 2.2. The power supply leads are connected to the two-terminal power connector shown in Figure 2.
The
CD-1300-ST
series must never be connected directly to line power.
Operation at voltages higher than specified will damage the unit and void the warranty. When operating from DC power, the
polarity of the power leads must be as shown in Figure 2. Reversed polarity connection will not damage the unit, but will make
it inoperable until the connection is reversed.
3.3.2 Signal Output
The
CD-1300-ST
series provides either a 0 – 10 volts or a 4-20mA current loop output at the two terminals of the analog output
connector shown in Figure 2. The type of analog output is determined by the setting of the analog output selector shown in
Figure 2. The analog output of the CD-1300-ST Series is completely isolated from the power supply. The common outputs of
multiple units can be connected with no interaction regardless of power supply hook-up.
3.3.3 Voltage
When the outboard and middle pins of the analog output selector are connected with the shorting block, a voltage output
appears between the two terminals marked ANALOG OUTPUT. The output voltage increases linearly from
0 volts at the low output threshold to 10 volts at the high output threshold. The unit is shipped from the factory with the low
output threshold at 0 ppm and the high output threshold at 2000 ppm. See section 4.1 the
Analog Output Range Adjustment
to
change the analog output range limits.
3.3.4 Current
When the inboard and middle pins of the analog output selector are connected with the shorting block, a current output appears
between the two terminals marked ANALOG OUTPUT. The output current increases linearly from 4 mA at the low output
threshold to 20 mA at the high output threshold. The unit is shipped from the factory with the low output threshold at 0 ppm
and the high output threshold at 2000 ppm. See section 4.1 the
Analog Output Range Adjustment
to change the analog output
range limits. If the total resistance between the two terminals exceeds the specified maximum loop resistance, the output
current may be erroneously low at high concentrations.
3.4 Verifying Voltage or Current Output Connection
After the voltage or current output of the CD-1300-ST Series is connected to a controller or indicator, the following check should
be performed to ensure that the connection has been properly established and the CD-1300-ST Series is transmitting the correct
values:
1.
Be sure that the output select jumper is set
correctly for voltage or current output. If this is not done first, the following
check may produce incorrect results.
N
OTE
: whether the shorting block at jumper JP5 is covering both pins or only a single pin, then borrow the shorting block and
slide it over the two pins of jumper JP4 (see Figure 2). The display (if present) will show ‘SEL’
2. Momentarily closing JP5 will set the unit to full-scale output (10V or 20mA). Do not press the buttons on the unit, as this will
affect the output calibration.
If the receiving device does not indicate a full scale reading after JP5 is closed, verify that the wiring is correct.
3. Remove the shorting block from JP4 and restore it to its original position at jumper JP5. The CD-1300-ST Series will reset and
its output now corresponds to the actual detected CO
2
concentration.
3.4.1 Cover Replacement
Engage the top center of the cover under the latch at the top of the base, then press the bottom of the cover onto the base until it
latches.


