RECON/4a
ENMET
Manual Revision Date – June 15, 2017
P a g e
|
8
Manual Part No. – 80006-004a
4.0 Calibration
It is recommended that every day before using the device, the user perform a bump test, to verify that the device is working properly.
Test method:
When the device is powered on, expose it to a level of gas greater than the lower level alarm points. This should be done for each of
the active sensors in the instrument. If all the device’s functions are ok, then the device can be used in the working area.
C
AUTION
:
The
RECON/4a
will Auto Zero when you enter the calibration menu. Please fully charge the
RECON/4a
and
put the instrument into a clean air environment before beginning this procedure.
The
RECON/4a
is capable of calibrating multiple channels at the same time. However, you may elect to calibrate individual gas
sensors. During calibration, the
RECON/4a
automatically determines if a single gas or multi gas is being applied.
With the
RECON/4a
ON, Press and
hold
the push button, the
RECON/4a
will turn OFF. Continue to press the push button until the
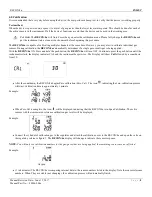
instrument restarts, the display indicates CAL and the instrument beeps twice. The Display will show
Cal
followed by a countdown
from 30.
•
After the countdown, the RECON/4a begins Zero calibration (Zero Cal). The icon,
, indicating the zero-calibration process
will start. Calibration time is approximately 1 minute.
Example:
•
When Zero Cal is complete, the icon, , will be displayed indicating that the RECON/4a is in Span Calibration. The active
sensors with their associated reference calibration gas levels will be displayed.
Example:
•
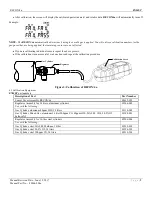
Connect the cylinder of calibration gas to the regulator and attach the calibration cover to the RECON/4a and open the valve on
the regulator, reference figure 3. The
RECON/4a
display will change to indicate the sensor response.
NOTE:
You will only see calibration numbers for the gas/gases that are being applied; the remaining sensors are not affected
Example:
Oxygen
•
(1 to4 minutes) The RECON/4a is comparing internal data to the sensor numbers listed in the display. Note the sensor reference
numbers. When They are stable (not changing), the calibration process will automatically finish.

