background image

eno

 one 2/r - user manual

REV.05

12

 The A-Z references shown on this page and on the previous one,  

are mentioned throughout the manual. 


V1. 

Small dose dispensing button (lit) 

V2. 

Medium dose dispensing button (lit)

V3.

 Large dose dispensing button (lit)

Z.


Multifunction button: confirmation, power on/off, output (lit)

X.

 Increase arrow button 

W.

 Display (lit) 

Y.

  Decrease arrow button

V1

V2

V3

V1

V2

V3

Z

X

Y

W

Do not use objects to press the buttons on the keyboard. 

use only the fingers of the hand.

11. COMMANDS KEYBOARD AND DISPLAY

CHARACTERISTICS AND COMPONENTS

The keyboard of the dispensers is backlit, as such most of the buttons are 

only visible after powering of the dispenser.

Summary of Contents for eno one

Page 1: ...eno one 2 r user manual REV 05 1 2 bottle refrigerated wine dispenser User manual Distributed by Neodistributing 5555 Oakbrook Pkwy Suite 120 Norcross GA 30093 800 705 6940 www enomatic us ...

Page 2: ...SING 27 25 F 3 FREE OR PROGRAMMED DOSE SETTING 28 26 F 4 TYPES OF PROGRAMMED DOSES 30 27 SETTING OF PROGRAMMED DOSES 31 28 CO copy DOSE PROGRAMMING 32 29 nC not copy DOSE PROGRAMMING 34 30 CA copy all DOSE PROGRAMMING 35 31 F 5LED INTENSITY SETTING default value 10 36 32 F 6 WASHING AND SANITISING CL 37 33 F7 DISPENSER VERSION 38 34 DEFAULT RESET 39 35 WARNINGS 40 36 WARNING WASHING DISPENSER UNIT...

Page 3: ...user manual REV 05 3 51 TROUBLESHOOTING 47 52 INFORMATION ON REPLACEMENTS COMPONENTS 52 53 DECOMMISSIONING AND DEMOLITION OF THE DISPENSER 52 54 DECLARATION OF EC CONFORMITY 53 55 GUARANTEE OF ENOMATIC PRODUCTS 55 ...

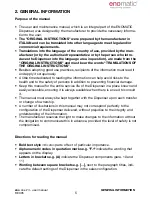
Page 4: ...cessary to move the machine do not lift or move it with a bottle bottles inserted with the power cord connected or with the gas supply pipe connected 10 Check the electrical components before using the appliance In case of damage contact your dealer 11 Do not use electrical appliances inside the bottle compartment unless expressly stated by the manufacturer 12 For replacement always request origin...

Page 5: ...ty of persons in addition to preventing financial damage Keep this manual for the entire service life of the Dispenser in a place known and easily accessible ensuring it is always available when there is a need to consult it The manual must always be kept together with the Dispenser upon each transfer or change of ownership A number of illustrations in this manual may not correspond perfectly to t...

Page 6: ...provide important information regarding safety during installa tion use and maintenance The manufacturer is not responsible in any way for damage caused by misuse irra tional or irresponsible use of the system or from misinterpretation of the instructions on safety and installation 4 IDENTIFICATION OF MODEL AND MANUFACTURER The identification plate shown is applied directly onto the Dispenser one ...

Page 7: ... protectors Inside the packing the Dispenser is protected by a non woven fabric bag During unpacking carefully remove it and check the integrity of the components Some of the external and internal surfaces may be appropriately protected with pro tective film which before use should be properly removed The package contains all the information necessary to perform movement correctly The packaging ma...

Page 8: ...cal power cord PACKING AND TRANSPORTATION Never leave the packaging parts such as plastic coverings etc within the reach of children as they may represent a potential hazard ACCESSORIES ON REQUEST Side panels black or white Modularity kit Spacer for short bottles Conditioning partition for 1 white wine and 1 red wine Disposable cylinder and pressure regulator Cylinder cover casing Graduated cylind...

Page 9: ...gned for free stand alone installation and does not require particular lifting devices given its low weight To move the Dispenser lift it up holding it from underneath Do not push the Dispenser do not drag it or turn it upside down If special needs so require it is possible to use the lifting devices shown in the image above PACKING AND TRANSPORTATION To protect the Dispenser during the transporta...

Page 10: ...m ø 3 54 in L 275 330 mm L 10 83 13 in CHARACTERISTICS AND COMPONENTS The Dispenser in the sale configuration allows the insertion of bottles with a maxi mum diameter and a height range indicated in the image below The right bottle location when facing the Dispenser allows the insertion of bottles with a diameter less than the left side due to the size of the thermoelectric refrigera tion system O...

Page 11: ... Identification plate G Data connection port for technical use H Inert gas connection I Power socket L Main switch M Door handle N Plug tap with seal O Thermoelectric cooling system P Bottle compartment Q Temperature probe R LED S Dispensing nozzle T Bottle raising piston T1 Gas spring T2 Spacer T3 Cylinder T4 Curved coaster U Foot 10 COMPONENTS OF THE DISPENSER CHARACTERISTICS AND COMPONENTS ...

Page 12: ... button lit Z Multifunction button confirmation power on off output lit X Increase arrow button W Display lit Y Decrease arrow button V1 V2 V3 V1 V2 V3 Z X Y W Do not use objects to press the buttons on the keyboard use only the fingers of the hand 11 COMMANDS KEYBOARD AND DISPLAY CHARACTERISTICS AND COMPONENTS The keyboard of the dispensers is backlit as such most of the buttons are only visible ...

Page 13: ...te changing always position the cylinder in accessible places In the case of recessing it cannot be accommodated in the space rear with strap E of the Dispenser but must be placed in a more accessible place for example within the cabinet Only place the Dispenser in indoor dry environments and with a maximum tem perature of 26 C 79 F with humidity no greater than 60 and away from heat sources MODUL...

Page 14: ... 27 56 in to place the cylinder in the relevant rear space ac companied by the strap E To position the cylinder away from the Dispenser and to accommodate it for example inside the door of any cabinet on which you will be positioning the Enomatic device contact the Retailer with regard to the gas con nection pipe of the desired length INSTALLATION 13 THERMOELECTRIC REFRIGERATION SYSTEM The dispens...

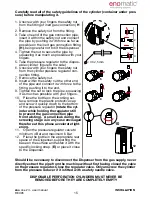
Page 15: ...ttle on the working sur face remove the plastic protective cap and screw it quickly down to the bottom of the pressure regulator rotate the cyl inder while holding the regulator still to prevent the gas connection pipe from twisting A small leak during the screwing stage is in any case envisaged therefore at this phase accelerate tight ening 11 Open the pressure regulator valve to minimum 4 Bar an...

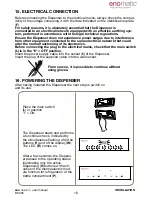
Page 16: ...onics Before connecting the plug to the electrical mains check that the main switch L is in the 0 OFF position Insert the power supply cable into the socket I of the Dispenser Insert the plug of the supplied cable into the wall socket INSTALLATION From now on it is possible to continue without using gloves Place the main switch L in position I ON The Dispenser starts and performs a functional chec...

Page 17: ...nsing is not per mitted and refrigeration is disabled even if powered by the electric mains From the operating state press the multifunction button Z until 8 8 ap pears on the display after the display of F1 When the button is released the Dis penser switches off leaving only the lit confirmation button Z on Rest condition stand by To switch on the Dispenser from the stand by condition simply pres...

Page 18: ...Dispenser unit The end of the straw where the filter that restricts the passage of wine sediments is located must be inserted into the bottle while the other end must be connected to the plug tap 2 5 cm 0 79 1 97 in 5 cm 1 97 in 19 FUNCTIONS MENU The Dispenser has a menu with features that are useful to set the main parameters and in order to interact with it To access the Functions menu press the...

Page 19: ... letters F1 are displayed Press the multifunction button Z to access the function chosen The Dispenser is on hold for loading of the bottles after which the medium dose button V2 of each dispensing unit will flash During this function refrigeration is switched off to limit energy consumption The Dispenser remains in this po sition for 10 minutes after which it automatically returns to the operatin...

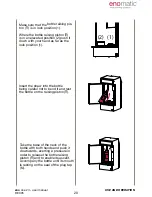
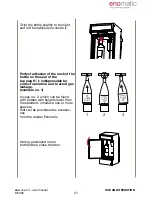
Page 20: ...as the lock position 1 2 1 Insert the straw into the bottle being careful not to bend it and rest the bottle on the raising piston T Take the base of the neck of the bottle with both hands and push it downwards exerting a pressure in order to release the bottle raising piston T and to enable its ascent Accompany the bottle until its mouth is resting on the seal of the plug tap N USE AND OPERATION ...

Page 21: ...nd centre it Perfect adhesion of the neck of the bottle on the seal of the tap plug N is indispensable for correct operation and to avoid gas leakage example no 1 In case no 2 which can be found with bottles with heights lower than the standard introduce one or more spacers that can be purchased as accesso ries from the retailer Enomatic USE AND OPERATION ...

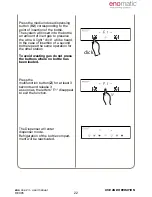
Page 22: ... heard In the case of insertion of a second bottle repeat the same operation for the other station To avoid wasting gas do not press the buttons where no bottle has been loaded Press the multifunction button Z for at least 3 seconds and release it as soon as the letters F 1 disappear to exit the function The Dispenser will enter dispenser mode Refrigeration of the bottle compart ment will be react...

Page 23: ...the bot tle down exerting pressure with the hands on the base of the neck in order to lock the bottle raising piston T into the locked position Keep the door B open for the shortest possible time in order to avoid dispersion of the tempera ture of the bottle compartment P and the formation of condensation Dry any moisture which forms on the inside of the compartment and on the bottles every time t...

Page 24: ... will display the current setting highlighting it with a point Scroll with the arrow buttons X Y to select the desired setting between 6 18 OF Press the multifunction button Z to save the setting Flashing of the display lines confirms successful saving of the setting 3 3 22 F 2 TEMPERATURE SCALE SETTING default setting C It is possible to set the temperature measurement unit in degrees Celsius C s...

Page 25: ...It is pos sible to set the unit of measurement of temperature in degrees centigrade C or degrees Fahrenheit F consulting para 22 Switch off refrigeration of the bottle compartment by setting the value to OF OFF that is located before the value 6 43 and after the value 18 64 This mode is recom mended when the temperature of the room in which the Dispenser is located is similar to the temperature of...

Page 26: ...r Retailer Looking at the front of the Dispenser insert into the right position the bottle of wine that requires a lower temperature e g white wine 8 C 46 4 F and in the left position a bottle of wine that requires a higher temperature red wine 18 C 64 4 F The difference in temperature between the right compartment temperature con trolled and the left one derived temperature will be approximately ...

Page 27: ...dual wine is below the dose chosen Finishing of the liquid during dispensing involves a significant escape of gas that is easily recognisable by an irregular and loud flow intermittent spraying It is therefore necessary to follow these instructions In the case of free dose immediately release the dose button V In case of programmed dose immediately press the dose button V The Dispenser has 2 dispe...

Page 28: ... different modes FREE DOSE FE Dispensing starts with pushing only of the medium dose button V2 of the two dispensing units and ends with its release Hold the button until the desired quantity is provided SCHEDULED DOSE PO When the dose button V is pressed the Dis penser provides the pre set quantity with the default values pressing again during dispensing instantly interrupts the dosing in progres...

Page 29: ...rrent setting highlighting it with a point Scroll with the arrow buttons X Y to select the desired setting between PO PE Press the multifunction button Z to save the setting Flashing of the display lines confirms successful programming of the set ting USE AND OPERATION ...

Page 30: ... one para 30 In order to reset the default settings Default dF follow the instructions shown in para 27 USE AND OPERATION It is advisable to perform programming of the doses with a bottle of water in order to avoid wasting the wine In this case the doses of wine may not cor respond exactly to the doses pre set with water given the different densities and temperature between the two liquids Before ...

Page 31: ... the arrow buttons X Y to select the function F 4 Press the multifunction button Z to access the function chosen The Dispenser will display the current setting highlighting it with a point Scroll with the arrow buttons X Y to select the desired setting between CO nC CA dF Press the confirmation button Z to save the setting 27 SETTING OF PROGRAMMED DOSES USE AND OPERATION 3 ...

Page 32: ...first pressing lasts less than half a second the dose will not be perceived and an error will be reported with rapid flashing of all the light buttons In the next 5 seconds if the dis pensed volume is insufficient it is possible to increase it either by pressing once more or with short sequential pressings After 5 seconds from the last dosing the Dispenser will recognise the dose and will prepare ...

Page 33: ...grammed all three doses the Dispenser automatically copies the doses set into the adjacent dispensing unit and then places itself in operating mode Before inserting a bottle of wine it is advisable to perform the pipe empty ing procedure para 46 ...

Page 34: ...ived and an error will be re ported with rapid flashing of all the light buttons In the next 5 seconds if the dis pensed volume is insufficient it is possible to increase it either by pressing once more or with short se quential pressings After 5 seconds from the last dosing the Dispenser will recognise the dose and will prepare for the next one The button relating to the dose just stored is now s...

Page 35: ...uid is obtained If the first pressing lasts less than half a second the dose will not be perceived and an error will be re ported with rapid flashing of all the light buttons In the next 5 seconds if the dis pensed volume is insufficient it is possible to increase it either by pressing once more or with short se quential pressings Having programmed the one dose the Dispenser automatically copies i...

Page 36: ...ng state press the multifunction button Z for 3 seconds and release it as soon as the letters F1 are displayed Scroll with the arrow buttons X Y to select the function F 5 Press the multifunction button Z to access the function chosen The Dispenser will display the cur rent setting highlighting it with a point Scroll with the arrow buttons to select the desired setting between 1 10 OF Press the co...

Page 37: ...dures to be performed see para 44 During this function refrigeration is switched off to limit energy con sumption The Dispenser from this function does not place itself automatically in operating mode Once the procedure is finished to re turn to the operating mode press the multifunction button Z for more than 3 seconds 3 3 With this function it is possible to access the washing and sanitising pro...

Page 38: ...on F 7 Press the multifunction button Z to access the function chosen The Dispenser will alternatively dis play a series of numbers and letters that define the hardware installed 1 and the firmware version loaded 2 Once the display view is completed the Dispenser automatically returns to the operating mode 3 H 02 F 01 00 01 03 1 2 This function displays the hardware version of the dispenser and of...

Page 39: ...word rS Reset hold down the multifunction but ton Z Release the multifunction button as soon as the display shows 8 8 Flashing of the display and of the keyboard icons confirms successful default settings reset after which the Dispenser will automatically change to operating mode 10 3 If necessary it is possible to reset all the settings to the defaults values The default values are shown in squar...

Page 40: ...d again after 24 hours or upon each subsequent access to the functions menu 1 2 1 2 All the warnings are indicated on the display with dedicated abbreviations A warn ing does not interrupt the normal functioning and may be temporarily hidden for 24h Having resolved the problem the warning disappears automatically from memory If several warnings are present they will be displayed in succession for ...

Page 41: ...on button Z If the fault persists it will be displayed again after 24 hours or upon each subsequent access to the functions menu In case of damage to the refriger ation system or to the probe while waiting for the intervention of a Technician it is possible to contin ue to use the Dispenser by setting the temperature to OF para 23 thus in ambient temperature mode 1 2 1 2 USE AND OPERATION This ale...

Page 42: ...ay open the door B and lift the drip grill keep ing it in a horizontal position Close the door again Then drain off the liquid from the tray and clean it using a non abrasive sponge with water at a maximum tem perature of 40 C 104 F and possibly a mild detergent Finally rinse thoroughly with water dry completely and replace in position Do not wash the tray in a dishwasher Do not use the Dispenser ...

Page 43: ...all the liquid present in the bottle in 5 6 times pressing the one active button V2 and waiting a few tens of seconds between one dispensing event and the next so that the solution cleans the dispensing unit 7 Remove the bottle and perform the procedure emptying the ducts as described in para 46 in order to remove the washing solution 8 Insert a bottle filled only with drinking water and then rins...

Page 44: ...aning products provided by the Authorised Retailer or prepared carefully following the instructions given in this paragraph During the preparation of the washing solutions to strictly follow the instructions given in the safety data sheets of the products used 45 SOLUTION FOR WASHING AND SANITISATION OF THE DISPENSER UNIT Method 1 Remove the straw from the plug tap N 2 Insert an empty bottle in th...

Page 45: ...ery month Washing of the Dispenser unit para 44 Every six months Sanitising the dispenser unit par 44 and then washing of the dispenser unit MAINTENANCE IT IS advisable to follow the actions in the following table with the specified fre quency Avoid performing the operation when the bottle is not completely empty to protect the wine from oxidation The frequency of washing depends on the type of wi...

Page 46: ...e collection tray Never use pa per or other material that can tear 5 Clean the rubber straws para 43 6 Clean the external parts para 39 7 Clean the drip grill with tray para 41 8 Clean the bottle compartment para 42 9 Clean the door gasket B 10 Clean the command keyboard and display par 40 11 Leave the door slightly open to allow air circulation 12 Cover the Dispenser with the appropriate non wove...

Page 47: ...he dispenser does not come on No voltage on the power supply network Restore the power supply para 15 Electrical power not activat ed Plug in the power cord and turn the main switch to the position I ON para 16 Power cable visibly damaged Request a new power cable from the Retailer The Dispenser does not suffi ciently cool the compartment Unsuitable ambient condition Position the Dispenser in an a...

Page 48: ...sired dispensing mode para 25 The piston T for lifting does not re main in the locked position It was not sufficiently pushed down Push the piston down to the lock position para 20 The piston seat is blocked by foreign objects or the com ponents of the piston are not correctly positioned Remove any foreign objects in the piston seat or position the components of the piston correctly TROUBLESHOOTIN...

Page 49: ...ertion paras 18 and 20 The dispensing gas circuit is finished or the supply pressure is insufficient Replace the inert gas cylinder para 14 The filter of the rubber straw is clogged with wine sedi ment Clean the rubber straw para 43 Storing of all the doses dur ing the programming phase was not completed Repeat dispensing storage from all the dose buttons pa ras 28 or 29 or 30 The dispenser unit i...

Page 50: ...d Replace the neck of the bot tle on the seal of the cap tap para 20 Excessive pres ence of condensa tion on the door B The door is open Close the door Unsuitable ambient condition Position the Dispenser in an appropriate ambience para 12 The door seal is out of posi tion Reposition the seal in the correct position Presence of dirt on the door seal Clean the door seal The LED R does not come on Th...

Page 51: ...ting it in the Dispenser More than 4 weeks have elapsed since insertion of the bottle in the Dispenser Remove the bottle wash the dispenser unit para 44 It is advisable to always take note of the date before inserting a bottle of wine Storage temperature of the wine is too high Change the setting of tem perature according to re quirements para 23 The Dispenser unit has not been adequately serviced...

Page 52: ...equate separate collection for the future use of the equipment assigned for recy cling treatment and environmentally compatible disposal helps to prevent possible negative effects on the environment and on human health and promotes recycling and or reuse of the materials of which the equipment is composed Illegal dumping of the product by the user entails the application of administrative sanction...

Page 53: ...old and similar electrical appliances Safety Part 2 24 Particular requirements for refrigerating appliances ice cream appliances and ice makers EN 55014 1 2006 A1 2009 A2 2011 Electromagnetic compatibility Requirements for household appliances electric tools and similar apparatus Part 1 Emis sion Product family standard EN 61000 3 2 2014 Electromagnetic compatibility EMC Part 3 2 Limits Limits for...

Page 54: ...nt designed for use within cer tain voltage limits Electromagnetic Compatibility Directive 2004 108 CE Directive on the approximation of the laws of Member States relating to electro magnetic compatibility Date of issue 2016 Name and signature of the authorised person President and CEO Lorenzo Bencistà Falorni Enomatic s r l Via di Meleto 1 int 19 50027 Strada in Chianti FI Italy VAT No 0106631052...

Page 55: ... system is not made up entirely of components supplied by Enomatic It is understood that the warranty is subject to compliance with performance specifi cations of the products indicated by Enomatic The warranty will not operate if Enomatic S r l ascertains on the machinery unau thorised alterations or interventions or tampering of any kind The warranty does not include Faults or damage caused by t...

Page 56: ... user manual REV 05 56 Produced by Enomatic S r l Via di Meleto 1 int 19 50027 Strada in Chianti Florence Italy Distributed by For assistance contact TO BE COMPLETED BY THE RETAILER TO BE COMPLETED BY THE RETAILER ...

Reviews: