Page 22
PEDESTAL INSTALLATION GUIDE: CLIPPERCREEK HCS
CLIPPERCREEK HCS INSTALLATION
REQUIRES THESE STEPS
THESE STEPS ARE TO BE COMPLETED AFTER THE MAIN PEDESTAL
INSTALLATION FOR THE CLIPPERCREEK HCS CONFIGURATIONS ONLY.
REPEAT EACH STEP FOR DUAL-MOUNTED CONFIGURATIONS ON THE
OPPOSITE SIDE OF THE PEDESTAL:
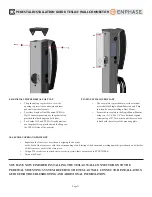
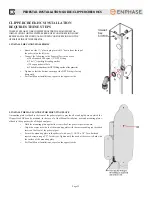
1. INSTALL THE CONDUIT ASSEMBLY
•
Knock-out the 1½” plastic plug located 10” down from the top of
the pedestal on the left side.
•
Connect the following to the Pedestal Post in the order:
a) The Standard 90 degree 1/2” NPT Fitting
b) The ½” liquid tight sealing washer
c) The open pedestal hole
d) The first locknut from the NPT Fitting (inside of the pedestal)
•
Tighten so that the bottom opening of the NPT Fitting is facing
downward.
•
For Dual-Mount Installations, repeat on the opposite side.
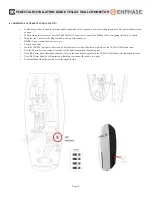
2. INSTALL THE WALL CONNECTOR MOUNTING PLATE
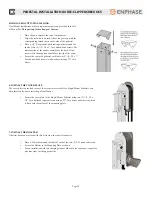
A mounting plate is affixed to the front of the pedestal post to provide a flat and rigid base on which the
ClipperCreek HCS can be mounted. In the case of a Dual-Mount Installation, a second mounting plate is
affixed to the opposite side of the pedestal post.
•
Hold the mounting plate against the front side of the pedestal post as shown.
•
Align the center screw hole of the mounting plate with the corresponding top threaded
insert on the front of the pedestal post.
•
Secure the mounting plate to the pedestal with one (1) 1/4-20 x 3/4” Torx flat-head
tapered screw using a T27 Torx driver. Tighten until the head of the screw is flush with
the surface of the mounting plate.
•
For Dual-Mount Installations, repeat on the opposite side.


