- 11 -
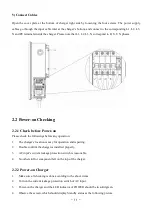
5) Connect Cables
Open the cover plate at the bottom of charger right side by loosening the four screws. The power supply
cables go through the input cable inlet at the charger's bottom, and connect to the corresponding L1, L2, L3,
N and PE terminals inside the charger. Please note that L1, L2, L3, N correspond to R, S, T, N phases.
2.2 Power-on Checking
2.2.1 Check before Power-on
Please check the followings before any operation:
1.
The charger’s location is easy for operation and repairing.
2.
Double confirm the charger is installed properly.
3.
AC input’s current leakage protection switch is reasonable.
4.
No other stuff or component left on the top of the charger.
2.2.2 Power-on Charger
1.
Make sure all checking is done according to the above items.
2.
Turn on the current leakage protection switch of AC input.
3.
Power-on the charger and the LED indicator of POWER should be in solid green.
4.
Observe the screen, which should display Standby status as the following picture.


