background image

6

TBE-250 Instruction Manual

Feb 2012

INTRODUCTION

SAFETY PRECAUTIONS

DESCRIPTION OF APPARATUS

OPERATION

4.1

 Preparation

4.2

 Assembly

4.3

 Cleaning Fluid

4.4

 Operation

POWER AND GRADE SETTING

5.1

 Power Settings

5.2

 Mode Settings

MAINTENANCE

CONSUMABLES

7.1

 Brushes

7.2

 Insulating Shroud

7.3

 Cleaning Fluid

7.4

 Neutralising Fluid

7.5

 Marking Fluid

7.6 

Other Fluids

TROUBLESHOOTING

8.1

 On/Off Switch Not Illuminated

8.2

 On/Off Switch Illuminated & Front Panel 

       Power Light Not Illuminated

8.3

 On/Off Switch & Front Panel Power Light 

       Illuminated & Unit Not Operating

7

8

10

12

12
12
12
14

15

15
15

16

17

17
17
17
17
17
17

18

18
18

19

CONTENTS

S1 

S2 

S3 

S4 

S5 

S6 

S7 

S8 

15

Ensitech Pty Ltd

www.ensitech.com.au

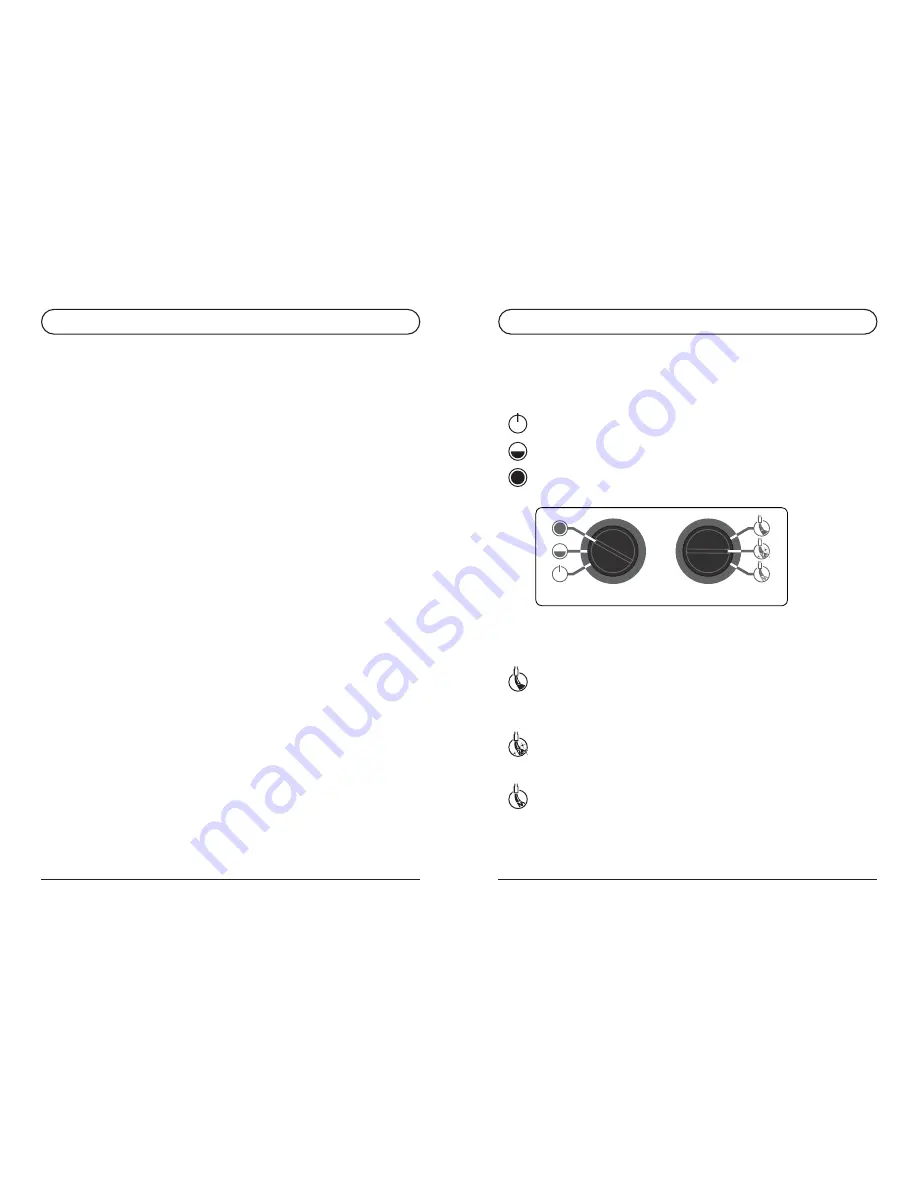
S5 POWER AND GRADE SETTINGS

MODE SETTINGS

POWER CONTROL

MODE CONTROL

5.2

POWER SETTINGS

5.1

Choose the cleaning intensity required by selecting the 
appropriate setting using the Power Control.

STANDBY

 - Power is not transmitted to the brush.

LOW

 - Use for light work and thin metals.

HIGH

 - Use for most cleaning operations. Provides fastest   

cleaning speed.

Choose the type of cleaning required by selecting the 
appropriate setting using the mode control.

CLEAN

 - This mode provides the fastest cleaning at each 

power setting. However, prolonged use may cause a milky 
appearance on the surface of the metal. If this happens, use 
RESTORE to rectify.
 

RESTORE

 - This mode provides metal polishing. Use this 

grade to repair a dull white surface, including one caused by 
over-use of CLEAN.

MARKING

 - This mode provides surface marking, when used 

with the appropriate chemical. 

Summary of Contents for TIG Brush TBE-250

Page 1: ...Ltd in writing by sending a pre paid letter to Ensitech Pty Ltd PO Box 179 Springwood NSW 2777 Australia or email to info ensitech com au You must include your full name address and contact telephone...

Page 2: ...Ensure the clamp is gripping the work securely Sometimes the clamp position may need adjusting to make a good contact If dirt or debris has built up on the clamp clean it as this may prevent a good c...

Page 3: ...it may have over heated Wait 30 minutes for the unit to cool down before trying to use it again The unit can be cooled more quickly by placing a damp cloth on the heat sink 8 1 8 2 If the TIG Brush is...

Page 4: ...able from authorised TIG Brush distributors The insulating shroud may become damaged or heat affected Replacement shrouds are available A range of cleaning uids is available including TB 21ND Weld Cle...

Page 5: ...ning solution Allow to dry before re assembling Before assembling the brush to the wand coat threads with copper lled anti seize compound This will exclude the acidic solution from the joints and prev...

Page 6: ...y Ltd www ensitech com au S5 POWER AND GRADE SETTINGS MODE SETTINGS POWER CONTROL MODE CONTROL 5 2 POWER SETTINGS 5 1 Choose the cleaning intensity required by selecting the appropriate setting using...

Page 7: ...cessary to remove discolouration Prolonged application may affect surface quality 10 Some light sparking may occur where brush tip contacts workpiece particularly on higher power settings and this is...

Page 8: ...he TIG Brush for any purpose other than that described in this manual Failure to observe this warning may result in permanent damage to the TIG Brush cause damage to the workpiece cause injury to the...

Page 9: ...TIG Brush Unit 7 Attach clamp to workpiece 9 Ensitech Pty Ltd www ensitech com au S2 SAFETY PRECAUTIONS CAUTION Fluid spilled on the skin should be washed off as soon as practical Material Safety Data...

Page 10: ...6 7 8 3 1 2 3 4 5 6 7 8 TIG Brush Control Unit Clamp Cable Handle Cable Handle Wand Shroud Brush Power Cord 11 Ensitech Pty Ltd www ensitech com au TBE 250 TIG Brush S3 DESCRIPTION OF APPARATUS Power...

Reviews: