background image

Version 1.1


Quick Start Guide


www.Entec-USA.com 

Date:  June 2018 


LBS-751 Electronic 

Sectionalizer Control 

Patent Pending Technology 


Summary of Contents for LBS-751

Page 1: ...Version 1 1 Quick Start Guide www Entec USA com Date June 2018 LBS 751 Electronic Sectionalizer Control Patent Pending Technology ...

Page 2: ...able online at www selinc com 4 Set comm parameters on laptop IP 192 168 1 10 Subnet 255 255 255 0 Gateway 192 168 1 1 5 Open acSELerator and go to Tools Options Settings Check the checkbox to enable Prompt for Action on Settings Read 751 Setup 6 Choose RDB click Open use tool at end of selection box to navigate and open RDB Template then click Cancel to close window 7 Connect to 751 with standard...

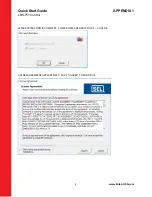
Page 3: ... APPENDIX 1 LBS 751 Control 3 www Entec USA com APPENDIX 1 Install acSELerator Application SAVE INSTALLATION FILE ON DESKTOP THEN DOUBLE CLICK TO START INSTALL AFTER DOUBLE CLICKING THIS WINDOW APPEAR AFTER CLICKING YES ...

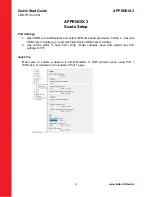
Page 4: ...Quick Start Guide APPENDIX 1 LBS 751 Control 4 www Entec USA com AFTER EXCTRACTION IS COMPLETE CHECK BOXES ARE GRAYED OUT CLICK OK LICENSE AGREEMENT APPEARS NEXT CLICK I AGREE TO CONTINUE ...

Page 5: ...Quick Start Guide APPENDIX 1 LBS 751 Control 5 www Entec USA com AFTER YOU AGREE THIS WINDOW APPEARS SELECT I AGREE AGAIN THIS WINDOW APPEARS NEXT TAKES ABOUT 2 3 MINUTE TO INSTALL ...

Page 6: ...SA com AFTER INSTALL THIS WINDOW APPEARS LISTING DRIVERS FOR ALL SEL RELAYS YOU HAVE THE CHOICE TO UNCHECK BUT THE EASIEST OPTOIN IS CLICK OK AFTER YOU CLICK OK PROGRESS WINDOW APPEARS WHILE INSTALLING ALL THE DRIVERS THIS TAKES A COUPLE OF MINUTES TO INSTALL ...

Page 7: ...Quick Start Guide APPENDIX 1 LBS 751 Control 7 www Entec USA com AFTER INSTALLING DRIVERS THIS WINDOW IS NEXT CLICK OK TO PROCEED AFTER CLICKING OK THIS WINDOW IS NEXT INSTALLATION COMPLETE ...

Page 8: ...ct OEM file saved previously in Step 4 Save As OEM Comm Config e g Customer Field Device OEM Comm Config 2 Use setting editor to open Port config Make changes save and upload new Port settings to 751 Quick Tip Make sure to enable a session in either Modbus or DNP protocol when using Port 1 Ethernet scroll down to the bottom of Port 1 page ...

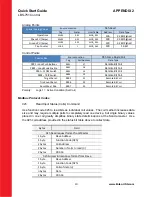
Page 9: ...rd Map Bit Coil User Table Address Bit Breaker Closed 52A IN302 Row 18 6 150 MOD_040 165 6 Breaker Open 52B IN303 Row 18 5 149 MOD_040 165 5 Handle Lock 69 IN301 Row 18 7 151 MOD_040 165 7 Diagnostic Alarm T03_LED Row 38 3 307 MOD_044 169 3 Battery Fail T04_LED Row 38 2 306 MOD_044 169 2 AC Power Fail T05_LED Row 38 1 305 MOD_044 169 1 Polarity Logic 1 True Condition ...

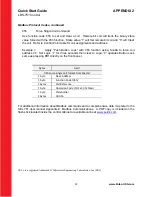
Page 10: ...emote Bit Coil Trip Count Reset RB06 32 Remote Bit Coil Reset Max Min RB07 33 Remote Bit Coil Polarity Logic 1 Active Condition Set Coil Modbus Protocol Codes 02h Read Input Status Coils Command Use function code 02h to read bits as individual coil values The coil method increases data size and may require multiple polls to completely read one device but single binary values placed in one coil gre...

Page 11: ...2 Bytes from address 169 The desired bit location is determined counting from Right to Left starting with Bit 0 The second bit counting from the right is Bit 1 representing AC Power Fail 1 AC Power Fail True 0 False Bytes Field 03h Read request format from Master 1 byte Slave Address 1 byte Function Code 03h 2 bytes Starting register address 2 bytes Number of registers read n 2 bytes CRC 16 03h Su...

Page 12: ...dress 27 Set Logic 1 for three seconds then clear to Logic 0 operates Button Lock same as pressing PB1 directly on the front panel Bytes Field 05h Force Single Coil format from Master 1 byte Slave Address 1 byte Function Code 05h 2 bytes Coil Reference 1 byte Operation Code FF Set 00 Clear 1 byte Placeholder 2 bytes CRC 16 For additional information about Modbus commands and a comprehensive data m...

Reviews: