background image

35

IP2085EN - 2014-09-01

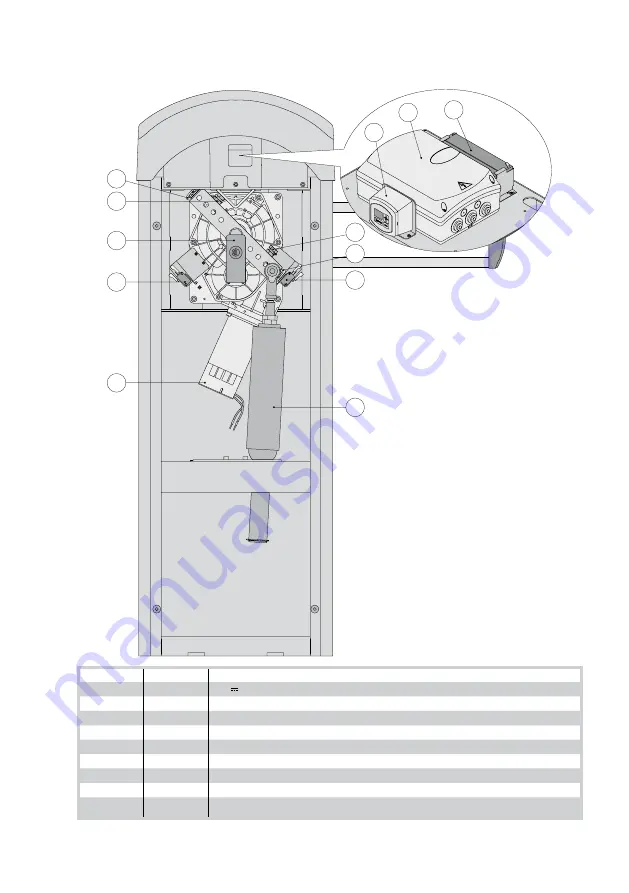
6.  Main components

1

5

4

3

2

2

3

4

6

7

8

9

Ref.

Code

Description

1

24 V  motor with encoder

2

Opening/closing limit switches

3

Limit switch adjustment

4

Mechanical stop adjustment

5

Key release

6

Blue spring Ø63 mm

7

Control panel

8

BATKH

Continuous mode battery kit

9

MD2

Display module for diagnostics and advanced control

Summary of Contents for Ditec QIK80EH

Page 1: ...Ditec QIK80EH Electromechanical barrier Translation of the original instructions www ditecentrematic com IP2085EN Technical Manual...

Page 2: ...perating instructions 43 Manual release instructions 45 Instructions for maintenance workers 46 i This symbol indicates instructions or notes regarding safety to which special atten tion must be paid...

Page 3: ...ty edges emergency stops etc must be installed taking into account applicable laws and directives Good Working Methods installation premises system operating logic and the forces developed by the moto...

Page 4: ...re properly supervised or have been instructed in the safe use of the device and the relative hazards Children must be supervised to make sure they do not play with the device nor play remain in the s...

Page 5: ...ler who motorises a door or gate has the same obligations as the manufacturer of machinery and as such must prepare the technical data sheet which must contain the documents indicated in Annex V of th...

Page 6: ...etermined under average operating conditions and are therefore not necessarily applicable to specific conditions of use QIK80EH Power supply 230 V 50 60 Hz Absorption 1 2 A Torque 200 Nm Insulation cl...

Page 7: ...h electromagnetic block Fixed support fastening base 4 LAMPH Flashing light 5 XEL5 LAN4 LAN7 XELCA Key selector switch Combination keyboard Card decoder Column for control accessories 6 GOL4 Remote co...

Page 8: ...34 IP2085EN 2014 09 01 5 Dimensions 140 815 405 PL min 4500 max 7600 100 525 1180 80 80 355 560...

Page 9: ...e Description 1 24 V motor with encoder 2 Opening closing limit switches 3 Limit switch adjustment 4 Mechanical stop adjustment 5 Key release 6 Blue spring 63 mm 7 Control panel 8 BATKH Continuous mod...

Page 10: ...ce does not allow cabinet to be fastened strongly and firmly prepare a concrete base with embedded anchor ties and QIK80Z base plate which must be level and clean Insert elements made of iron or anoth...

Page 11: ...37 IP2085EN 2014 09 01 8 Installation of bar L 3 3 Cut the length of the bar to L PL 350 mm Install the bar as shown in the figure 1 3 4 5 2...

Page 12: ...re that the bar remains still when in the open or closed position Warning never use the force of the motor to support the weight of the bar Always use the balancing spring WARNING for PL 4000 mm you m...

Page 13: ...hown in the figure Mount the spring using the special screw M12x40 C with thread locking compound and tightly fasten as shown in the figure Set the DIP2 on the control panel EL34 as shown in the figur...

Page 14: ...he bar using the special screws A Adjust the opening and closing limit switches using the special cams C so that the switches are activated approx 3 mm before the mechanical stop B 1 D D F E 3 2 12 Ac...

Page 15: ...nd connect it to the terminals L brown N blue yellow green in the automation Secure the cable using a special cable clamp and remove the sheath only where the clamp is Connection to the mains power su...

Page 16: ...k the state of wear of the mechanical parts in particular the spring after about 100 000 work cycles Reconnect the 230V power supply and batteries if present Check that obstacle detection is operating...

Page 17: ...o not enter within the operating range of the motorised door or gate while it is moving Do not obstruct the motion of the motorised door or gate as this may cause a dangerous situation The motorised d...

Page 18: ...ied personnel must perform routine maintenance on the motorised door or gate In particular regular checks are recommended in order to verify that the safety devices are operating correctly All install...

Page 19: ...ockwise and remove the key Manual release instructions Warning do not release with the springs under tension without bar Perform bar locking and release with the motor switched off Do not enter the op...

Page 20: ...power supply or replace the battery kit Batteries not connected or ab sent Check the battery kit is correctly connected to the control panel or disable the advanced battery test if there are no batter...

Page 21: ...tion blocked Check the blocking device is working properly Check there are no obstacles near the end stops Motor short circuit Check the motor is correctly connected Check the motor is working properl...

Page 22: ...bled Perform the trimmer enabling procedure If the alarm persists contact Technical Support VA trimmer not enabled Perform the trimmer enabling procedure If the alarm persists contact Technical Suppor...

Page 23: ...ler s stamp Operator Date of intervention Technician s signature Customer s signature Intervention performed Intervention performed Entrematic Group AB Lodjursgatan 10 SE 261 44 Landskrona Sweden www...

Page 24: ...IP2085EN 2014 09 01 Entrematic Group AB Lodjursgatan 10 SE 261 44 Landskrona Sweden www ditecentrematic com...

Reviews: