Secondary Installation
o
ptionaL
3
anD
4 s
iDeD
t
RimmabLe
p
aneLs
:
Modifying the Surround Panel:
The E30 Trimmable Surround Panels are large rectangular panels that may be cut for use in cases that a non-
standard fireplace opening (e.g. an arched opening) is to be filled. Optionally this surround can be left uncut
and placed in front of the fireplace opening.
1. Measure the fireplace opening and/or make a template of the fireplace opening.
2. Transfer the measurement to the Trimmable Surround.
3. If desired, offset the measurements by approximately
1
/
8
” (3mm) to the inside; this will allow for the panel
to be placed just inside the fireplace opening for a cleaner appearance.
4. Cut along the preferred line (from direct measurements of offset) and remove any sharp edges.
5. The panel can be touched up with a high temperature metallic black paint available from your dealer.
REDUCED DEPTH INSTALLATION:
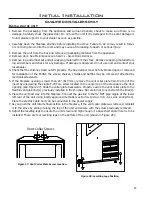
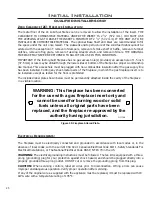
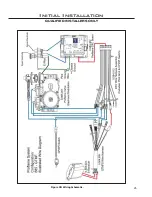
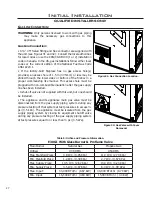
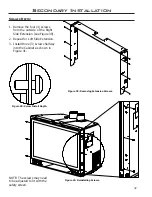
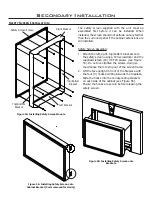
1. Install the two Trimmable Panel brackets onto the E30 unit using a T-20 Torx screwdriver.
See Figures 42
and 43
for the screw installation locations. There are three sets of hole patterns on the brackets depending on
which Surround Panel is being installed. See Figures 42-46.
Figure 42: Screw
Installation Locations.
DATE: 13/01/2012
BY
SHERWOOD INDUSTRIES LTD.
INTERNAL ASSEMBLY MANUAL
STATION:
THIS DRAWING IS THE PROPERTY OF SHERWOOD INDUSTRIES LTD. AND MAY NOT BE COPIED, REPRODUCED, OR OTHERWISE DISCLOSED WITHOUT THE PRIOR APPROVAL OF SHERWOOD INDUSTRIES LTD.
STEP:
1 of 1
SHEET:
E30 Master
PART NUMBER:
UPDATED: ----/--/--
BY --
STATION 1
STATION 3
STATION 4
STATION 2
Figure 46: Screw
Installation Locations.
Installed Brackets
A
Figure 44: Installation for Contemporary
and Extruded Surround.
NOTE: The Extruded and
Contemporary Surround Panels use
the same holes for mounting the
Trimmable Brackets. The Regular
Surround Panel uses its own set of
holes.
A
Figure 45: Installation
for Regular Surround.
Figure 43: Screw
Installation Locations.
33

