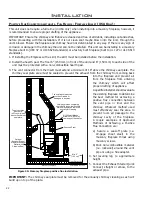
background image

Installation

i

nStaLLation


With

 e

xteRioR

 m

ounteD

 e

xhauSt

 b

LoWeR

 - f

ReeStanDing

:

The  MERIDIAN  can  be  equipped  with  an  externally  mounted  exhaust  blower  (PART  #20-070).  This 

optional kit will include all components necessary to install the exhaust blower on any external vertical 

wall surface.
Choose a location for your stove that meets the requirements stated in this manual and allows installation 

with the least amount of interference to house framing, plumbing, wiring, etc.

Included in the exterior mounted exhaust blower kit are:

1 - Exhaust blower housing box.

1 - Blower cover plate.

1 - Hardware bag

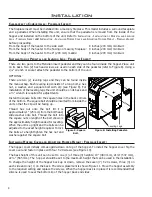
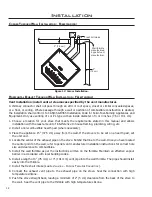
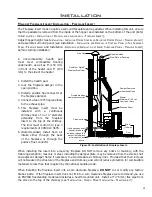
Exhaust motor must be 

replaced with cover 

Left side with cab side 

removed

Exhaust motor

Complete assembly - Exterior 

blower & housing

1.  Open  the  left  side  of  the  unit  and  the  back  grill  and 

disconnect  the  Exhaust  Blower  wires  from  the  harness.  

Remove the exhaust blower by undoing the six (6) ¼ hex 

head  sheet  metal  screws  that  fasten  the  blower  to  the 

housing.

2.  Remove  the  back  grill  from  the  exterior  exhaust  vent 

housing and remove the round cover plate installed on the 

blower housing.

3.  Install the round cover plate over the gasketed opening in 

the stove where the exhaust motor was removed from.

4.  Install  the  exhaust  blower  motor  in  the  Exterior  Vent 

Housing Box onto the exhaust blower housing.

5.  Follow the procedures for 

I

nstallatIon

 - H

orIzontal

 e

xHaust


t

HrougH

  W

all

  I

nstallatIon

  -  F

reestandIng

.

  Place  the  unit  in 

the desired location. Cut the hole in the wall at the desired 

location.  Install a wall thimble. 

6.  Drill holes in the wall thimble in the corresponding locations 

for wire and fresh air if needed.  Install wire clamps and 

feed wire through the hole in the thimble into the house. 

Tighten clamp on wire and attach green ground wire (at 

the symbol) with the screw and star washer provided. 

7.  Attach a short or an adjustable section of 3” of double wall 

pellet vent through the wall thimble to the stove. Seal all 

joints with silicone. Maintain clearances to combustibles.

8.  Apply  silicone  to  the  pipe  in  the  Exhaust  Box,  slide  the 

pipe into the exhaust vent.  Mount the Exhaust Box to the 

house. Reinstall the back grill on the Exterior Vent Housing 

Box.  Apply  normal  venting  practices  when  installing  the 

vertical vent pipe. 

9.  Connect the wires in the stove. Re-install the Left side and 

Back Grill on the stove.

10. Set  the  Slider  Damper  as  described  in  the 

I

nstallatIon

  - 

s

lIder

/d

amper

 s

ettIng

“ section. 

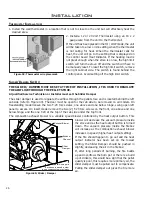
Figure 26: Exterior Exhaust Blower. 

18

Summary of Contents for MERIDIAN-1

Page 1: ...PELLET BURNING ROOM HEATER FAILURE TO FOLLOW THESE INSTRUCTIONS COULD RESULT IN PROPERTY DAMAGE BODILY INJURY OR EVEN DEATH CONTACT YOUR BUILDING OR FIRE OFFICIALS ABOUT RESTRICTIONS AND INSTALLATION...

Page 2: ...rmination Installation Recommended Freestanding 14 Through Concrete Wall With Vertical Rise Installations Freestanding 14 Inside Vertical Installations Freestanding 15 Outside Vertical Installations F...

Page 3: ...stion air is achieved by adjusting the slider damper located on the left side of the stove When installing the stove in a mobile home it must be electrically grounded to the steel chassis of the home...

Page 4: ...rs should be installed and maintained in the structure when installing and operating a pellet burning appliance OPERATION The ash pan and door must be closed securely for proper and safe operation of...

Page 5: ...5 cm diameter or over 28 inches 180 cm cross sectional area An interior vent can be used with approved pipe passing through the ceiling and roof 5 Locate the stove in a large and open room that is cen...

Page 6: ...mm 24 3 4 629mm Installation Dimensions Freestanding Figure 3 Meridian Freestanding Dimensions 23 3 4 604mm 12 7 8 326mm 22 7 8 583mm 23 7 8 605mm Figure 4 Meridian Fireplace Insert Dimensions Dimensi...

Page 7: ...ian on Floor Protection Minimum Width 36 914mm Minimum Height 48 1219mm Maximum Depth 30 762mm Back wall Side wall Adjacent wall 2 51mm 3 76mm 6 152mm Installation Clearances to Combustibles Freestand...

Page 8: ...our T 20 screws see Figure 10 The back height of this unit can be set to one 1 of three 3 heights 19 483 mm 21 537 mm 22 565 mm The hopper should be set to the maximum height that can be used in the i...

Page 9: ...sure the unit is electrically grounded to the chassis of your home permanently WARNING Do not install in a room people sleep in CAUTION The structural integrity of the manufactured home floor wall and...

Page 10: ...ermination locations Table 1 Use in conjunction with Figure 13 for allowable exterior vent termination locations Air Supply Inlet Gas Meter Restriction Zone Termination not allowed Termination Cap G G...

Page 11: ...1 16 229mm Outside fresh air is mandatory when installing this unit in airtight homes and mobile homes A Fresh air intake is strongly recommended for all installations Failure to install intake air ma...

Page 12: ...aming plumbing wiring etc 2 Install a non combustible hearth pad where necessary 3 Place the appliance 15 37 5 cm away from the wall If the stove is to be set on a hearth pad set the unit on it 4 Loca...

Page 13: ...through wall Installation 10 The pipe must extend at least 12 30 cm away from the building If necessary bring another length of pipe PL type to the outside of the home to connect to the first section...

Page 14: ...th a rodent screen may be used in place of the termination cap or stainless steel termination hood Through Concrete Wall With Vertical Rise Installations Freestanding A 45 elbow with a rodent screen m...

Page 15: ...a carpeted surface and space the unit in a manner so when the pellet vent is installed vertically it will be 3 76 mm away from a combustible wall 3 Locate the center of the fresh air intake pipe on th...

Page 16: ...ee with clean out on the outside of the house 2 Install PL vent upward from the tee Make sure that you install support brackets to keep the vent straight and secure 3 Install ceiling thimble and secur...

Page 17: ...place dampers 3 Connect a clean out tee or a 90 elbow to the exhaust pipe 4 Install flexible stainless steel liner or listed pellet vent to the top of the chimney Floor Protection Combustible Floor Ma...

Page 18: ...he gasketed opening in the stove where the exhaust motor was removed from 4 Install the exhaust blower motor in the Exterior Vent Housing Box onto the exhaust blower housing 5 Follow the procedures fo...

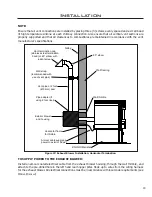
Page 19: ...d a small bead of high temperature silicone at each chimney connection Also ensure that all vertical vent sections are properly supported and that all clearances to combustibles are maintained in acco...

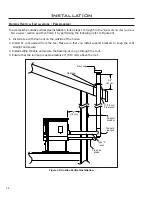
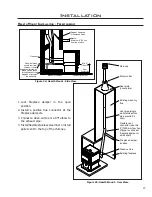
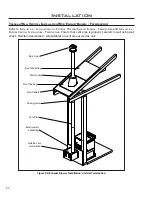
Page 20: ...on Outside Vertical Installations Freestanding Ensure that vent pipe is properly secured to wall using wall straps Maintain clearances to combustibles on vent pipe as well as unit Rain Cap Roof sheath...

Page 21: ...cut or modify any factory firebox parts If the fireplace insert does not fit into a zero clearance fireplace we recommend you use an ENVIRO freestanding model and install as a hearth mounted unit Inst...

Page 22: ...tion Combustible Floor Masonry Fireplace Min 6 15 2 cm 8 203mm Mantle Minimum 8 203mm from body of the heater Chimney must be completely sealed with a non combustible material and maybe removed annual...

Page 23: ...e Figure 32 REMOVAL When maintenance is required on the unit the surround must be removed Pull the surround straight up till it stops then pull it out about 4 10 cm and rest the surround on top of the...

Page 24: ...o Figure 35 Close both cab sides and replace the two 2 screws on each side REMOVAL OF TOP TRIM With door open undo the two 2 screws on the underside of the top there are visible under the angled corne...

Page 25: ...nual Figure 38 Inner side of Meridian door Plated Door Installation TO AVOID PERSONAL INJURY DO NOT REMOVE OR REPLACE COVER WHEN PELLET STOVE IS HOT Door must be open The three 3 arrows in Figure 37 p...

Page 26: ...inside the firebox will increase as the combustion exhaust blower increases in speed higher heat output setting If the fire should happen to go out and the heat output indicator has been set on the lo...

Page 27: ...is a major factor in how the Pellet stove will operate If the pellets have a high moisture content or ash content the fire will be less efficient and has a higher possibility of the fire building up a...

Page 28: ...ced in the burn pot Check the Heat Level Indicator If the 2 light is flashing see the 2 light is flashing Check the fuse on the circuit board If the unit still does not start contact your local servic...

Page 29: ...is installed Check the operation by opening a window does this solve the problem If it does install fresh air intake to unit or room Venting system may require vertical section to move termination int...

Page 30: ...gnitor should be bright orange in color If not replace the ignitor 9 Control settings Heat Level has no effect on the fire NOTE If the system light is flashing the Control Board has complete control o...

Page 31: ...Yellow Yellow Grey Grey Grey Grey Purple Purple Blue 115V Black 220V Brown Black Black Black Blue Black Armor Cable Supplied Vacuum Switch Combustion Blower Optional Exterior Exhaust Blower Power Cor...

Page 32: ...lete EF 028 9 Slider Damper Rod with Knob EF 050 10 Glass Set with Tape EF 062 11 Slider Damper Plate EF 064 12 Brass Auger Bushing EF 065 13 Ash Pan Latch Freestanding EF 178 Pedestal Ash Pan Gasket...

Page 33: ...ck Grill Freestanding 50 675 27 Hopper Lid Freestanding 50 676 28 Top Front Freestanding 50 677 29 Tube Cleaner Rod 50 680 30 Fluted Liner Set 50 3038 31 Liner Retainer Set 50 682 Owner s Manual 115V...

Page 34: ...50 664 43 Lower Cabinet Trim 1 piece Antique Copper Freestanding 50 665 44 Upper Cabinet Trim 1 piece Painted Freestanding 50 666 44 Upper Cabinet Trim 1 piece Gold Freestanding 50 667 44 Upper Cabin...

Page 35: ...35 MERIDIAN Components May 2015 4 11 1 17 6 2 12 7 5 3 39 Parts Diagram Components...

Page 36: ...36 MERIDIAN Freestanding Steel Parts May 2011 10 42 8 41 20 21 31 18 38 22 13 29 30 23 24 40b 28 14 16 19 26 27 44 43 45 25 Parts Diagram Freestanding Steel...

Page 37: ...MERIDIAN Insert Steel Parts May 2011 48 50 49 52 53 51 46 47 37 36 34 45 33 32 35 40a Parts Diagram Insert Steel 37...

Page 38: ...38 Notes...

Page 39: ...s for which the unit is not certified by the EPA and void if not operated according to the Owner s Manual Exclusions An expanded list of exclusions is available at www enviro com help warranty html Th...

Page 40: ...MBER ___________________________ DATE OF PURCHASE _____________ dd mm yyyy DATE OF INSTALLATION ___________ dd mm yyyy MAGNEHELIC AT INSTALL ___________________ INSTALLER S SIGNATURE _________________...

Reviews: