background image

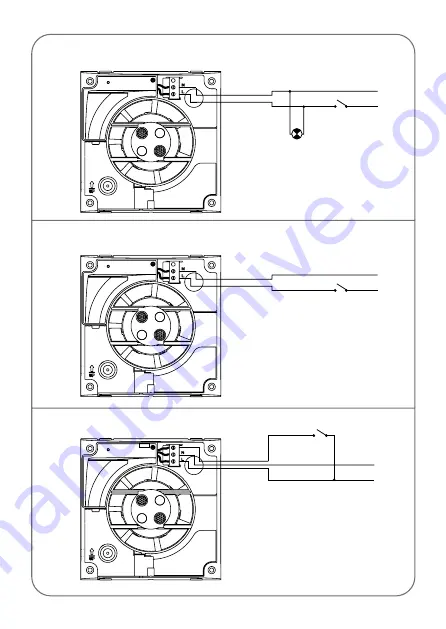
Fig.3 

Fig.5 

Fig.4 

L

N

L

N

L

N

Summary of Contents for PROFILE-100

Page 1: ...PROFILE 100 Installation and Wiring Instructions ...

Page 2: ...make sure that the product corresponds to the one you have ordered and that the details on the instruction plate fulfil your requirements IMPORTANT BE SURE TO HAVE READ AND UNDERSTOOD THESE INSTRUCTIONS BEFORE BEGINNING THE INSTALLATION PROCESS SAFETY AND RECOMMENDATIONS All wiring must comply with Building Regulations and the current I E E Wiring Regulations BS7671 or the equivalent standards for...

Page 3: ...INSTALLATION PROFILE 100 Fig 1 1 4 3 2 5 Ø 105 mm ...

Page 4: ...INSTALLATION PROFILE 100 Fig 2 ...

Page 5: ...Fig 3 Fig 5 Fig 4 L N L N L N ...

Page 6: ...Fig 6 Fig 7 Fig 8 60 90 2 20 Hr 60 90 Hr 60 90 t min 2 20 t min 2 20 L N L N Fig 9 ...

Page 7: ...00mm The hole for the duct should be angled downwards to prevent rainwater running through the duct into the unit Loosen the screw 2 which holds the grille in place 1 and remove grille Place the extractor against the internal wall or ceiling For a wall mounted fan the terminal block should be at the bottom Mark the 4 screw hole positions Drill plug and screw the extractor in position Check that th...

Page 8: ...table timer The timer enables the fan to continue running for the selected period after the switch has been turned off Fig 5 Fan operating through an independent switch Fig 6 Fan operating through a light switch The desired run on time is selected by means of an adjuster positioned on the printed circuit board Fig 7 and is accessible once the grille 1 is removed To reduce the run on time turn anti...

Page 9: ...riod set on the timer after the light switch has been switched off ATTENTION When the humidity rises above the selected value the automatic option takes precedence over the manual and the unit cannot then be switched off using a switch Settings The fans are set to operate at 60 relative humidity and with 2 minutes run on time If the humidity in the room is lower than 60 the fan will not turn on If...

Page 10: ...riod The desired run on time is selected by means of an adjuster positioned on the printed circuit board fig 7 and accessible once the grille 1 has been removed To reduce the run on time turn anticlockwise min 1 minute To increase the run on time turn clockwise max 30 minutes CLEANING AND MAINTENANCE IMPORTANT DISCONNECT FROM THE MAINS SUPPLY BEFORE CARRYING OUT CLEANING OR MAINTENANCE To ensure o...

Page 11: ...e stated within this booklet In the event of any failure of the fan within two years of supply excluding only wilful or careless damage we will exchange the fan free of charge EnviroVent Ltd EnviroVent House Hornbeam Business Park Harrogate HG2 8PA Name and address of purchaser Model Date of purchase Dealer stamp ...

Page 12: ...EnviroVent Ltd EnviroVent House Hornbeam Business Park Harrogate Hg2 8PA 01423 810 810 www envirovent com info envirovent com Ref 9023007403 ...

Reviews: